Filament dryer
thingiverse
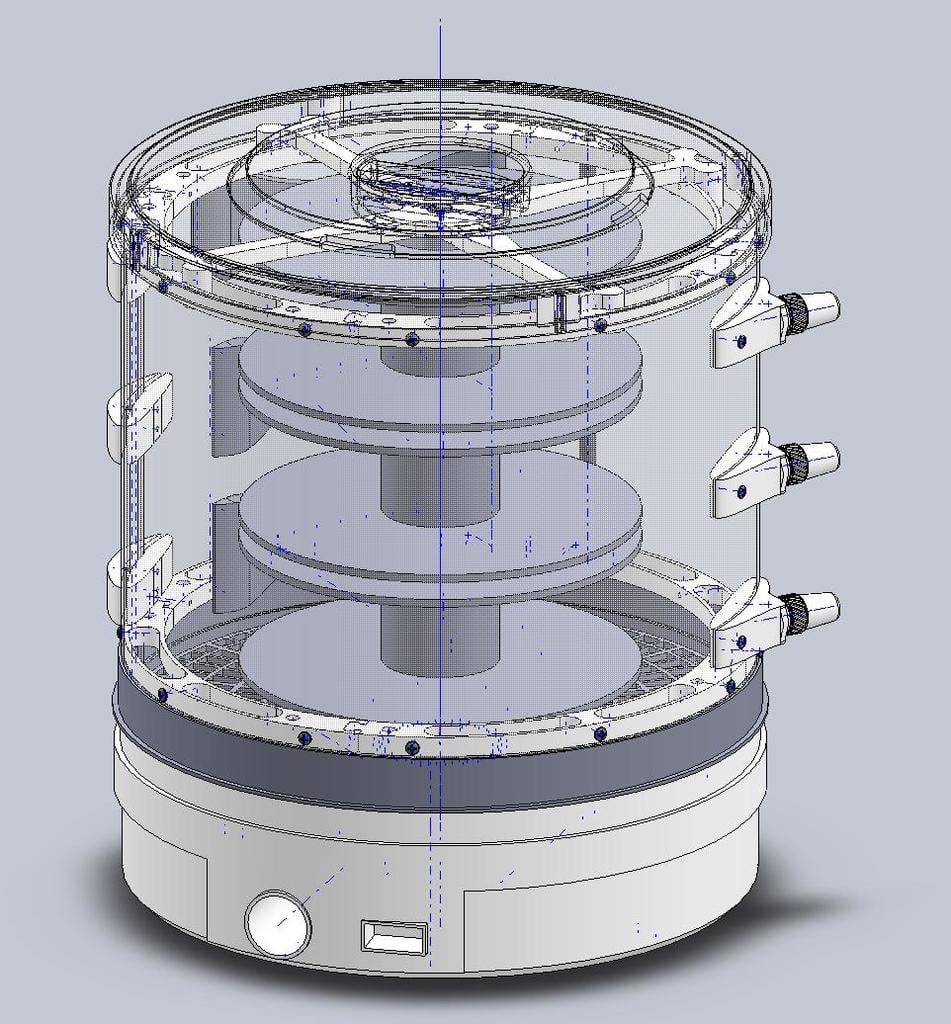
This is a filament dryer based on the "Havsö Svamp- och Frukttork Vera 2.0" that was bought on this pages:[Link1](https://cdon.se/hem-tradgard/havso-svamp-och-frukttork-vera-2-0-p41266933#fo_c=1753&fo_k=702534d35904caa8fc393843e3bd2784&fo_s=gplase) [Link2](https://fyndiq.se/product/10587506-havso-vera-21-svamp-frukttork/) [Link3](https://www.teknikproffset.se/Hem-hushaall-traedgaard/Hushaallsapparater/Oevriga-hushaallsapparater/Havso-Vera-21-Svamp-Frukttork.htm) If it is not found on these pages it might be found with a search on the full name of it on your favorite search engine. This filament dryer extension is approximately 317mm outside diameter so this should be the inside diameter if you wish to use it on another brand/variant of base drying machine. The filament dryer includes a braking system and a filament pass thru with a filament filter that makes it possible to dry the filament during the printing session for long print of highly hygroscopic filament like nylon. The screw lid for the filament bowden tube is suited for the original tube that FFCP2016 is delivered with but should be easy to adapt for other tub diameters. Maybe i should make one for those fancy pneumatic connectors and/or some other brands of bowden tube but that i will save for later if i can find the time. This s done so there are no problem for dual use of the product. You can use it for filament dryer and food dryer with none of the original parts part broken or discarded during the build. I have included a measurement sketch for the sweep with drilling holes etc so it should be fairly easy to replicate it. The base on what everything stands on i may have to print in polycarbonate because it will be placed immediately in the output stream of the heated air. I do not know if this but it might be needed. The rest (except for shim) i have printed in add:north PETG on 0.1mm layer hight but i should say you can choose whatever you want between 0.1mm and 0.3mm. I used 0.4mm nozzle. <h3>The BOM for the non printed parts:</h3> 1x Food dryer: [Link1](https://cdon.se/hem-tradgard/havso-svamp-och-frukttork-vera-2-0-p41266933#fo_c=1753&fo_k=702534d35904caa8fc393843e3bd2784&fo_s=gplase) [Link2](https://fyndiq.se/product/10587506-havso-vera-21-svamp-frukttork/) [Link3](https://www.teknikproffset.se/Hem-hushaall-traedgaard/Hushaallsapparater/Oevriga-hushaallsapparater/Havso-Vera-21-Svamp-Frukttork.htm) (Havsö Svamp- och Frukttork Vera 2.0) 30x Screws wood Thread Length=11.5, Thread diameter=2.85, Core diameter=2.0mm 8x Screw M3x30 6x Nut M3 2x Threaded rod M8x225 3x Nut M8 1x Threaded rod M12x270 1x PVC/Acrylic for the sweep [Link](https://www.k-rauta.se/produkt/plexiglas-gop-plana-pvc-glasklar-15x600x1200mm/7392814203023) Rubber band or Spring for brake. 3x of suitable length. I have not chosen yet. The parts for filament braking is optional and also the filament filter and pass through if you do not want to use the dryer as a filament holder while printing. The filament brake is highly prototypical and have not yet been tested by me. <h3>Parts to print:</h3> 4x AxelStabalizerBar 1x AxelStabalizerCenter 1x Base 3x EndClamp-Inner 3x EndClamp-Outer 1x FilamentBrake-70mm-Upper(70mm is for outer with of filament bobbin) 1x FilamentBrake-70mm-Mid(70mm is for outer with of filament bobbin) 1x FilamentBrake-70mm-Lower(70mm is for outer with of filament bobbin) 3x Filter CAP Female 6mm tube 4x LidSupport 3x ThruBushing_outer(This has designed support and there is a ThruBushing_outer_WoSupport that has no support) 3x ThruBushing-Inner 4x Stabalizer_Type1 2x Stabalizer_Type2 2x Stabalizer_Type3 A also provided a shim that i will print in nylon and filament fittings for 2 different sizes but as this is very different depending on bobbin sizes i suggest you make your own or provide me with the measurements and i will draw them and add them to the library. <h3>Work to be done after print.</h3> 1: Thread the center hole in the base for the threaded rod. 2: Drill the hole in part "AxelStabalizerCenter" to fit properly 3: Thread the holes for the threaded rods for the filament brakes 4: Drill the holes in the "FilamentBrake" part to slide easily on the threaded rod. 5: Cut the rod to the desired length. Take the length i stated in the list above as a guidance only. Measure what you need as i have not yet assembled the product. 6: If you used the filament passthrough option. After you mounted the parts you need to drill a hole through the PVC/Acrylic sweep through the passthrough hole. I submitted a 3D PDF to be able to look at the product a little better. <h3>Disclaimer 1:</h3> This product is not yet finished. I have printed all the parts but not yet assembled it or cut the PVC plastic for the sweep but i have had many requests to publish it so here it is. <h3>Disclaimer 2:</h3> The tolerances is of course to suit my environment, keep that in mind for the "press fit" parts AxelStabalizerCenter to AxelStabalizerBars I will make a statement here when i am done and/or if i needed to change anything etc. The parts i in STL and STEP AP204 file format. If asked I may be able to provide other formats if i can find the time. Feedback is always appreciated but don't scare me as this is my first totally own published design :-D Good Luck! :-)
With this file you will be able to print Filament dryer with your 3D printer. Click on the button and save the file on your computer to work, edit or customize your design. You can also find more 3D designs for printers on Filament dryer.