Filament Dryer / Dehydrator
thingiverse
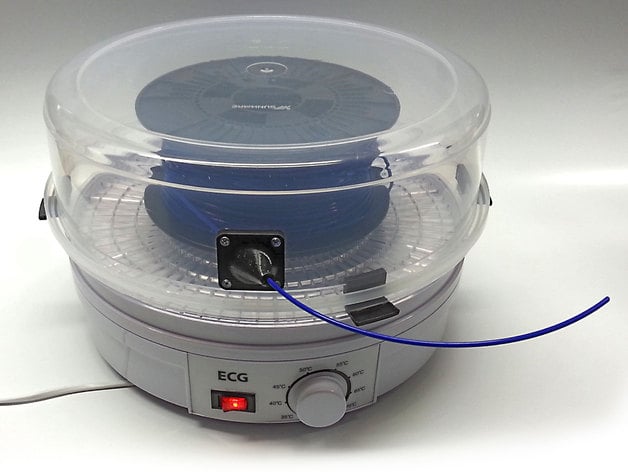
Filament dryer / dehydrator Filament dryer based on a widely available food dehydrator, a plastic food container and some 3D printed parts. The food dehydrator used is of the brand: ECG type SO 375 The cap used is the bottom part of a food container - brand: Sunware™ article 087 Building instructions: The food dehydrator comes with 5 layers (shelves) and a lit. For the filament dryer we use 1 shelve only and place it on the food dehydrator in the originally intended way. Then we place (hang) 4 pieces of the 3D printed part named "Cap Brace" on the rim of this shelve (see pictures). On these 4 "cap braces" we can now place the (bottom part of the) food container (upside down - or actually downside up) thus creating a transparent "cap" of the filament dryer. We then attach the 3D printed part named "Filament Snoot" to this cap. In order to do this we make a hole with a diameter of approx. 20 mm in the cap and 4 more 3 mm holes to mount the filament snoot to the cap using M3 bolts and nuts. Next we place the 3D printed part named "Spool Axes" in the center(hole) of the shelve. This part is modeled so that most (small and large) filament spools will fit on the "spool axes". The spool axes part enables the filament spool to unwind smoothly with minimal friction involved. Pull the filament through the filament snoot and feed it into the 3D printer's extruder. The filament snoot has a hole with a diameter of 3.5 mm, so 3mm as well as 1.75 mm filaments will easily pass through it. Specifications: This filament dryer enables you to: dry filaments for many hours on end. keep on drying the filament while printing. dry food (because we did not damage the original food dryer, we have only supplemented it with 3D printed parts and a food container) temperature range 35-70 °C no build-in timer The total cost of this filament dryer was €59,- (3D printed parts not included). And as I said before: The food dryer can still be used as food dryer, because none of the parts of the original food dryer were damaged. Update 12-6-2016: Thanks to the idea of Crazy Dog, who suggested to include a PTFE filament guide clamp, I have now added an alternative snoot for those who would like to guide the filament with a Teflon tube right up to the extruder. This will enclose the filament so that it will not absorb moist on its way to the extruder, once it leaves the filament dryer. He also suggested to incorporate one of the many filament dust filters that are available here:http://www.thingiverse.com/thing:153807/#files These filters can be clamped onto the other end of the PTFE tubing just before the filament enters the extruder, thus combining optimal drying and dust removal in one go. The files that belong to this snoot and clamp are called: Filament_Snoot_for_PTFE_Filament_Guide_Rod.STL Filament_Guide_Clamp_Nut.STL This PTFE guide rod option can hold and fix PTFE rods that have an outer diameter ranging from 4-6 mm so that it will be suitable for 3 mm as well as 1.75 mm filaments guide rods. It is meant to replace the default "Filament_Snoot" when using a PTFE rod as a filament guide. Note that with this addition the Teflon rod can even be extended into the dryer so that the filament is being picked up by the Teflon tubing close to the spool, thus preventing the filament to unwind itself from the spool or fall off of the spool as a result of gravity (because the spool is unwinding horizontally). Print Settings Printer: Mankati Fullscale XT plus (customized bed) Rafts: No Supports: No Resolution: 0.25 mm Infill: 20% Notes: I have printed these parts using PolyMakr PC Plus filament (black). (Poly Carbonate) This is a spectacular filament IMO to make really usable / durable / strong parts from. Printer settings for PolyMakr PC Plus: This material is very easily printed when using Cura as slicer software! When using Slic3r you will need to set the extruder width of all layer types to 200% Printing speed must preferably be kept low (30-40 mm/s). Cooling fan should be disabled or kept as low as 30% max. Printing temp: 255°C Bed temp: 90°C When printing with PolyMakr PC plus, use the included BuildTak™ printing surface for good adhesion with the building platform. I decided to use PC for this purpose, because of its high temperature resistance.
With this file you will be able to print Filament Dryer / Dehydrator with your 3D printer. Click on the button and save the file on your computer to work, edit or customize your design. You can also find more 3D designs for printers on Filament Dryer / Dehydrator.