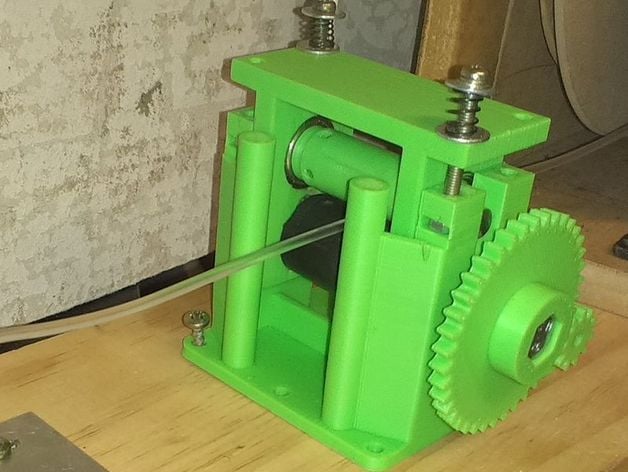
Filament extruder puller
thingiverse
This winder is a remake of the Lyman extruder filament puller (seehttp://www.thingiverse.com/thing:380987 ) . The original design is using a stepper motor, and this design a geared DC motor. This design is more compact, with the motor on the back. I have used this motor to extrude lots of filament, and it really helps to keep the extruded filament nicely constant in diameter. It does not damage the filament in any way. It keeps it smooth surface and round shape. The pressure on the filament is made with 2 springs, and the pressure can be adjusted with the screws. It holds the filament very good, and need quite a couple of kg pull force before it starts slipping. In order to get the filament out, you need to lift the top parts. Getting it is in easy: just push it against the running rolls, and it is pulled in. The design uses a 60rpm motor. This gives a good adjustment range for both 3mm and 1.75mm filament extrude speeds. If the speed range is not matching your extruder, then the motor can be get in other RPM speeds. Normally you only need to adjust to speed in the beginning for the correct diameter, and then it keeps that during the rest of the run The filament must be cooled before it enters the puller, otherwise it will be squashed to an oval shape. The design has place for 4 springs, but you only need 2 springs in opposite corners to get an good pressure on the filament. The top roller is an idler. It only function in life is to keep the filament pressed on the bottom driven roller. You can use the bare (abs, pla) printed version for this. It it slips that is no problem The bottom roller needs to pull the filament, and thus need some surface with a lot of friction. For example you can use silicone, PU, latex or real rubber. Either in the form of a tube that is pulled over the plastic roller, or as solid material with a 8mm hole in the middle. I used an inkt rubber roller . In case the filament wanders to the side, use this: http://www.thingiverse.com/thing:681880 for a smaller entry. The sprockets are a remix from the Mendel90 design ( http://www.thingiverse.com/thing:17826 ) from nophead . The small is remixed for a smaller shaft hole. Some pictures of my plastic extruder setup are here : http://3dwingmaster.blogspot.co.nz/2016/02/filament-extruder-creating-my-own.html Please share your experiences with the extruder puller! Cheers! Instructions I printed the design in PLA. I did not notice any melting if the idler roll, even when in contact with hot ABS filament for hours. The 2 main parts will need support during printing. The inkt rubber roller must be cut it to size. Also needed to drill a 8mm hole through it. Also drilled a 2.5mm hole in the side for a m3 grub screw to hold it on the 8mm axel You need to print all parts 1x. Can be printed in PLA. Don't print the extruder_assembly.stl ! Possible the roller is needed 2x. Parts: To control the speed I use this voltage regulator: http://www.banggood.com/5A-XL4005-DC-DC-Adjustable-Step-Down-Module-Power-Supply-Converter-p-943556.html SKU124701 Motor is a 60rpm version: http://www.banggood.com/12V-DC-Powerful-Torque-Micro-Speed-Reduction-Gear-Box-Motor-p-941191.html SKU154499 Rubber coating or pully.. I used this: .http://www.banggood.com/Ink-Paint-Brayer-Painting-Roller-Printmaking-Tool-6_5CM11CM-p-963236.html SKU176928 Bold M8x120 with a hex head + nut(s) for he driven roller. 1x Bold or 8mm (100mm) silver stell rod for the idler 3x M3x5 grub screws + 3x M3 nut 2x M4 screws and nuts 2x strong spring 4x bearing BB608 2x m3 screws to hold the motor. When using the paint roller is a bit tricky: This need to be drilled in the center with a 8 mm drill. You need to drill exactly straight through the middle of the roll, otherwise it would wobble. I didn't get that right and still left with a tiny wobble. Connecting the dc motor is quite simple. You need a small 12v to 24v power supply. Normally your filament extruder will have one already. Connect the 12v supply to the voltage regulator input. Connect the output of the voltage regulator to your motor. Watch the + and -. If the motor runs the wrong direction, swap the motor wires. Adjust speed by turning the (square blue) variable resistor on the voltage regulator. For 3mm filament with my DIY extruder I need run the motor at about 4volt. For 1.75 filament the voltage is higher, but have not created that yet.
With this file you will be able to print Filament extruder puller with your 3D printer. Click on the button and save the file on your computer to work, edit or customize your design. You can also find more 3D designs for printers on Filament extruder puller.
