Filament Joiner
thingiverse
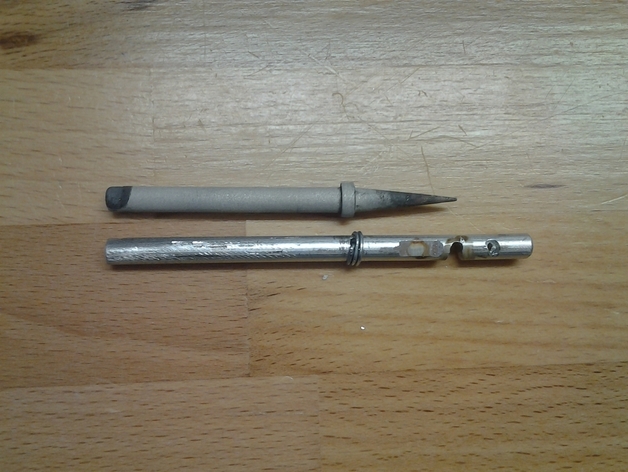
If you have a 3D-printer. You will sooner or later want to join filament to be able to use up all your stumps you get. I decided to take on the problem and this is what I came up with. I know that Rich already designed a nice joiner ( http://www.thingiverse.com/thing:9850 ), but that requires that you have a heat resistor and that you use the computer (software) to control the heat. This results in that you cannot join filament while you are printing. :) PS: The Sketchup file is just an example (I had to have a file). :) Instructions Make sure the size of the aluminum rod fits in to your soldering iron first. Cut the rod to a 80mm long piece (measure your soldering iron tip to get a desired length). Now measure the length from the back of the tip to the stop ring. Drill a hole in the aluminum rod at the same distance from the end as on your original tip. This hole is for the wire who will serve as a stop for the tip (the lock-ring from the soldering iron will hold it in place). Drill another hole and saw down thought the rod so you get a groove. This will be used to smoothen the joint. And last, file the rod on both sides to make two small flat parts where you can heat the ends of the filament before joining them. Mount the tip in your soldering iron and set the temp to about 160 degrees. Start practicing. It takes some practice. Use sandpaper to smooth out the joint if needed. Read the full story here: http://old.snille.net/index.php?info=joiner
With this file you will be able to print Filament Joiner with your 3D printer. Click on the button and save the file on your computer to work, edit or customize your design. You can also find more 3D designs for printers on Filament Joiner.