Filament Runout Sensor w/ Creality Limit Switch
thingiverse
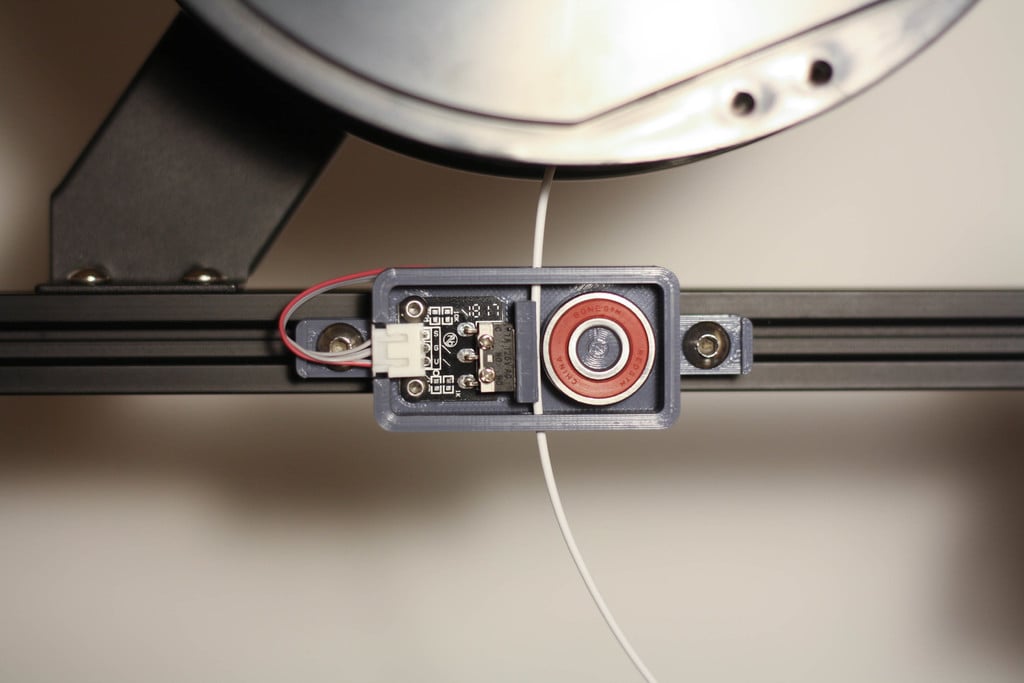
If you upgraded your Creality 3D printer to use an ABL system such as a BLTouch, then you probably have an unused Z limit switch laying around. I designed this model so the unused limit switch from my CR-10 Mini can be used as a filament runout sensor. The limit switch is commonly found in Creality CR-10 and Ender 3 line of printers and it consists of an SPDT switch mounted on a small PCB with a female JST XH connector. I mounted the filament runout sensor to the top of my 3D printer's frame, right under the spool. You can use t-nuts and bolts, or zip ties. Typically, runout sensors are positioned much closer to the extruder for minimal filament waste. However, I converted my CR-10 to be direct drive and the position of the sensor makes the most sense for my setup. As an added benefit for its position, I am given a generous length of filament to fuse/melt ends together. I use octopi with my printer, so this switch works perfectly with the GPIO pins. (I'll explain briefly below.) I'm not familiar with other setups, but considering it just a switch... I can't imagine this not being adaptable to your setup. The design uses a 608 bearing and a custom PTFE holder to allow filament to glide through with minimal friction. I wanted to use commonly available parts and more than likely, you probably have the necessary items laying around. **.STL files:** - Main body (58.5 x 31mm excluding mounting points) - PTFE holder (9 x 19 x 4mm) - 5mm spacer (if you need it) (88.5x11x5mm) **Parts you need:** - Limit switch (taken off the stock mount) - 2x 5mm M3 screws (taken off the stock mount) - 20mm PTFE tubing - Standard 608 bearing aka skateboard bearing (you could probably even print one) - Wires (you can use the original cable that was plugged into the limit switch, but you would have to fish it out of the enclosure.) - Optional: Using connectors such as JST XH and/or dupont is super helpful for making good connections with your hardware. Otherwise, you'll have to figure out a way to make the connections. **Making the PTFE guide:** 1. Rough up the outside of the PTFE tube using medium grit sandpaper. 2. Adhere PTFE tube to the holder and allow to dry. Original Super Glue worked best for me. 3. Using a sharp blade and while using the holder as a guide, carefully trim off the excess PTFE like shown in the pictures. 4. Attaching ONLY to the metal lever of the limit switch, adhere the PTFE guide with a small drop of glue. Be careful not to get glue on the switch itself! Note: Depending on the tolerances of your limit switch, you may or may not have to file down the PTFE guide. Just make sure the switch has enough room to click and unclick. **Wiring guide:** Using the limit switch PCB as a reference, you will notice the three pins are labelled as S, G, and V. Depending on how you want to wire the switch, you can have it normally open or normally closed. Using pins S and G will make the switch normally open. Using Pins S and V will make the switch normally closed. If you are using the wires that originally plugged into the switch, it is set up for normally closed. **Connecting it to your Raspberry Pi (Octopi):** Refer to my photos and https://www.raspberrypi.org/documentation/usage/gpio/ You will need to connect one wire of the switch to any GPIO labelled pin and the other wire to ground on the Raspberry Pi. You will need to install the Filament Sensor Reloaded plugin. Under the Filament Sensor Reloaded settings, choose the board pin you are using, the switch type, and make sure "Pause print when out of filament" is check marked. You may leave debounce time unchanged and Out of filament GCODE blank if you wish. For my setup, I connected the switch to GPIO 23 (board pin 16) and ground on pin 14. Using "Board Mode" I entered a value of 16. My switch is normally closed. Modify your GCODE to whatever works best for you. I only use print/resume GCODE scripts regardless of any interruption to my prints.
With this file you will be able to print Filament Runout Sensor w/ Creality Limit Switch with your 3D printer. Click on the button and save the file on your computer to work, edit or customize your design. You can also find more 3D designs for printers on Filament Runout Sensor w/ Creality Limit Switch.