Filament samples (with rack)
thingiverse
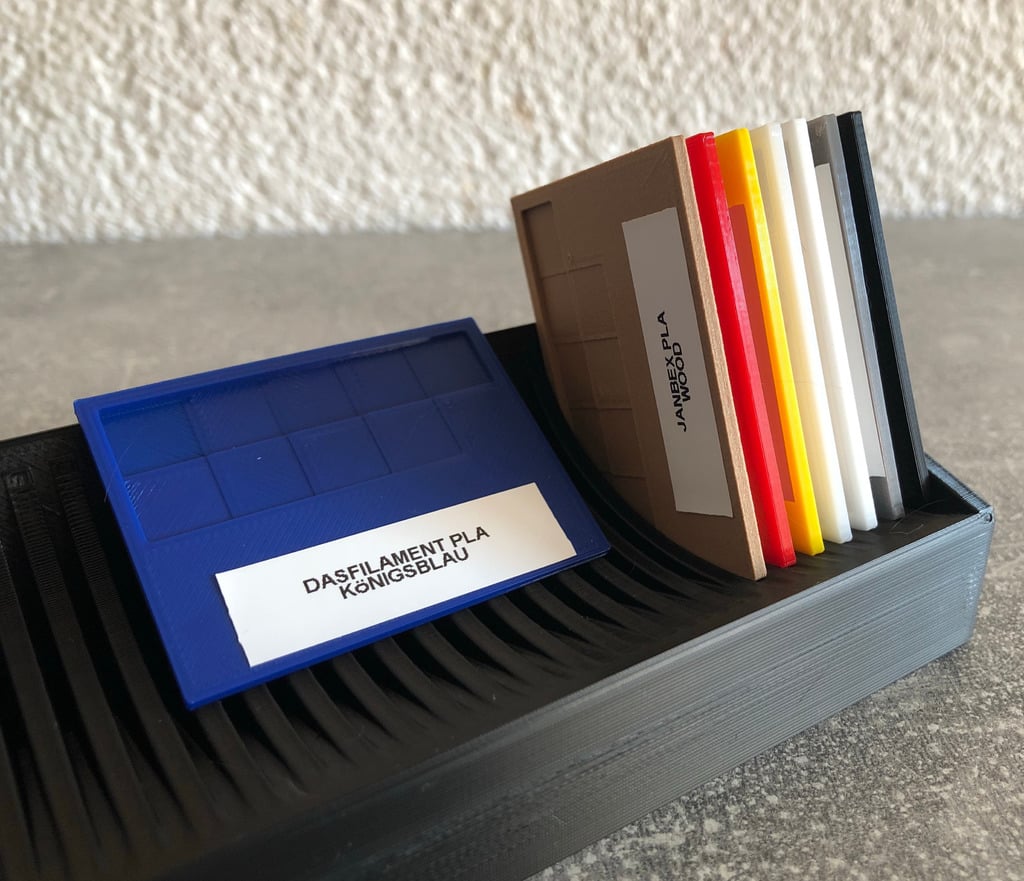
I tried a lot of filament sample systems, but no one was perfect for me. So I create my own one. Additional there is a rack to store/display the samples. My goal was to create a sample with different thickness fields (to check the transparency) and without any curves or holes for smooth prints and space for labels. One sample is 54x42x2mm. Thickness fields are 10x10mm and from 0.2mm to 2.0mm in 0.2mm steps. Works best with a 0.4 nozzle and 0.2 layers. I suggest to print the samples with the following settings in Cura 3. (If you use another slicer find a similar setting). Some settings are hidden by default in Cura and have to be enable first. (Some are defaults, but I write it down if you like to check it) Layer Height: 0.2 Initial Layer Height: 0.2 Wall Line Count: 2 Top Layer: 999 Top/Bottom Pattern: Lines Bottom Pattern Initial Layer: Lines Z-Seam Alignment: Sharpest Corner Top/Bottom Speed & Wall Speed: 30mm/s (depends on the quality of your printer, I suggest max. 30) Additional I suggest to use skirt and if you changed the filament recently a really higher skirt line count. Check the prepared model in Cura. If all settings fits you should get the same result as shown on my screenshots. Also make sure that the printer starts to fill the bottom layer not at the corner of the 0.2 field. (The walls can start there.) Otherwise rotate the model. With the given settings the whole sample is printed with a nice 100% infill (as top layers) and only with the given speed. In my case it was around 25-30min to print and need less than 5g of filament. Independent which settings you use - save it. To compare the samples you should always use the same settings. The filament sample can simply scale on the X and Y axis if you need a larger one and accept the wider walls. You can print the rack in your favorite settings. You can place the samples in portrait or landscape format in the rack, there are 35 slots. The slots in the rack were designed with a width of 2.2mm. On my print it fits perfect - not sure about your printer. I add a small part of the rack if you like to test first before print the whole one. If it not fit, stretch the model on one axis a bit. The rack is designed to stay (on the desk), but it should be possible to add bolts for wall hanging systems like pegboards at the back side - but there is a risk the samples can fall out of the rack. Find your own solution or design your own rack. **Update:** I add a second version of the rack with only 15 slots as requested. (Hint: If you upload the rack to tinkercad or use your favorite tool you can add a custom text at the front.) Do'nt forget to check the remixes for compatible things: https://www.thingiverse.com/thing:3108748/remixes
With this file you will be able to print Filament samples (with rack) with your 3D printer. Click on the button and save the file on your computer to work, edit or customize your design. You can also find more 3D designs for printers on Filament samples (with rack).