Filament Winder for my Medium Filament Spool design
thingiverse
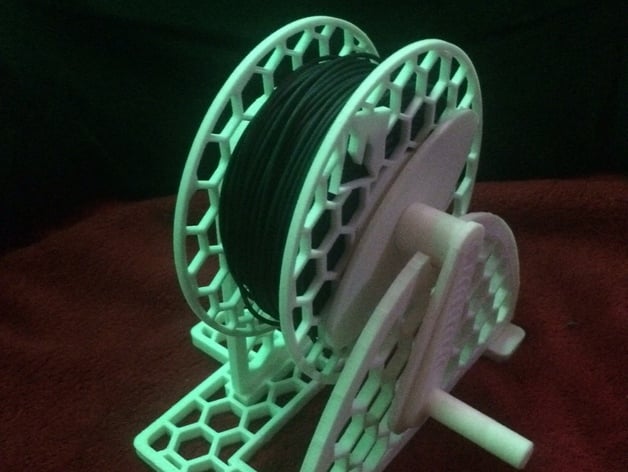
Mates with the spool located here: www.thingiverse.com/thing:780874 - could be modified to work with other designs, but this takes advantage of the hex pattern in the makeup of the filament spool. Where I'm about to install the Flashforge Dreamer on my boat, there's not really enough space to comfortably hang large spools outside of it - so I'll be doing a fair amount of rewinding onto moderately sized spools. This winder is to make that easier. Instructions Print out parts (except for "example.obj"), snap together the support pieces and the axel/spoke pieces. They should fit together tightly enough to serve the purpose without gluing them so you'll have a collapsible and easily stowed filament winder. The vertical supports snap into the holes provided in the base - they're symmetrical so orientation is unimportant, and they each will only insert into their corresponding slots. Then take the axel crank mount and insert an axel crank peg in either side. On one side, slide the crank on. On the opposite, push the beg through the spoke and into the hex slot in the axel. This should all snap into place pretty securely but if there's any play you may want to glue it with an adhesive appropriate to your filament material. Hexagonal male connectors on "spoke" fit into a pair of hexagonal holes on the side of this spool www.thingiverse.com/thing:780874 . Just insert the crank and rotate and they'll slide into place when they line up. Modeled in c4d from profiles drawn in Illustrator, meshes checked and cleaned up where necessary in netfabb basic. I'm designing this specifically so that no part has any overhangs. It'll print nicely without support material or concerns about drooping during printing. The hexagonal mesh provides strength while keeping filament requirements very low and weight very light. Original upload had a single crank peg that went all the way through the axel crank mount, attaching the handle on one side, passing through the spoke and into the main axel. I changed that to two pegs, each goes into one side of the axel crank mount. The original was very hard to push all the way through the crank mount - I had to be super careful not to destroy the peg trying to force it through. This version assembles easily. Parts snap into place.
With this file you will be able to print Filament Winder for my Medium Filament Spool design with your 3D printer. Click on the button and save the file on your computer to work, edit or customize your design. You can also find more 3D designs for printers on Filament Winder for my Medium Filament Spool design.