First 3d printed airsoft Panzerfaust
thingiverse
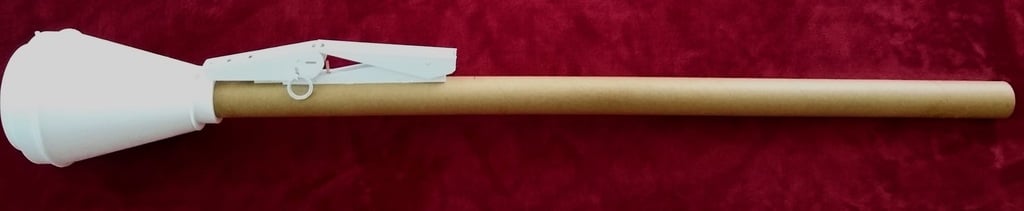
First 3d printed airsoft Panzerfaust Say you're airsofting and romanticize about playing themed airsoft in WWII style and have some pistols or AEG's...but yearn for something exciting, however. Something... special! You've used it in games like Call of Duty, Battlefield, and Sniper Elite. You've seen in in TV series like Band of Brothers. You've watched it tear holes in tanks like in 2014's Fury... and you want that fun-looking small rocket launcher (Probably wasn't too fun in real life). You go online and find out it is called a "Panzerfaust". It looks simple, looks cool, you want one. You go online and see there IS an airsoft version.... but wtf look at that price!!! Octagonairsoft $300: https://www.octagonairsoft.com/product-page/fcw-arrow-dynamic-panzerfaust-100-gas-grenade-launcher Airsoft GI $400: https://www.airsoftgi.com/product/Panzerfaust-100m-1-1-Scale-Replica-Grenade-Launcher-Sand-Gelb-66751/ Airsoftmegastore $400: https://www.airsoftmegastore.com/index.php?route=product/product&product_id=39624&sort=pd.name&order=aschttps://www.airsoftmegastore.com/index.php?route=product/product&product_id=39624&sort=pd.name&order=asc Switairsoft $480: https://www.switairsoft.com/product-page/ad-panzerfaust-100m-airsoft-grenade-launcher They all use a cheap and affordable 40mm airsoft grenade, have a simple small mechanism... so what gives? You could buy 2 airsoft electric rifles for that cost! That's where 3d printers come in as a blessing! I introduce you to the first affordable 3d printed airsoft panzerfaust anywhere on the internet! Easy to build! Simple to use! Buy the complete model here: https://cults3d.com/en/3d-model/game/first-3d-printed-airsoft-panzerfaust The only external hardware you need is: * your own 40mm airsoft shell * a click pen spring * 2 random wood screws (~1" long) * a wooden skewer like the kind you use for grilling shrimp on * and a packaging cardboard tube (The one I used was OD:40mm, ID:34mm, L:890mm). PART 1: the shell holder and tube mount. Parts list: Cradle shell bracket part 1 Cradle shell bracket part 2 Cradle tube mount Instructions: Glue all of these together. You may choose to align with cut wooden skewer pins. PART 2: Firing mechanism Parts list: Mechanism front plate Mechanism firing-pin Mechanism plunger Mechanism side-panels Mechanism backplate Instructions: 1) Put the pen spring into the front plate hole 2) Put the spring into the firing pin's front hole 3) Glue the front plate and backplate to one of the side panels 4) Align the pin and plunger into their V-grooves. Leave these free-floating 5) Glue the second side panel in place, locking the parts together. NOTE: the plunger will be free moving INTERMEDIATE INSTRUCTIONS: Align your firing mechanism to your pipe. Front plate should be level with tube's lip. Mark the plunger's hole on the pipe and drill that hole through your pipe. PART 3: Trigger mechanism Parts list: Body Panels (with wedges and hinge pins) Trigger Sight Instructions: 1) Glue side panels to the trigger core. 2) Once panels are glued, fit the wedges into their grooves 3) Slide the completed firing mechanism into the tube. 4) Insert a 35mm cut section of wooden skewer through the hole in the pipe and into the plunger inside, making sure the holes are aligned. 5) Place the trigger mechanism on top of the frame, aligning the second hole with the plunger's pin. 6) Screw your two 1" wood screws through the 1st and last hole in the core piece, directly into the firing mechanism inside the tube. NOTE: Make sure the mechanism functions or you have screwed too far! 7) Slip the sight and the trigger in their respective places and lock with hingepins. BONUS STEP: The firing mechanism has holes in the side panels but not the core. Drill through the core and insert safety pin provided in the designs for realism. PART 4: Warhead Parts list: Nosecap Front Support band Body Sightpost instructions: Glue front to body using the support band to help align the large parts. Glue the sightpost into the front's hole. Glue the body to the extended cradle tube, making sure the sightpost is aligned with the trigger mechanism's sight. FIRING INSTRUCTIONS: CHECK to make sure firing pin does not protrude through the cradle hole too far or your shell will go off when loading. 1) Load your airsoft 40mm gas grenade shell into cradle (You may wish to have a rubber band hold it in place when carrying) 2) Pull safety pin to flip up sight (allowing trigger to be able to move) 3) Push down on trigger lever to push the pin which will make the mechanism push the pin on your airsoft 40mm grenade shell, setting it off.
With this file you will be able to print First 3d printed airsoft Panzerfaust with your 3D printer. Click on the button and save the file on your computer to work, edit or customize your design. You can also find more 3D designs for printers on First 3d printed airsoft Panzerfaust.