FIRST Tech Challenge Control System Board for Moto G4 Play
thingiverse
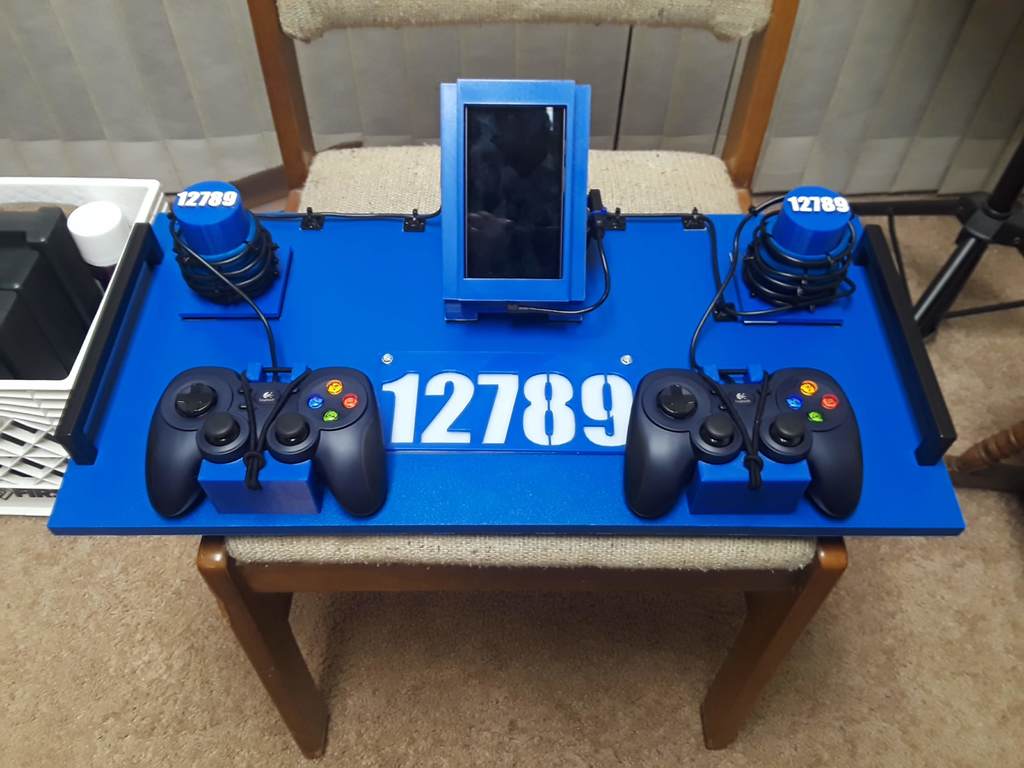
This build is brought to you by FTC team 12789, the Hack-Gearz from Merrimack, NH. We certainly hope this helps other teams in their pursuit of a better way to manage their electronics at competitions. This is a bit of a "Labor of Frustration" because we were frustrated with constant tangling of the Logitech F310 cables and USB OTG cables and phones and unplugging and AAAAARGH! at FTC events. There's multiple components here, and the 3D printed elements are only a part of the overall solution. But let's cover what we've got here: Non-3D Printed Components: 1. One (1) 24" wide x 12" deep x 1/2" thick HDPE sheet (blue) for the base of the board. 2. Two (2) 10-inch drawer handles. These are the black handles on the sides for carrying. 3. Two (2) Logitech F310 Joysticks 4. One (1) Anker 4-Port USB 3.0 Ultra Slim Data Hub 5. Two (2) Categories Catty Coil Spring Action Cat Toy 6. One (1) USB OTG cable 7. One (1) Moto G4 Play phone 8. Cable Ties, Cable Tie Mounts, Hair Ties, 1/2" Screws, electrical tape, and Dual Lock. 3D Printed Components 1. Two (2) Cable Holders. 2. Two (2) F310 Joystick Holders (These are twlum's absolutely WONDERFUL holders) 3. One (1) Moto G4 Play Case 4. One (1) Moto G4 Play Case Support Most of the control board explains itself, but here are a few things that may not jump out at you at first. (1) The phones go into the G4 Play case - if you print the case using ABS, the ABS will bend around the phone's camera and provide the force you need to keep the phone in the case and everything is great. If you print the case out of PETG or something more stiff, you will likely need to file down a groove for the camera. (2) The Case gets dual-locked to the top of the Support. It's important to mount the case high up on the support so that the USB OTG cable hole is easy to access to plug the cable into the phone. I found that if you mount the bottom of the case flush with the front of the support, and then use dual-lock to mount the support to the board, the dual-lock provides the extra height to make the spacing perfect. (3) Use the Catty Coil to wrap the wires. Cable tie the wires along each catty coil, you'll probably use 2 cable ties every inch. The catty coil provides a springy coiled wire that can be placed around the circular wire holders. This keeps the wires managed and prevents them from getting tangled (and you can pull on the joysticks to get more cable if you need, and when you release them they relax back into a coil!). (4) Make sure you cover any unused USB ports with electrical tape. It's essential not to let dirt, water, or debris get in there. (5) Use the screws to screw down your F310 holders. In my second board I made, I used Dual Lock to hold down my phone support and my cable holders to the board, but I used screws to hold down the F310 holders. The reason is that the F310 holders - believe it or not - got more abuse than even the cable holders. Initially I used dual lock for those too, but the dual lock wouldn't hold them - they kept getting knocked off the board. So I quickly just screwed them in and that solved that problem. Enjoy!
With this file you will be able to print FIRST Tech Challenge Control System Board for Moto G4 Play with your 3D printer. Click on the button and save the file on your computer to work, edit or customize your design. You can also find more 3D designs for printers on FIRST Tech Challenge Control System Board for Moto G4 Play.