Flashforge Creator Pro and similar JTech Photonics Laser mount
thingiverse
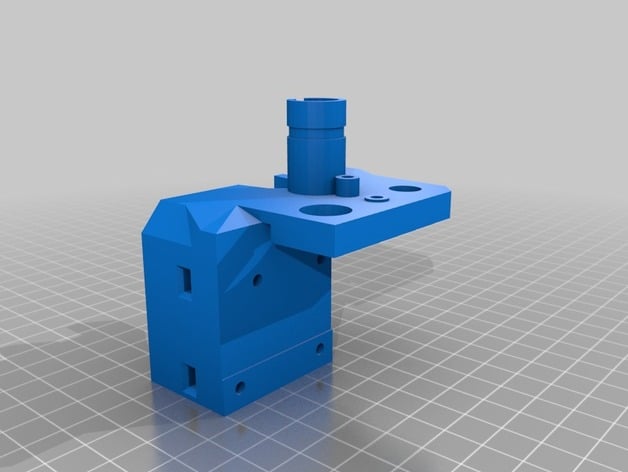
I am removing my left stepper motor and extruder, replacing them with a 2.8W laser from JTech Photonics - the Alpha version is still untested, but it will allow the laser to shine through the removed extruder hole in the extruder bar. I will redesign the top plate as needed. I'm bringing this out of Work in Progress Status since I've installed and finalized the mount and case code. Update 4: The part is printed and installed, with a few minor tweaks still needed - it's working well enough for now. Development continues, and I have also added a case to mount the laser control board at the printer's rear. I'm working with Simplify3D developers on a profile or method to generate an STL that works seamlessly with the laser. Update 3: I combined both pieces into one - though they haven't been printed yet, everything should line up perfectly. The individual parts work together well enough for now. I plan to finish wiring in the bot tomorrow and also make a case for mounting the board at its back. A thread insert screw and 6mm push lock is designed into the filament feed tube. Update 2: This is my first print-ready version. I should receive the laser today, so it will get printed and test-fit tonight. Eventually, the top piece, stepper mount, and laser mount will all be part of a single print. Update 1: Some modifications were made to the left stepper replacement after realizing the laser didn't need to be centered. It's still in Work in Progress and unprinted. The top plate remains a work-in-progress too. Follow the instructions on JTechPhotonics' website for installation and hook-up procedures. Print the controller case, laser mount, both with supports needed. You will need to remove left stepper motor, fan, heatsink, extruder, heater, and thermocouple. Use 2 M3 nuts (included in spare parts bag) to secure mount to extruder bar - and reuse fan mounting bolts, some of which may be in your spare parts. Disconnect the active cooling fan controlled by M126 / M127 (on EXTRA header for AT2650 board) when using the laser. To print with laser: install Inkscape, then Inkscape Unicorn to gcode plugin. Generate the G-Code. Manually edit G-code - look at the attached examples for more information.
With this file you will be able to print Flashforge Creator Pro and similar JTech Photonics Laser mount with your 3D printer. Click on the button and save the file on your computer to work, edit or customize your design. You can also find more 3D designs for printers on Flashforge Creator Pro and similar JTech Photonics Laser mount.