Flashforge FFC Pro Vent Kit
thingiverse
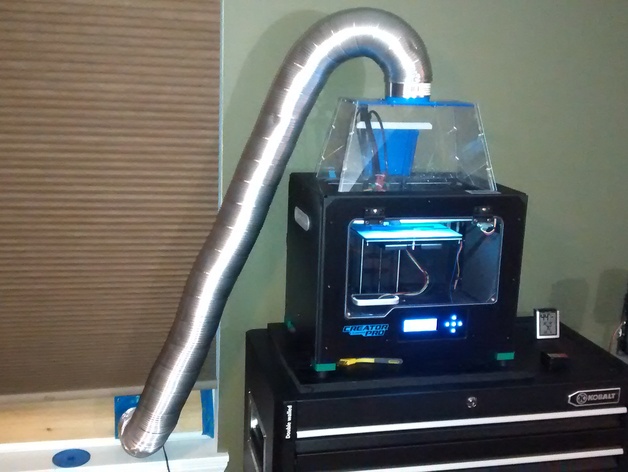
Latest UPDATE 8/14/16 Added a Straight Coupling Adapter for the clear hose listed, see pictures, works with all existing parts but now allows easy plug and unpluging of the hose and I use the Vent plug when ventilation system is not in use. This is meant to be a full ventilation kit for a Flashforge Creator Pro. You will need to print: -Top Replacement pieces for FFC Pro: FFC PRO Vent Top Left and Right (2 pieces total) -Duct to mount to top of new FFC Pro Top: 4in Vent adapter from ffcp01 file duct.mount (1) -A 120mm Fan to 4in Vent Hose adapter (1) Recommended to print but not needed: -120mm exhaust cap (designed for smooth exhaust directed downward with blocked line of sight, preventing most drafts and rain) -FFC PRO Hood Plug Remix (Trapping additional heat inside for printing ABS) -Some form of side plugs, many available on thingiverse (to trap heat) -4in Vent Plug (for when not in use in an air conditioned home, I originally intended for this to be wrapped in a compliant tape like electrical tape but this is not sealing as well as I'd want, and will likely make another version in the future) You will need to buy: -1x 120mm fan (you can use more, or use a different fan setup with a different adapter), I used a Corsair SP https://www.amazon.com/Corsair-SP120-High-Performance-Twin/dp/B007RESFYK -1x 4in Duct hose, I originally purchased https://www.amazon.com/gp/product/B003CLL9V8/ref=oh_aui_detailpage_o01_s00?ie=UTF8&psc=1 and the fittings are currently setup to take both hoses as pictured, but I prefer this: https://www.amazon.com/gp/product/B000DZFTEO/ref=oh_aui_search_detailpage?ie=UTF8&psc=1 which is more flexible. -1x 12 volt power supply, anything will do to power one fan, I used: https://www.amazon.com/gp/product/B000MGG6SC/ref=oh_aui_search_detailpage?ie=UTF8&psc=1 (it really can only power two fans and there is a good speed drop) -4x #8 or #6 screws, depending on how accurate your hole drilling is 2.5 to 3in long, and nuts 4x #8 or #6 screws, depending on how accurate your printing is 1in long and nuts -1x piece of 1inx6inxwidth of your window, I used cedar which is recommended, or you will need a painted board or weather resistant material if you want it exposed Nice to haves: -Foam and tape to seal the window sash where open above, and stick on foam around the board, mine is sealed pretty tight. -A way to make this work between my fan and the outside http://www.thingiverse.com/thing:529661 I haven't tried yet but would be a nice solution, short of that there will be a sliding door eventually, for now the plug. With everything above I am able to print abs without warping, and without any hint of fumes. Note the Exhaust port pictured, that was printed with this setup, without it installed. I still recommend running a in room hepa filter for any leftover fumes, but at least I don't mind staying in the room while its printing. There were two updates: UPDATE 8/14/16 -> Added a Straight Coupling Adapter for the clear hose listed, see pictures, works with all existing parts but now allows easy plug and unpluging of the hose and I use the Vent plug when ventilation system is not in use. UPDATE 8/8/16 -> Received the clear hose today from amazon (pictured), much easier to work with (if a danger to easy puncture, avoid animals). The fit is a bit off on my current setup of adapters, I may have to remix the linked 4in outlet and the 120 to 4, but it works pretty well. I would recommend getting the clear hose if you don't have a danger of tearing the plastic (there is a pic of both to help you choose, both are $10). Print Settings Printer: FFC Pro and Rostock Max V2 Rafts: No Supports: No Resolution: .15-.35 Infill: 7-15% Notes: These were printed on two different printers in PLA and ABS. Anything outside needs to be in ABS or something durable.
With this file you will be able to print Flashforge FFC Pro Vent Kit with your 3D printer. Click on the button and save the file on your computer to work, edit or customize your design. You can also find more 3D designs for printers on Flashforge FFC Pro Vent Kit.