Flex Holder
thingiverse
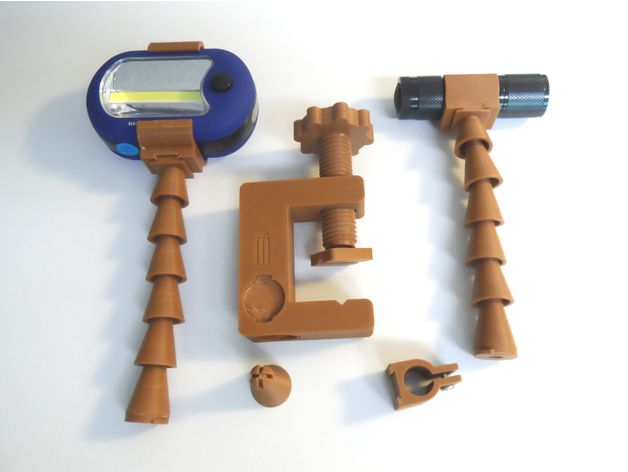
I designed this flexible clamp for temporary holding of small LED flashlights, typically found at Harbor Freight stores. The clamp can be easily adapted to accommodate other items such as magnifying glasses by changing removable heads. To provide optimal angles for various tasks, the bottom link can be attached to different sides of the clamp. Each individual link can also be adjusted for tension using a #6-32 screw. I discovered that this method of "tensioning" is essential when holding heavier devices in place with flex-links. The base link consists of a standard link with a base button glued to it, and I found six links to be sufficient for most tasks. To print the clamp and clamp screw, I used 30% fill, while all other parts were printed with 100% infill. After printing the links, I cleaned and tapered the interior link receiver using a 90° hand countersink. The receiver opening must be large enough to accommodate the head of the next link without breaking it and small enough to prevent the head from popping out. I used a #6-32 tap on the interior hole to provide for a #6-32 x ½" round head screw, which is used to adjust tension on the link joint by pressing on the captive ball in the link. To assemble the links, press one link into the receiver of the next link before inserting the screw, then insert the screw and tighten to desired link tension. I utilized the Simplify3D slicing program to create custom supports for the captive ball in the link. After printing, the supports and ball must be cleaned such that the ball is loose and free to move around within the head. I also found that printing links singly produced a better link than printing them in multiples.
With this file you will be able to print Flex Holder with your 3D printer. Click on the button and save the file on your computer to work, edit or customize your design. You can also find more 3D designs for printers on Flex Holder.