Flexible chassis 2WD & 4WD robot
prusaprinters
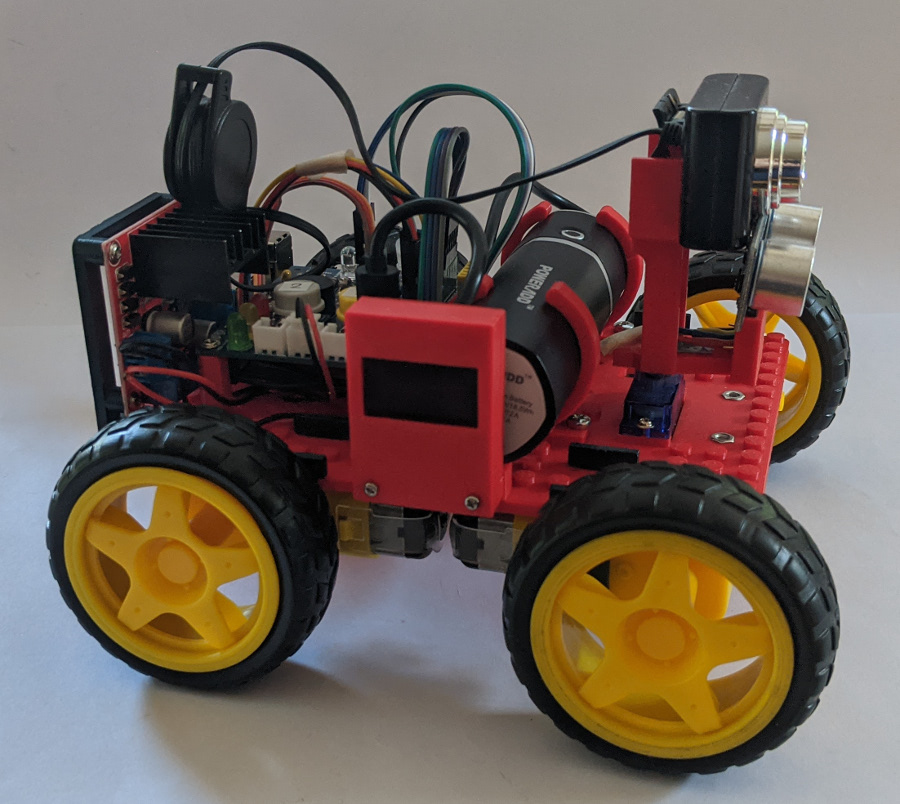
<p>A set of printed components to build 2WD or 4WD robots that can be controlled and managed by any of the Raspberry Pi single board computers (SBCs), a Raspberry Pi Pico microcontroller or an ESP32 microcontroller. Detailed descriptions of all aspects of this evolving project are at <a href="https://onlinedevices.co.uk/Flexible+Hardware+Design+Project"><strong>this link</strong></a>.</p><p>The main, single plate 3D printed chassis is designed to allow a standard set of drive, sensor and other components to be assembled in a number of different arrangements to allow different build configurations. It has also been designed to allow individual customisation with Lego blocks and/or card cut-outs that insert into custom 3D printed Lego-compatible blocks (the files for the LEGO-compatible blocks for card cut-outs are available <a href="https://www.prusaprinters.org/prints/67808-esp8266-2wd-robot-components"><strong>here</strong></a>). </p><p>All the components use 1.75mm PLA and a layer height of 0.15mm with print details for each component produced on an i3 Mk3 shown in the table below.</p><p>Further details on this evolving project are at <a href="https://onlinedevices.co.uk/Flexible+Hardware+Design+Project"><strong>this link</strong></a>.</p><p>Updates:</p><ul><li>main chassis plate updated 17th Sept'21 to correct servo and ON/OFF rocker switch cut-outs</li></ul><p> </p><figure class="table"><table><tbody><tr><td><strong>component file name/description</strong></td><td style="text-align:center;width:80px;"><strong>needs support (Y/N)</strong></td><td style="text-align:center;width:60px;"><strong>brim (mm)</strong></td><td style="text-align:center;width:82px;"><strong>filament</strong><br><strong>length (m)</strong></td><td style="text-align:center;width:75px;"><strong>print time </strong><br><strong>(i3 Mk3)</strong></td></tr><tr><td><i>mega-flex_chassis_plate22b_repaired.stl:</i> main chassis plate with Lego-compatible studs on the top surface (small correction made to servo cut-out and ON/OFF rocker switch cut-out 17th Sept'21)</td><td style="text-align:center;">N</td><td style="text-align:center;">10</td><td style="text-align:center;">16.30</td><td style="text-align:center;">5h 18m</td></tr><tr><td><i>4x_motor_fixing_tab02.stl: </i>tabs that insert into the chassis plate to secure the drive motors</td><td style="text-align:center;">N</td><td style="border:1px solid rgb(191, 191, 191);padding:0.4em;text-align:center;">3</td><td style="border:1px solid rgb(191, 191, 191);padding:0.4em;text-align:center;">1.36</td><td style="border:1px solid rgb(191, 191, 191);padding:0.4em;text-align:center;">31m</td></tr><tr><td><i>L298N_vcradleHi_mega01_roty90.stl</i>: vertical fixing mount for a L298N motor controller</td><td style="text-align:center;">N</td><td style="text-align:center;">0</td><td style="text-align:center;">1.35</td><td style="text-align:center;">39m</td></tr><tr><td>H<i>C-SR04_transverse_fixed_plate01.stl</i>: fixed ultrasonic sensor mount</td><td style="text-align:center;">N</td><td style="text-align:center;">0</td><td style="text-align:center;">0.6</td><td style="text-align:center;">20m</td></tr><tr><td><i>HC-SR04_servo_holder02.stl</i>: servo mounted ultrasonic sensor</td><td style="text-align:center;">N</td><td style="text-align:center;">0</td><td style="text-align:center;">0.81</td><td style="text-align:center;">25m</td></tr><tr><td><i>HC-SR04_Pi-cam__transverse_fixed_plate05.stl</i>: fixed mount for ultrasonic sensor and Raspberry Pi camera</td><td style="text-align:center;">N</td><td style="text-align:center;">0</td><td style="text-align:center;">1.46</td><td style="text-align:center;">1h 0m</td></tr><tr><td><i>HC-SR04+camera_servo_arm09.stl</i>: servo mounted ultrasonic sensor and USB camera mount</td><td style="text-align:center;">N</td><td style="text-align:center;">5</td><td style="text-align:center;">2.35</td><td style="text-align:center;">1h 35m</td></tr><tr><td><i>OLED1_flat08-front+back.stl</i>: 128x64 OLED 2pc mount assembly for the 27.3 mm wide and 27.8mm high OLED</td><td style="text-align:center;">N</td><td style="text-align:center;">0</td><td style="text-align:center;">2.64</td><td style="text-align:center;">1h 15m</td></tr><tr><td><i>OLED2_flat05-front+back.stl</i>: 128x64 OLED 2pc mount assembly for the 24.7mm wide and 27.0mm high OLED</td><td style="text-align:center;">N</td><td style="text-align:center;">0</td><td style="text-align:center;">2.77</td><td style="text-align:center;">1h 16m</td></tr><tr><td><i>32mm_top_open__left-right_bat_holder02.stl</i>: 32mm 5000mAh 5V/2A <i>battery bank</i> mounting clips</td><td style="text-align:center;">Y</td><td style="text-align:center;">0</td><td style="text-align:center;">2.21</td><td style="text-align:center;">52m</td></tr><tr><td><i>21mm_top_open__left-right_bat_holder01.stl</i>: 21mm 3350mAh 5V/1A <i>battery bank</i> mounting clips</td><td style="text-align:center;">N</td><td style="text-align:center;">0</td><td style="text-align:center;">1.25</td><td style="text-align:center;">33m</td></tr><tr><td><i>stretched_40mm_caster_loose03.stl</i>: front or rear castor that holds a marble ball </td><td style="text-align:center;">N</td><td style="text-align:center;">5</td><td style="text-align:center;">2.55</td><td style="text-align:center;">1h 34m</td></tr><tr><td><i>mega-flex_RPi_maker_kit_2x_spacer02.stl:</i> two hexagonal spacers that secure the overhanging portion of the RPi Maker Kit PCB to the chassis plate.</td><td style="text-align:center;">N</td><td style="text-align:center;">5</td><td style="text-align:center;">0.63</td><td style="text-align:center;">27m</td></tr><tr><td><i>PiZero_mount01.stl</i>: PiZero 'mount' that screws to the chassis plate and this then aligns with the outer pair of the PiZero mounting holes.</td><td style="text-align:center;">N</td><td style="text-align:center;">0</td><td style="text-align:center;">0.55</td><td style="text-align:center;">19m</td></tr><tr><td><i>mega-flex_USB_adaptor_holders_left01+right01.stl</i>: mounts to secure a 3 port USB + ethernet adaptor to the chassis plate which overcomes the lack of multiple USB ports on a PiZero</td><td style="text-align:center;">N</td><td style="text-align:center;">0</td><td style="text-align:center;">1.65</td><td style="text-align:center;">42m</td></tr><tr><td><i>ESP32_side_leg01.stl</i>: ‘legs’ that attach one side of the ESP32 Maker Kit PCB to a separate mount (see below) that attaches to the chassis plate</td><td style="text-align:center;">N</td><td style="text-align:center;">0</td><td style="text-align:center;">0.69</td><td style="text-align:center;">26m</td></tr><tr><td><i>ESP32_side_leg_mount01.stl</i>: chassis plate mount for the side 'legs' refrenced above</td><td style="text-align:center;">N</td><td style="text-align:center;">0</td><td style="text-align:center;">0.37</td><td style="text-align:center;">16m</td></tr><tr><td><i>mega-flex_ESP32_maker_kit_centre_leg01.stl</i>: ' leg' that attaches the other side of the Pico Maker Kit PCB to the chassis plate</td><td style="text-align:center;">N</td><td style="text-align:center;">0</td><td style="text-align:center;">0.61</td><td style="text-align:center;">18m</td></tr><tr><td><i>Pico_mount01.stl</i>: leg mount for attaching one side of the Pico Maker Kit PCB to the chassis plate</td><td style="text-align:center;">N</td><td style="text-align:center;">0</td><td style="text-align:center;">0.89</td><td style="text-align:center;">39m</td></tr><tr><td><i>Pico_side_leg01.stl</i>: leg mount for attaching the other side of the Pico Maker Kit PCB to the chassis plate</td><td style="text-align:center;">N</td><td style="text-align:center;">0</td><td style="text-align:center;">0.61</td><td style="text-align:center;">18m</td></tr><tr><td><i>mega-flex_PCB_mounts01-left+right.stl</i>: pair of mounts for the custom PCB that can connect any of the system controller options</td><td style="text-align:center;">N</td><td style="text-align:center;">0</td><td style="text-align:center;">1.82</td><td style="text-align:center;">59m</td></tr></tbody></table></figure><p> </p>
With this file you will be able to print Flexible chassis 2WD & 4WD robot with your 3D printer. Click on the button and save the file on your computer to work, edit or customize your design. You can also find more 3D designs for printers on Flexible chassis 2WD & 4WD robot.