Flexure Joystick for XBOX
thingiverse
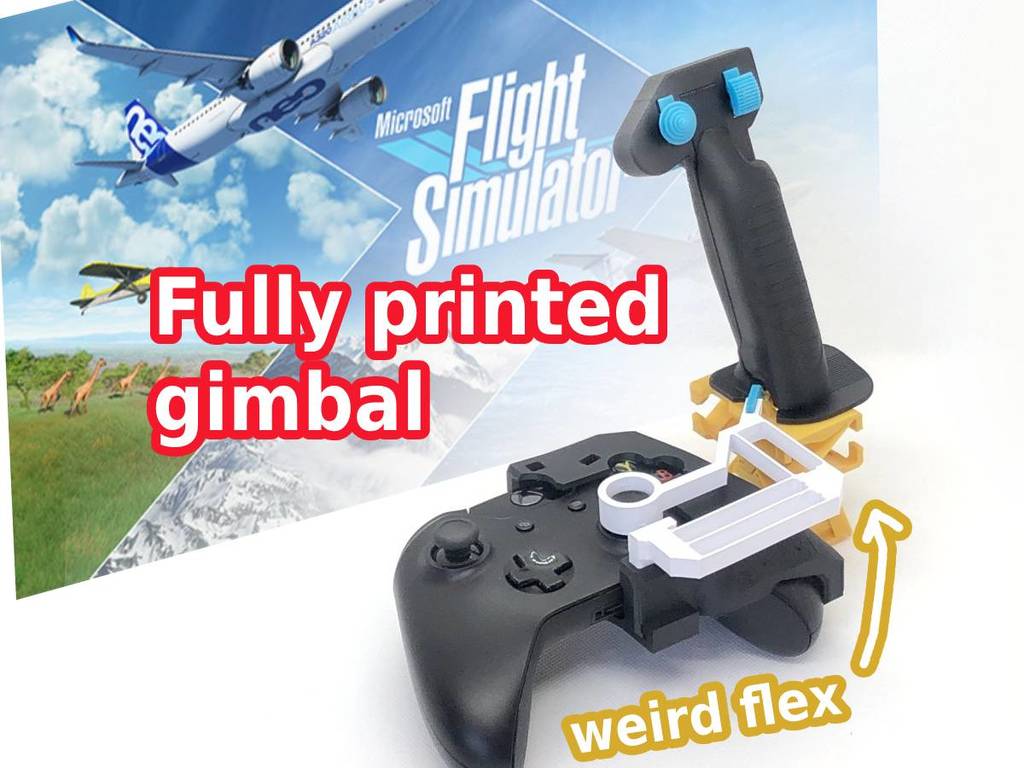
An adapter to make your Xbox One or Series S/X controller into a flight stick. Features a novel compliant mechanism flexure for the hinge, and another flexure for the linkage from the stick to the controller's right thumbstick. This free version features the stick motion and associated linkages. In addition, the upgraded version has a working trigger and buttons. You can find it here: https://www.etsy.com/listing/1049524850/3d-printable-flexure-joystick-for-xbox The upgraded version is compatible with the pieces in this posting, so you can print this design first, and later upgrade to the full version. Print all parts as oriented in the STLs. I used 0.2 mm layers, with 3 perimeters, in eSun PLA+, with default settings on an Ender 3 and a Prusa Mini. No supports are needed. Many printers leave large bulges in sharp corners. If you have a poor printer, the snap-in ball-and-cradle joint might not fit well. You can fix this by tuning your Linear Advance K-factor. Or, as a quick fix, re-print flexure_joint.stl with XY-compensation set to some appropriate value, or sand the knob, or use heat to remold the shape, etc., until it fits well. Build instruction are in this video: https://youtu.be/7gByrNiSMNI Follow the relevant steps for the pieces that are in the files, and ignore the pieces that are in the full version. And an overview of the design is in this video: https://www.youtube.com/watch?v=7wZQwBcmanE Here are the rough steps to assemble the design. Slide and glue the X and Y flexure hinges together with 2 drops of CA glue. Slide and glue the larger half of the stick onto the X flexure hinge. Snap in the dummy trigger and dummy buttons to their positions at the head of the stick, glue on the button faces for decoration. (don't glue the dummy buttons in, you can later upgrade to the full version with working buttons) Glue the flat connecting member of the Y flexure into the matching slot in the controller mount. Slide the small lid piece into its slot in the stick head, and slide on the small half of the stick. Glue the flexure_knob.stl into its slot in the thumbstick flexure. Glue the thumbstick flexure into its slot in the controller mount. This glue joint must be as solid as possible. (the small piece in controller_mount.stl is not used, but you can glue it in its slot on top of the controller face buttons) To insert the controller, slide the mount from below, along the hand-grip of the controller, and carefully bend and lead the backside support of the mount piece around to the back of the controller. Use the strap-like piece to secure the mount against the controller. To configure your game to use the controller, set your flight controls to the right stick. The joystick is designed to only move the thumbstick in the square are enclosed in the circle of the whole motion area, so you will have to add about 50 % "extremity deadzone" in Flight Simulator to get the full range of motions.
With this file you will be able to print Flexure Joystick for XBOX with your 3D printer. Click on the button and save the file on your computer to work, edit or customize your design. You can also find more 3D designs for printers on Flexure Joystick for XBOX.