Flight Sim G1000 (Mini)
thingiverse
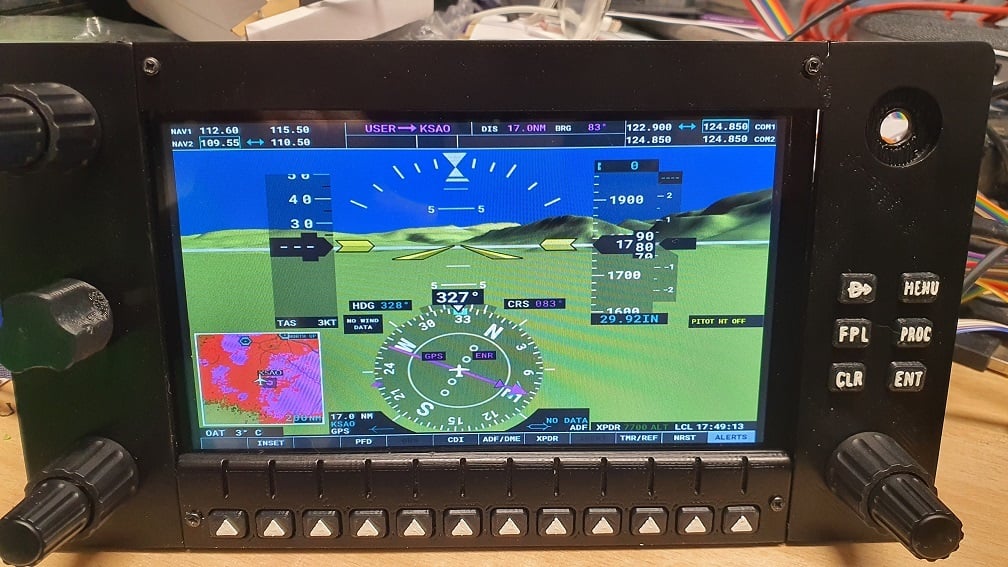
I'll start off by saying that I hated the G1000 aircraft in FS2020! One of the main reasons was that using a head tracker and trying to use a mouse to click on the right pixel to operate the G1000 is just an exercise in frustration. Then I spotted the excellent G1000 by Flightsimmaker which, if you're looking for an awesome full G1000, go there, go there right away! Here, click it, just click here https://www.thingiverse.com/thing:4019943 However, Ryan uses 10.4" screens and my little hobby console already featured a pair of 7" screens, because they're cheap on Amazon at only about £55 each and I didn't want to pay twice that for more screens, plus I can only just see over them already to see the ultrawidescreen monitor behind. I really didn't have room to go higher and didn't want to lose my existing logitech equipment which works fine. What I needed to do was remove the sheer frustration of the G1000 which meant that I just needed the important stuff, hence my G1000 "mini". So what did I lose? I didn't bother with the volume knobs and moved the CRS/Baro control to the top left of the MFD. Ryan also crafted a lot of stuff, I bodged with skill so no special tools are required here, no PCB making, just the ability to wire up a shed load of switches and operate small screwdrivers. The other element that I included was to make a hybrid MFD panel that includes 7 additional buttons, these being the Garmin G530 Zoom, MSG and CDI so that when the G530 is popped out to this panel, it can be fully operated (other than radio which is covered by my Logitech stuff in this use case). Also, there are three soft buttons that sit nicely when the TBM 930 lower touch panel is popped out. These 7" screens are touch screens and this can work with FS but badly as they haven't used the right touch screen library in their Javacode apparently. Maybe they'll work better in future, for now it's a mouse and these three soft buttons. PARTS LIST ========== Ribbon Cable (I favour this one over the 40 ways which has thicker insulation and is much stiffer) https://www.amazon.co.uk/gp/product/B07FM9TP75/ref=ppx_yo_dt_b_asin_title_o00_s00?ie=UTF8&psc=1 100 pack of button switches https://www.amazon.co.uk/gp/product/B07Q1BXV7T/ref=ppx_yo_dt_b_asin_title_o06_s00?ie=UTF8&psc=1 Dual Concentric Rotary Encoders (expensive option and order knobs at the same time) http://www.leobodnar.com/shop/index.php?main_page=product_info&cPath=98_75&products_id=196 Dual Concentric Rotary Encoders (cheap option) go and visit Flightsimmaker and 3D print some using cheap encoders https://www.thingiverse.com/thing:4373531 Pan/Zoom control https://www.thingiverse.com/thing:4222606 7" Touch Screen Monitor (Looks like Brexit has bumped the price of these up, another "benefit") https://www.amazon.co.uk/Elecrow-Monitor-Display-1024X600-Raspberry/dp/B076J8ZWFF/ref=sr_1_9?crid=29G4HULZ4YB38&dchild=1&keywords=7+touch+screen+monitor&qid=1613947592&sprefix=7%22+touch+%2Ccomputers%2C145&sr=8-9 Leo Bodnar boards if you connect this way, otherwise Mobflight or other Arduino etc. There's a LOT of switches, minimum 26 per panel and then 5 more switch inputs PER dual encoder with push switch. I would STRONGLY recommend a couple of the 64 button input ones if you choose these. 32 button board http://www.leobodnar.com/shop/index.php?main_page=product_info&cPath=94&products_id=205 64 button board http://www.leobodnar.com/shop/index.php?main_page=product_info&cPath=94&products_id=300 HDMI cables, USB cables to power stuff THE BUILD ========= It's pretty simple, print the switch mounts and pop the switches in and bend over a couple of the diagonally opposite switch legs. You can glue them in but I found that there's no need, they won't go anywhere once wired up and mounted. Print the frame parts. I printed mine in ABS which sands really easily. Glue the four parts together with solvent glue (I used plumbers pipe fitting glue which welds as it contains acetone and other stuff which smells nice ;) ) There's none of that nice lettering that are on Flightsimmakers because I printed mine face down on glass as I was going for a glossy smooth finish but I ended up sanding anyway. Spray paint to suit. Print the buttons, leave the autopilot panel and 12 soft buttons connected, there's no need to split them as they are space correctly already and it makes fitting them simpler as there's less to handle. Because i'm lazy, I didn't want to bother making the buttons backlit or anything fancy so I just printed in black ABS and edited the GCODE prior to printing to insert an M600 after one layer of printing the lettering in black. M600 should pause the printer and prompt for filament change at which point print to white and let the printer do the lettering in white. I did try some in relief and then filled with white paint and sand back to flush but it was taking too long and lots of buttons. See above "lazy" statement. Pop them into place and glue the 12 soft button carrier into place onto the frame. There are some lugs into which you can drill and screw this first but it didn't work out quite as well as planned hence I just glued in the end. Repeat similar for the other switch panels which are screwed into place using something small like 5mm x 1.4mm screws. I just bought a pack of 1 to 2mm screws from Amazon. Mount the encoders and pan/zoom control, glue or screw those if you print Flightsimmakers. In my original design, I didn't think I was going to need the COM/NAV swap buttons so they got added in later. The frame design incorporate the controls but you'll need to glue in the bodged add on for the switch mount. Sorry! WIRING ======= It's all just a bunch of switches, nothing to be afraid of. If you use the 64 button inputs, I made up ribbon cables for the functions so that it was pretty simple to plug a switch module in. Making up ribbon cables is boring and tedious but pays back in the end. FS INPUTS ========= Because I use Logitech stuff (i've had it years), I drive this via Spad.next https://spadnext.com and this detects the Leo Bodnar input board and gives a glorious panel of buttons to add and it's just a case of pressing each button to identify it in Spad.next and then assign an FS action. You can use Mobiflight or FSUIPC7 but note that FSUIPC7 does not support more than 32 buttons according to the Leo Bodnar site so choose the 32 button boards if that's your route. To get at the FS inputs of the G1000/G3000 etc. you will need the FS2020 web plugin from Mobiflight and this goes into your community folder as part of the install. You don't need to pay for Mobiflight for this but I donated and I think you should too because Sebastian deserves it, for without this, none of this would work ... at all. MONITORS - READ THIS PLEASE IT'S IMPORTANT!!!! =========================================== The resolution of the monitors is 1200x600 which is a problem for the G1000 when popped out from FS2020 because that's a 4:3 ratio presentation and does not occupy the full screen. The G3000 when popped out is fine as is the display in some of the other aircraft. However, if you set the 7" screens to 1024x768 in Windows Display Settings, then the G1000 pops out full screen, albeit a little stretched but the fonts are actually easier to read. The G3000 is now a little less tall but also fits full width. The result is that the buttons match on screen to the soft buttons in my build and i'm happy with that, i'm going to take functionality over perfection as this was always a compromise design. ATTRIBUTION =========== My thanks and appreciation to Ryan (Flightsimmaker) for granting me permission to re-upload his buttons here and for the inspiration to create my version.
With this file you will be able to print Flight Sim G1000 (Mini) with your 3D printer. Click on the button and save the file on your computer to work, edit or customize your design. You can also find more 3D designs for printers on Flight Sim G1000 (Mini).