Flight Simulator Trim Controls for Logitech/Saitek Yoke and Throttle
thingiverse
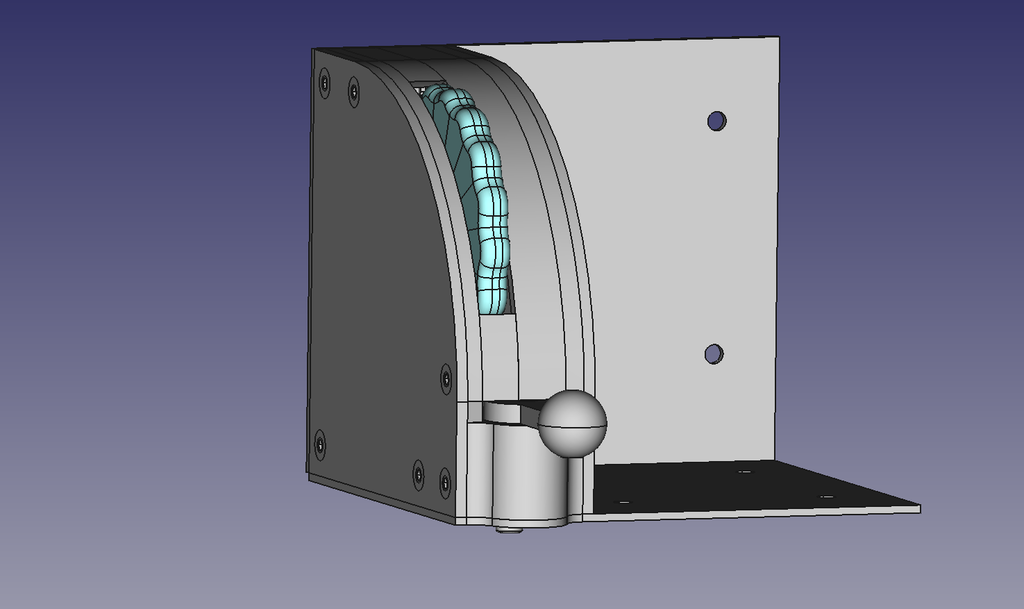
Do you like flight simulators, but finding that trimming the aircraft using buttons on the joystick or the keyboard doesn't feel right? Ever wished you had a elevator and rudder trim control but no-one seems to make them? Here's a rudder and elevator trim controller for flight simulators (Flightgear, X-Plane, MS Flight Sim etc). Designed to match with the Logitech/Saitek yoke/throttle quadrant. Can be mounted to the left side of the quadrant. Version 2 now uploaded. This has some revisions based on feedback - see below for more details. I'd like to recognise user JayBirde (https://www.thingiverse.com/jaybirde/designs) in particular here as he made this and gave me some very valuable freedback. Note the photo shows an earlier prototype version. See some of the recent makes here for examples of the production version. There have been several confirmed working builds so i'm now considering the current V2 version to be production stars. If you do build this, please let me know if you find anything that need modifying, and please post a make. if you would like one, but don't have access to a 3D printer, feel free to contact me via PM. Updates; 11th February 2021 - Now there have been three independent confirmed working builds of version 2, i've changed the status of the current V2 from 'Work in Progress' to 'Production'. 24th January 2021 - Some makes have been made. I've you've built this, it would be great if you can post an 'I made this'. i'm really keen to hear your experiences and feedback (in the comments so that everyone can benefit). I'm working on V3 at the moment so any feedback is gratefully received and I can incorporate this into the design. 10th January - Version 2 uploaded * New top V2.stl and base V2.stl - these have the curvature fixed to properly match the Logitech quadrant. For reference - the radius of curvature of the quadrant is 80mm (the previous version had a 70mm radius). Some other minor issues with the locating lip fixed. * This version also changes the axle for the bearings from the previous 8mm countersunk machine screw to an 8mm diameter metal rod or threaded rod - It will be much easier to source threaded rod or bar than the previous specified fastener. The axle is now held captive between the two halves of the case so no longer sticks out the side (as in V1). * Revised Elevator pot gear. V2.stl - size reduced to fit in the new enclosure, and fixed an error in the pressure angle to match the trim bearing mount. * Revised Trim bearing mount geared dual bearing V2.stl - fixed an error in the pressure angle to match the elevator pot gear. * All other parts are the same as the previous versions - if you've printed this previously these parts can be reused. However the changes are essentially cosmetic only - if you have V1 and it's working and you're happy with it, there's no need to print this version. * IMPORTANT - please note that i've not printed this version myself, but the CAD models check out and everything should fit together. If you find any issues please let me know in the comments. 9th January 2021: * Revised 'top.stl' - Remove incorrectly located lip behind rudder pot mount that interferes with the base. * Revised 'rudder trim base.stl' - open up the back of the mounting so securing grub screw in the rudder arm can be accessed. * Revised 'rudder trim lever.stl' and 'elevator pot gear.stl' with a 2.5mm diameter holes added that can be tapped for a M3 grub screw to secure the lever to the potentiometer if required 3rd January 2021 : Mounting plates, Fritzing wiring diagram and beta Arduino code added. In addition to the printed parts you will need: Tools: * M3 and M4 taps * soldering iron, solder etc Electronic components: * 2x 10K potentiometers. I used these: https://www.tinytronics.nl/shop/en/components/resistor/10kω-potmeter-standard * hookup wire * An appropriate Arduino for connecting to the computer - if you're using this as a USB game controller a Pro Micro or Leonardo is recommended. Hardware: * 5x M3x12 or M3x10 button head machine screws (ISO7045 or similar), for mounting the elevator trim pot mount to the body, and the rudder trim knob to the arm * 6x M3x16 or M3x20 button head machine screws (ISO7045 or similar), for assembling the trim wheel * (optional) 6x M3 washers for assembling the trim wheel * 1x piece of 8mm diameter bar or M8 threaded rod 32mm long for the trim wheel axle. For example an M8 bolt with the head sawn off to the appropriate length can be used here. * 2x 608ZZ bearings (or similar 608 bearing - used on inline skates and skateboards) for the elevator trim wheel. * 5X M4x25 or M4x30 countersunk screws (torx, hex or crosshead) for screwing the two halves together. * 3X M4x10 countersunk machine screws (torx, hex or crosshead) for fixing the rudder pot mount. * 8X M4 bolts for fixing the mounting plates to the quadrant and trim controls. These need to be short - 6mm length seems to be correct. Most of the screws are standard parts and should be available at any DIY store (e.g. B&Q/Screwfix for Brits, Home Depot/Lowes for Americans, Praxis, Gamma or Hornbach for NL), You'll get the bearings from a skate shop or bearing stockist. A note on the fasteners - i've specified metric ones, but if you're building this in the US where metric fastenings can be hard to come by the majority can be substituted for similar sized imperial ones. Just open the holes up slightly with drills as needed and use the appropriate taps to thread the holes. It helps here if your printer prints the holes slightly undersize (like mine does). The only fasters that MUST be the specified sizes is the M8 rod used for the axle for the bearings, and the M4 bolts that fix the mounting plates to the Logitech quadrant. Permission given for non-commercial use, feel free to remix. But if you want to produce this commercially please contact me first.
With this file you will be able to print Flight Simulator Trim Controls for Logitech/Saitek Yoke and Throttle with your 3D printer. Click on the button and save the file on your computer to work, edit or customize your design. You can also find more 3D designs for printers on Flight Simulator Trim Controls for Logitech/Saitek Yoke and Throttle.