Flight Simulator Trim Wheel
thingiverse
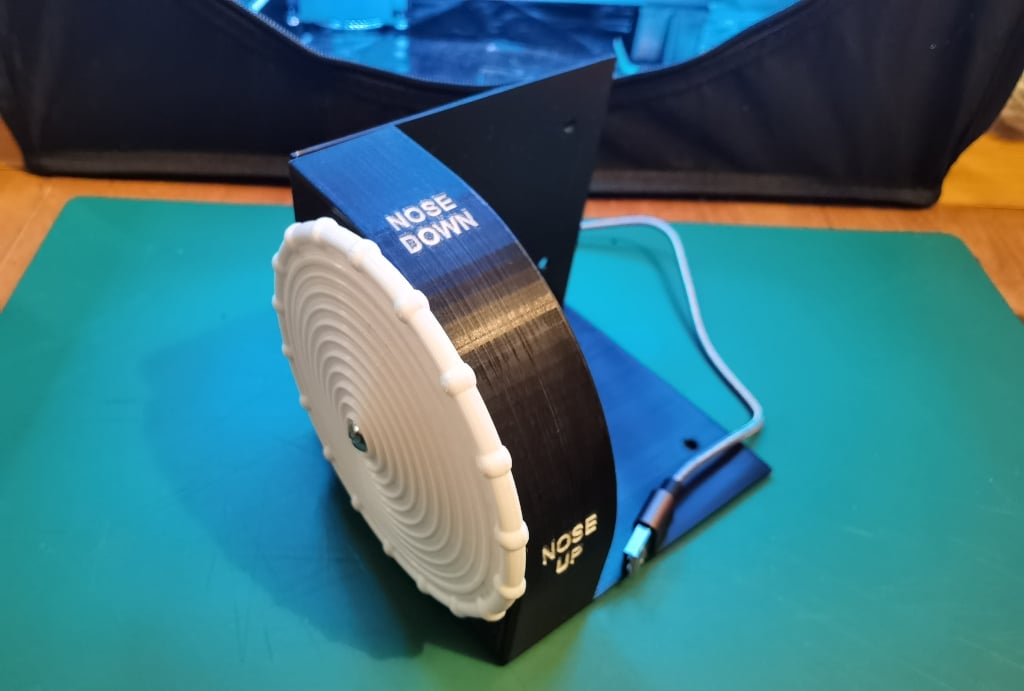
Here's a elevator trim controller for your flight simulator. I use it with FS2020 but it should also work with other flight simulators, as it is recognized in Windows (10 or 11) as a joystick type device. I wanted a robust trim wheel that fits on the Saitek throttle quadrant and also a system that preserves the axis of the encoder. The axis of the wheel and the encoder are connected by gears (ratio 1/1). This trim wheel requires an arduino micro pro or an arduino leonardo (or another compatible brand like the one I used) only compatibility with the Joystick library . I provide the code for a trim wheel configured as 2 buttons, + and -, (as on the saitek yoke) and not as a potentiometer with a MAX/Min range: this makes it easy to be compatible with the autopilot (at least for FS2020). I also provide the Fusion 360 file to adapt this trim to your needs. - EDIT 15/03/2022 : Improved arduino sketch, trimwheel_5.ino. The mount for the arduino pro micro can be downloaded here: https://www.thingiverse.com/thing:4828970. The 2 parts wheel (provided here) comes from : https://github.com/robdobsn/TrimWheel. To mount the Trim wheel on the Saitek throttle quadrant, I was inspired by the 2 plates here https://www.thingiverse.com/thing:4676615. Parts needed : - 1 Arduino like micro pro : https://www.amazon.fr/KeeYees-ATmega32U4-D%C3%A9veloppement-Leonardo-Bootloader/dp/B07FQJW2KN/ref=sr_1_3 - 1 Rotary Encoder : https://www.amazon.fr/Encodeurs-Rotatifs-Vegena-Capuchon-Raspberry/dp/B08YJZRPP2/ - 1 micro USB cable : https://www.amazon.fr/C%C3%A2bleMicro-SUNGUY-donn%C3%A9es-torsad%C3%A9-vitesse/dp/B073TSSJGB/ref=sr_1_9?keywords=SUNGUY&qid=1647122387&sr=8-9 - 1 608 bearing (skate bearing) for the wheel : https://www.amazon.fr/TRIXES-Roulements-billes-8x-Skateboard/dp/B00WXDAUQG?ref_=ast_sto_dp&th=1 - 1 M4x40 screw & 1 M4 nut for the wheel - 8 M4x10 screws to screw the case to the plates and to the Saitek throttle quadrant - 2 M3x30 screw for bearing cover - 4 M3x4 screws to screw rotary encoder and screw the cover - 6 M3 Nuts to go with the M3x10 screws How to assemble : - Print all STLs ; - Print arduino mount ; - Glue two parts of the wheel ; - Screw wheel with M4x40, add spacer out, engage in base, add bearing, add spacer in and nut ; - Screw bearing cover ; - Screw rotary encoder ; - Glues Arduino Pro Micro Mount (see pictures) ; - Wire arduino and rotary - rotary encoder CLK pin to arduino 2 pin ; - rotary encoder DATA pin to arduino 3 pin ; - rotary encoder + pin to arduino VCC pin ; - rotary encoder GND pin to arduino GND pin ; - plug USB cable and fix it (micro USB connector of arduino is very fragile) ; - Screw upper gear on M4x40 screw ; - Inser lower gear on encoder axis ; - Screw cover ; - Screw base and back plate ; - Screw your trim wheel to the Saitek throttle quadrant ; - Plug the USB cable to your PC - Use Arduino IDE to load trimwheel_3.ino in arduino micro pro ; - your PC dectects the trim wheel (names arduino leonardo or something like that) ; - you can test it after lauching joy.cpl. You must see two buttons ; - in FS2020 you can now configure the two buttons as trim nose up and trim nose down. Note : For all my flight sim peripherals, i'm using SPAD.neXt as driver and configuration interface.
With this file you will be able to print Flight Simulator Trim Wheel with your 3D printer. Click on the button and save the file on your computer to work, edit or customize your design. You can also find more 3D designs for printers on Flight Simulator Trim Wheel.