Flipper Zero Case
thingiverse
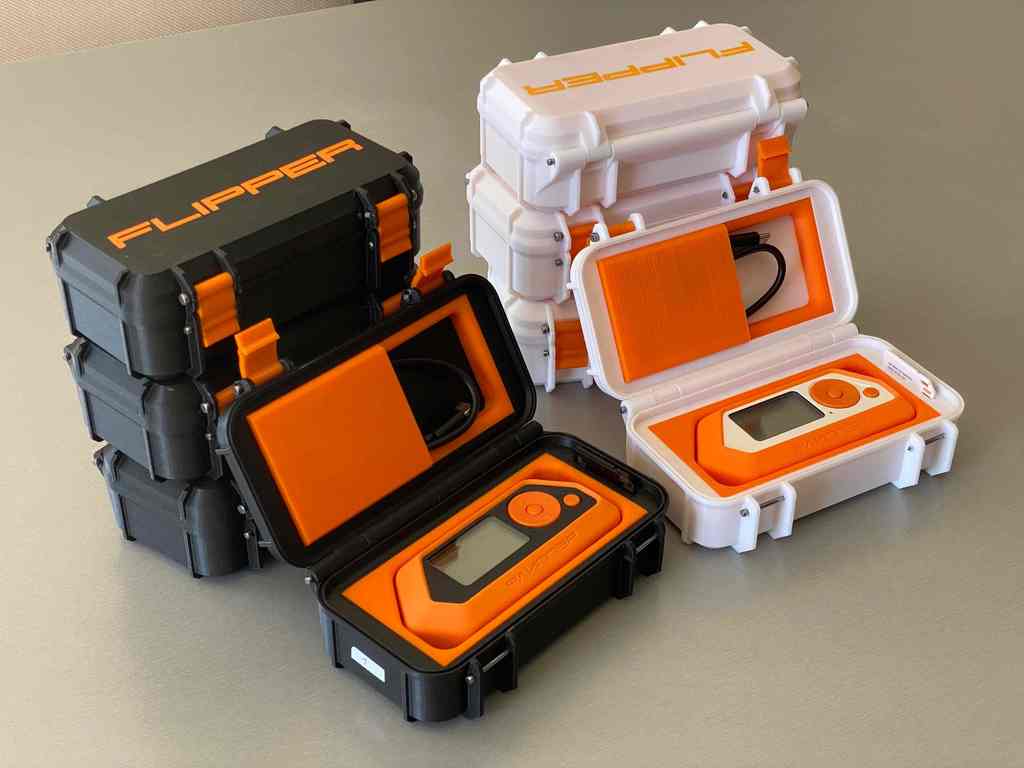
# What is it This is a pelican-like case for the awesome [Flipper Zero](https://filpperzero.one). The base (**bottom**, **top** and **clip** parts) are from [this model](https://www.printables.com/model/215066-flipper-zero-case-without-overhangs), which is a remix of [this model](https://www.printables.com/model/204882-flipper-zero-case), which itself is an adaptation of [this model](https://www.printables.com/model/39729-tool-box-parametric). # Why those parts The **bottom**, **top** and **clip** parts are - adapted to the dimensions of the precut foam included in the original Flipper Zero package - have no overhangs, allowing for support-less printing The **top** and **text** parts are made to fit together and to print a bi-color part without two extrudors. The **top_adapter_1** and **top_adapter_2** parts are made to - to fit with the **top** part - to replace the original foam, in a nice and colored way - to have room for the USB cable (and maybe other small accessories) - fit perfectly with the **bottom_adapter** and with the Flipper (with [silicone case](https://shop.flipperzero.one/products/flipper-silicone-case)) height. The flipper will sit tight in its case The **bottom_adapter** is made to - to fit with the **bottom** part - to replace the original foam, in a nice and colored way - fit with the Flipper with [silicone case](https://shop.flipperzero.one/products/flipper-silicone-case). The flipper will sit tight in its case # How to print the top parts 1. put the **text** and **top** parts in the slicer and make the **text** fit nicely with the **top** 2. keep only the **text**, without moving it, and slice it 3. keep only the **top**, without moving it, and slice it 4. print the **text** in a color (i.e. orange) 5. as soon as the part is printed, quickly change the filament (making sure the bed keeps the same temperature during the process helps) 6. once the new filament is installed (i.e. white), start to print the **top** 7. **bonus**: for the printers that have an automatic bed leveling sensor, make sure to place the text and top parts on a side, where the sensor will not make the measurement. If you don't, and if the parts are centered on the bed, the sensor will take the **text** height into account when leveling before the **top** print, resulting in a lower quality printing All parts can be printed without supports, without skirt/raft/brim. A case needs two **clip** parts. # How to assemble the parts I personnally use nails, that I cut to the right length, to make assemble all that. You can then use strong glue, or hot glue, on the cut end of the nail. - 4 nails of 2mm diameter, cut to ~2.4mm length - 2 nails of 3mm diameter, cut to ~2.4mm length Some people use 4xM2 20mm, and M2,5 with nuts and glue for the hinges ([example](https://twitter.com/zuidwijk/status/1550871549548400645?s=20&t=Mh28CeG6Hk-lbzzSSXdVqA)). # Bonus A gasket : https://www.printables.com/model/245691-gasket-for-flipper-case
With this file you will be able to print Flipper Zero Case with your 3D printer. Click on the button and save the file on your computer to work, edit or customize your design. You can also find more 3D designs for printers on Flipper Zero Case.