"Floating" 8-Inch open baffle Speakers (Full Range Driver)
thingiverse
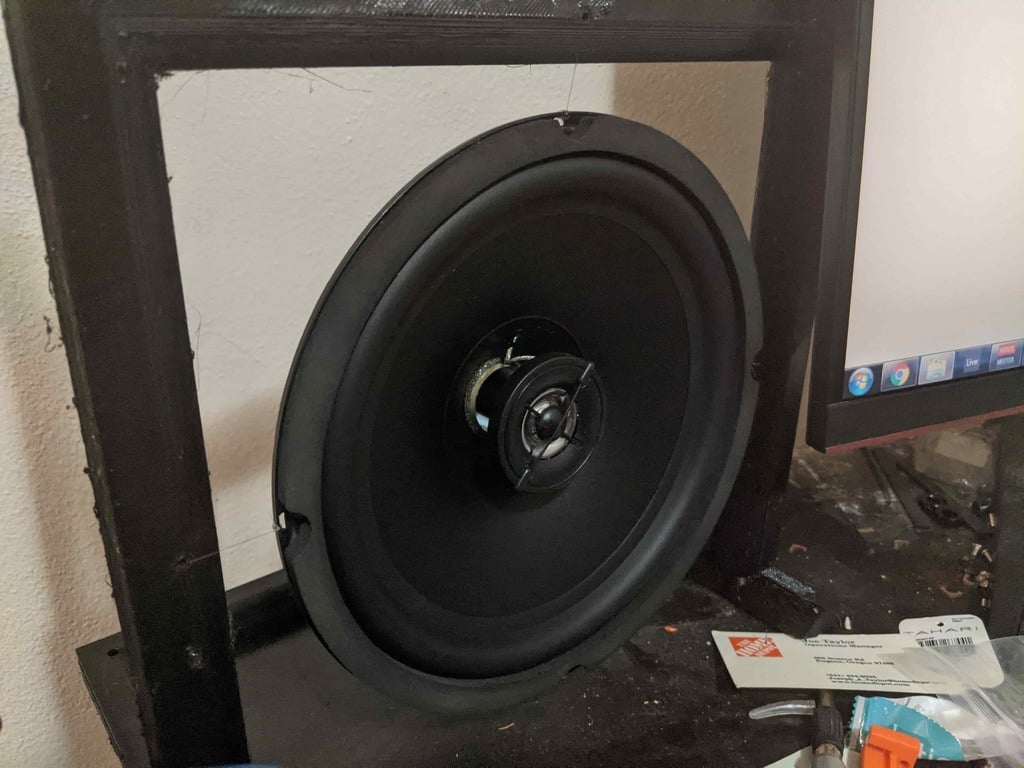
**About this design: ** This was an experiment to create a "Floating" speaker. The concept was originally inspired from the infamous $100 "Isoacoustic" decoupling stands I had used on an old audiophile system awhile back. What sets this design aside from other common open-baffle setups is that it uses fishing wire to mount the speaker instead of the traditional method of using a flat piece of MDF board. This further reduces the amount of surface contact you get that may muddy and dirty up the sound but comes at the expense of a trickier woofer installation. This frame should realistically fit any 8" woofer, although the woofer I chose has an integrated tweeter in the center, I never intended to design the frame to support a crossover-- so choose your own woofer accordingly. If you are interested, I also made another open baffle frame for a 5" woofer using a traditional tweeter crossover combination so if you want to go that route instead feel free to check it out here: https://www.thingiverse.com/thing:4756153 I designed this with my computer workstation in mind. My computer desk has a pretty limited space so I tried to make it as low profile as possible. It is only 180 mm deep which includes the front-facing feet which helps stabilize it. The frame is fairly wide at 280mm and sits 254mm tall. Although the parts are currently assembled separately, you will still likely need at a 300mm (or larger) print bed to print this model. **"Why Open Baffle?"** The overall benefit (and downfall) of open baffle speakers is that they are not restricted to moving air in an enclosed space so sound waves can travel more freely without a cabinet or surface resonance coloring the sound. The result is a open, wide sound-stage with great transient response and tight low end if you do it correctly. The downside to open-baffle is the speakers fire both directions: forward and inversely. Because of this, frequencies (particularly low-mids and the sub) begin to phase cancel each other out. How successful your results are are highly dependent on your room's shape and where the speakers are located in the room. This is why cabinet speakers are still the go-to choice for most audio products found on the market today. That is not to say that open baffle should be disregarded completely. If you have access to a calibration microphone and DSP/outboard gear, then you can calibrate your speakers to compensate for the phase cancellation issues and get a fantastic rich sound that cabinet speakers struggle to reproduce. **"How can I get started?"** For the build shown in the photos above, I used this $25 full-range woofer from Parts Express. I chose it because it was cheap for experimenting with and this particular speaker actually has some very good specs for it's price. The two woofers combined plus shipping puts the costs under $60, so the project in of itself is relatively inexpensive. But you can always upgrade to a more expensive woofer if desired. https://www.parts-express.com/Goldwood-GW-8004-8-8-Coaxial-Speaker-290-378?quantity=1&custcol_ava_item=290-378&custcol_ava_incomeaccount=General&custcol_ava_upccode=643420100747&custcol_ava_pickup=F&custcol_disableshopping=F **Hardware required** *"...for a single speaker"* 1) 8" woofer. Preferably one with an integrated tweeter - $25 2) A power-amplifier for passive speakers - (I recommend the $10 PAM 8406) 3) Fishing Wire (10lb strength or greater) - $4 4) 14 x M4 30-40 mm screws - $5 5) Power-drill - *$10...? you should probably have one of these* ***Optional. Not required:*** 6) Audio interface with 1 input phantom power and stereo output. 7) Omni-Directional calibration microphone (Recommended: Sonarworks XREF20) 8) Voicemeter Banana Software (free OSX/Windows) 9) Element LT Modular Plugin Host - *allows VST processing on main outputs* 10) Spectrum Analyzer VST - *for measuring results on microphone* 11) Parametric EQ - *to adjust for changes* 12) *Extra bonus: Sonarworks Reference 4 calibration software if you have microphone to pair with it* **Printing Instructions:** I recommend using PETG for this. I believe PLA might give a better matt aesthetic when finished but it won't be as strong and sturdy. I did perform a test print of the frame in PLA but I noticed it wanted to bend backward under the load of the woofer and tension block. I did not have this problem when printing in PETG but I modified the design anyway with a "muscle" support beam so that you should be able to use PLA still if you want. Print with whatever layer height you want. What is shown in the picture is 0.3 layer height. You might want to print on the bed hotter than you usually do since most printers tend to not have completely even heat-displacement over larger areas and this is a fairly large model. **Installation:** Once you have the frame base, overhang, support beams (if PLA), and 4 tensions blocks printed you can begin assembling everything together. Place the base at an angle to where you reach underneath it. Align the female threads of the frame overhang to the female threads of the frame base and fasten them together using 2 M4 x 30 length screws. Rest the woofer on an object to get it as close as possible to the frame. I used a large candle container for this because it was just the right height. There is only so much slack that the tension blocks can accommodate for so you want the two parts to be close together as possible during the install. Using fishing wire, thread the wire through the frame first, then through the small hole on the tension block. Tie a "snell knot" around the block or use a similar method. There are plenty of different fishing knots on YouTube that do an equivalent job. Just pick one that works for you. Drill an M4 screw into the female thread of the tension block until it is only slightly sticking out of the other end. Continue drilling the screw into the frame overhang, holding the tension block in place as you drill. The general idea is you want to fasten the screw to the frame with the tension block as close as possible so that you can afterwards "unscrew" the block outward, pulling it away from the frame and loading tension onto the wire. Once all 4 blocks are threaded, knotted and fastened to the frame, tie a knot around each of the mounting holes for the selected speaker. As you do each side, load tension on each block carefully to center the speaker to the surrounding frame. Fishing wire should support the weight pretty easily but it likes to snap when rubbing against the threads of the tension block screw so it can help to lift the speaker first, adjust tension, then release the woofer in order to minimize this. TIP: Start wiring from the top of the frame first where the greatest amount of weight is held and then position it's height. Proceed to the bottom and work on the rear tension so that the speaker is pulled upright. It can help to keep an object in front of the woofer so that it does not swing around while this is happening. Once 3 of the 4 sides are complete, it should be stable enough to not require a object to keep in place. EDIT: The threads should have enough strength to hold the load of the wire tension and the weight of the speaker. However, if you are still having issues with the block unscrewing itself somehow, the separate larger hole on the block allows you to drill an additional screw through the block and into the frame, preventing it from pivoting/rotating movement from occurring ("Locks" it). Once the frame is completed, hook up the speakers to your amplifier of choice and your open baffle speakers are complete! I highly recommend performing some DSP calibration afterward using a proper microphone to get the full experience of one of these setups. However, I will not go into those details in this description as it is quite lengthy already.
With this file you will be able to print "Floating" 8-Inch open baffle Speakers (Full Range Driver) with your 3D printer. Click on the button and save the file on your computer to work, edit or customize your design. You can also find more 3D designs for printers on "Floating" 8-Inch open baffle Speakers (Full Range Driver).