Floor lamp with shelf
prusaprinters
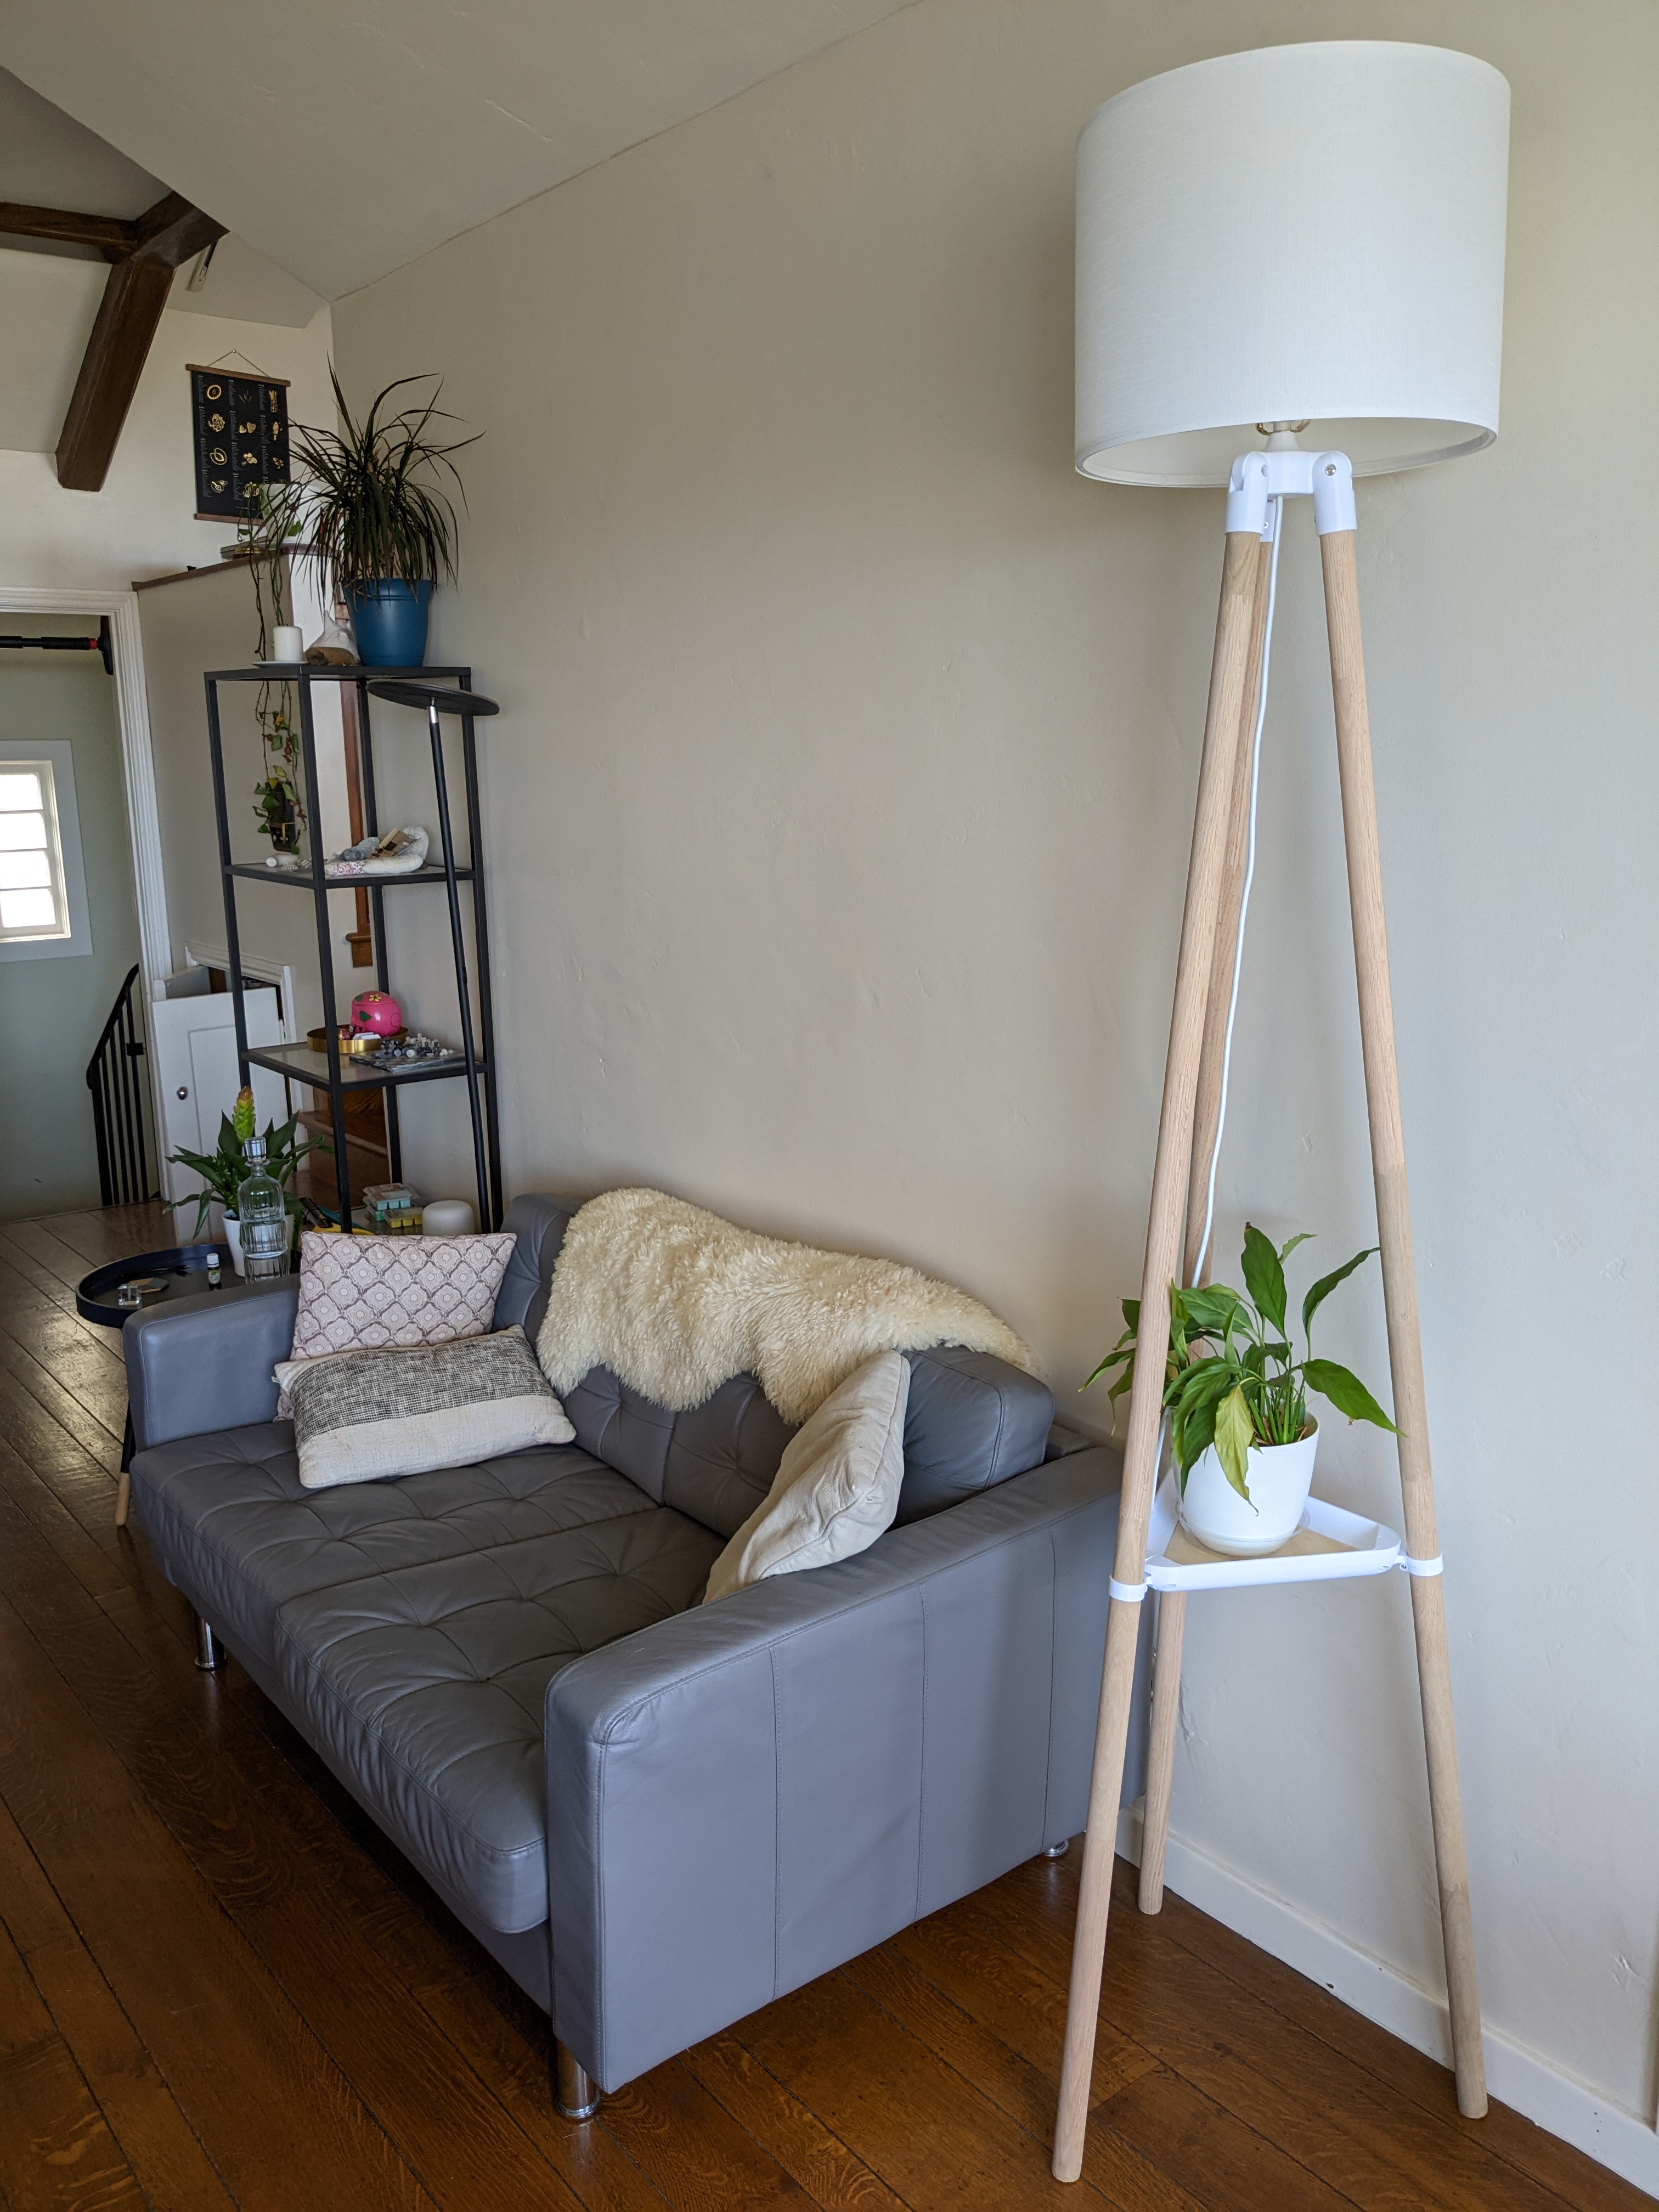
<p><i>[This project is still being actively printed, I will update this model with pictures, & upload remixes as I go through the iterative process.</i></p><p><i>Update May 13th 2022: modified shelf hinge diameter to better slide on the poles, added drawing for wooden shelf dimension]</i></p><p><strong>Undecided between a floor lamp & a side table? </strong></p><p>You don't have to choose anymore, with this amazing tripod floor lamp with a height adjustable shelf!</p><h4><strong>Dimensions</strong></h4><p>This design is fairly customizable, and parametric, so you can adjust the pole diameter, the size of the shelf, or the thickness of the wood used for it.</p><p>The current design fits in the Prusa mk3s print volume (you may need to rotate the parts to make them fit in diagonal).</p><p>Note that while the design is adjustable through a few parameters, I do not guarantee there won't be any errors, please double check that the assembly still looks good after changing any paremeter. </p><h4><strong>Materials</strong></h4><p>3D printed parts:</p><figure class="image"><img src="https://media.printables.com/media/prints/199744/rich_content/e177da3a-89ff-4e65-acd5-45c4db78f79e/pxl_20220513_183516128.jpg#%7B%22uuid%22%3A%2203be39fd-0337-4779-8102-bfd474060b38%22%2C%22w%22%3A4032%2C%22h%22%3A3024%7D"></figure><ul><li>Top support</li><li>Top support screw cap</li><li>Top hinges x3</li><li>Shelf frame side x3<ul><li>Because of how rounded it is, I've had better results printing it upside down with supports.</li></ul></li><li>Shelf hinges x3</li><li>Pole foot x3<ul><li>I'm using flexible material for this</li></ul></li><li>Router tool to round the wooden shelf angles</li></ul><p>Aside from the 3D printed parts, you will also need:</p><ul><li>3x poles<ul><li>I opted for 6ft oak closet rod (33mm in diameter).</li></ul></li><li>½" thick wood<ul><li>I used pine plywood for now but will switch for oak.</li></ul></li><li>3x M5 binding screws<ul><li>I had <a href="https://www.amazon.com/gp/product/B077C214YJ/ref=ppx_yo_dt_b_search_asin_title?ie=UTF8&th=1">these</a> on hand from a prior project. They work great for the top hinges.</li></ul></li><li>3x M3 hex screws & nuts<ul><li>For the shelf hinges holding the shelf to the pole (tightens the ring).</li></ul></li><li>3x M4 screws & nuts<ul><li>For the shelf frame assembly</li></ul></li><li>15x #6 x ½" wood screws<ul><li>M3.5 x 10 or 12mm should work too (should be shorter than the wooden shelf's thickness)</li><li>For the feet, wooden shelf to frame assembly, and top hinges to poles assembly.</li></ul></li><li>Lamp materials (you could choose different options):<ul><li><a href="https://www.amazon.com/gp/product/B089ZY6R3K/ref=ppx_yo_dt_b_asin_title_o03_s02?ie=UTF8&psc=1">Lamp shade</a></li><li><a href="https://www.amazon.com/gp/product/B0978G6VTN/ref=ppx_yo_dt_b_asin_title_o03_s02?ie=UTF8&psc=1">Lamp socket</a></li><li><a href="https://www.amazon.com/gp/product/B08L8T65R8/ref=ppx_yo_dt_b_asin_title_o03_s01?ie=UTF8&psc=1">Lamp rod</a></li><li><a href="https://www.amazon.com/gp/product/B082HJFCK6/ref=ppx_yo_dt_b_asin_title_o03_s02?ie=UTF8&th=1">Lamp cable</a></li><li><a href="https://www.amazon.com/gp/product/B08JTV8L9Q/ref=ppx_yo_dt_b_asin_title_o03_s00?ie=UTF8&th=1">Switch</a></li><li><a href="https://www.amazon.com/dp/B000BQLSHW?psc=1&smid=ATVPDKIKX0DER&ref_=chk_typ_imgToDp">Plug</a></li></ul></li><li>A router with a flush trim bit</li></ul><h4><strong>Assembly instructions</strong></h4><p>Before you start, prepare the 3D printed parts by removing the supports, cleaning and sanding them as needed.</p><h5>Poles, for each:</h5><ol><li>Put the top hinge on the end of the pole</li><li>Pre-drill the hole for the wood screw with a 3mm drill bit</li><li>Secure the hinge to the pole with a #6 x ½" wood screw</li><li>On the other end of the pole, pre-drill a 3mm hole</li><li>Screw in the foot</li></ol><figure class="table"><table><tbody><tr><td><figure class="image image_resized" style="width:90.07%;"><img src="https://media.printables.com/media/prints/199744/rich_content/c640de09-c5a3-4a37-9515-08e7ea0abe60/pxl_20220514_001859102.jpg#%7B%22uuid%22%3A%224696c9f9-faba-4e39-a030-fd9f1f082bb9%22%2C%22w%22%3A3024%2C%22h%22%3A4032%7D"></figure></td><td><figure class="image image_resized" style="width:90.09%;"><img src="https://media.printables.com/media/prints/199744/rich_content/28cc93e2-b6e5-45a9-a378-150ec624df46/pxl_20220514_002043989.jpg#%7B%22uuid%22%3A%221c44098b-c939-4b38-8d64-fb7032d936a7%22%2C%22w%22%3A3024%2C%22h%22%3A4032%7D"></figure></td></tr></tbody></table></figure><h5>Shelf</h5><ol><li>Assemble 2 of 3 the shelf frame sides and 1 shelf hinge, using an M4 screw & nut.</li><li>Repeat step 1 for the other sides</li></ol><figure class="image"><img src="https://media.printables.com/media/prints/199744/rich_content/2e934f33-80eb-4d0d-b564-193b38e03399/pxl_20220513_220214130.jpg#%7B%22uuid%22%3A%22e585bbc9-d7bd-4f38-ad57-23da02578c69%22%2C%22w%22%3A4032%2C%22h%22%3A3024%7D"></figure><ol><li>Cut the wood for the shelf to the appropriate triangular dimensions (provided in the A3 sheet)</li><li>Round the corners with the help of a router and the 3D printed tool</li><li>Sand as needed</li><li>Pre-drill the wooden shelf holes with a 3mm drill bit. Make sure<strong> not </strong>to drill all the way.</li><li>Screw in the wooden shelf to the frame using nine #6 x ½" screws<br><i>You may want to use something as a support under the wooden piece to elevate it while screwing the frame in place.</i></li></ol><figure class="image"><img src="https://media.printables.com/media/prints/199744/rich_content/be34d3f8-00b3-4b95-83e5-48255969caef/pxl_20220514_012334373.jpg#%7B%22uuid%22%3A%22d38c4919-cd49-4559-a711-c7ea9fd0c418%22%2C%22w%22%3A4032%2C%22h%22%3A3024%7D"></figure><h5>Light fixture & top</h5><ol><li>Assemble & wire the light socket to the top part.<ul><li>If you are using a lamp harp to hold the shade, or a shade that needs to be installed between the light socket and the top support, now is the time to put it.</li></ul></li><li>Wire the light switch</li><li>Wire the plug</li></ol><figure class="image"><img src="https://media.printables.com/media/prints/199744/rich_content/3802a715-4651-4e0b-a5db-fa9e1a9660eb/pxl_20220515_192854090.jpg#%7B%22uuid%22%3A%22090f6560-63de-4165-a8b7-1da23bbbe1e6%22%2C%22w%22%3A3493%2C%22h%22%3A2509%7D"></figure><h5>General assembly</h5><ol><li>Assemble the top to the poles using the M5 binding screws.</li><li>Put the M3 bolts into the shelf hinges, letting them loose</li><li>Place the bottom of each pole in its respective shelf hinge.</li><li>Carefully slide the shelf up.</li><li><i>Loosely</i> tighten the hinge M3 screws.</li><li>Make sure the shelf is level</li><li>Tighten the hinge M3 screws.</li></ol><figure class="image"><img src="https://media.printables.com/media/prints/199744/rich_content/d815a72d-bb9a-4580-878a-6287878db08b/pxl_20220514_181634289.jpg#%7B%22uuid%22%3A%2240b8c335-7229-4778-9be5-1cf8f00d9600%22%2C%22w%22%3A4032%2C%22h%22%3A3024%7D"></figure><figure class="image"><img src="https://media.printables.com/media/prints/199744/rich_content/6bb40c92-6124-4c53-8cd5-8bbe02b7f22e/pxl_20220514_213008050.jpg#%7B%22uuid%22%3A%22c066785e-138c-4218-9b01-1ebd4d41365c%22%2C%22w%22%3A3024%2C%22h%22%3A4032%7D"></figure><p><strong>Add the shade, a light bulb, plug it in, and voilà!</strong></p><figure class="image"><img src="https://media.printables.com/media/prints/199744/rich_content/462f4720-fca1-4ebd-9d40-3eb16b1ea55e/pxl_20220515_194457748mp.jpg#%7B%22uuid%22%3A%22cef4f0e6-f3f6-4116-82d6-57b6f8a45749%22%2C%22w%22%3A3024%2C%22h%22%3A4032%7D"></figure><p><i>Note: I don't actually like that shade with that lamp, which is very tall, I will probably cut the poles shorter or change the shade.</i></p><h4><strong>Further customization coming!</strong></h4><p>While not under development yet, I'm thinking about designing accessories & mods, such as a round shelf, a headphones stand that would attach to one of the poles, a screw cap with hook to hang a small plant, a built-in USB port and/or a wireless charger for the shelf.</p>
With this file you will be able to print Floor lamp with shelf with your 3D printer. Click on the button and save the file on your computer to work, edit or customize your design. You can also find more 3D designs for printers on Floor lamp with shelf.