Flowsnake Fractal Puzzle
prusaprinters
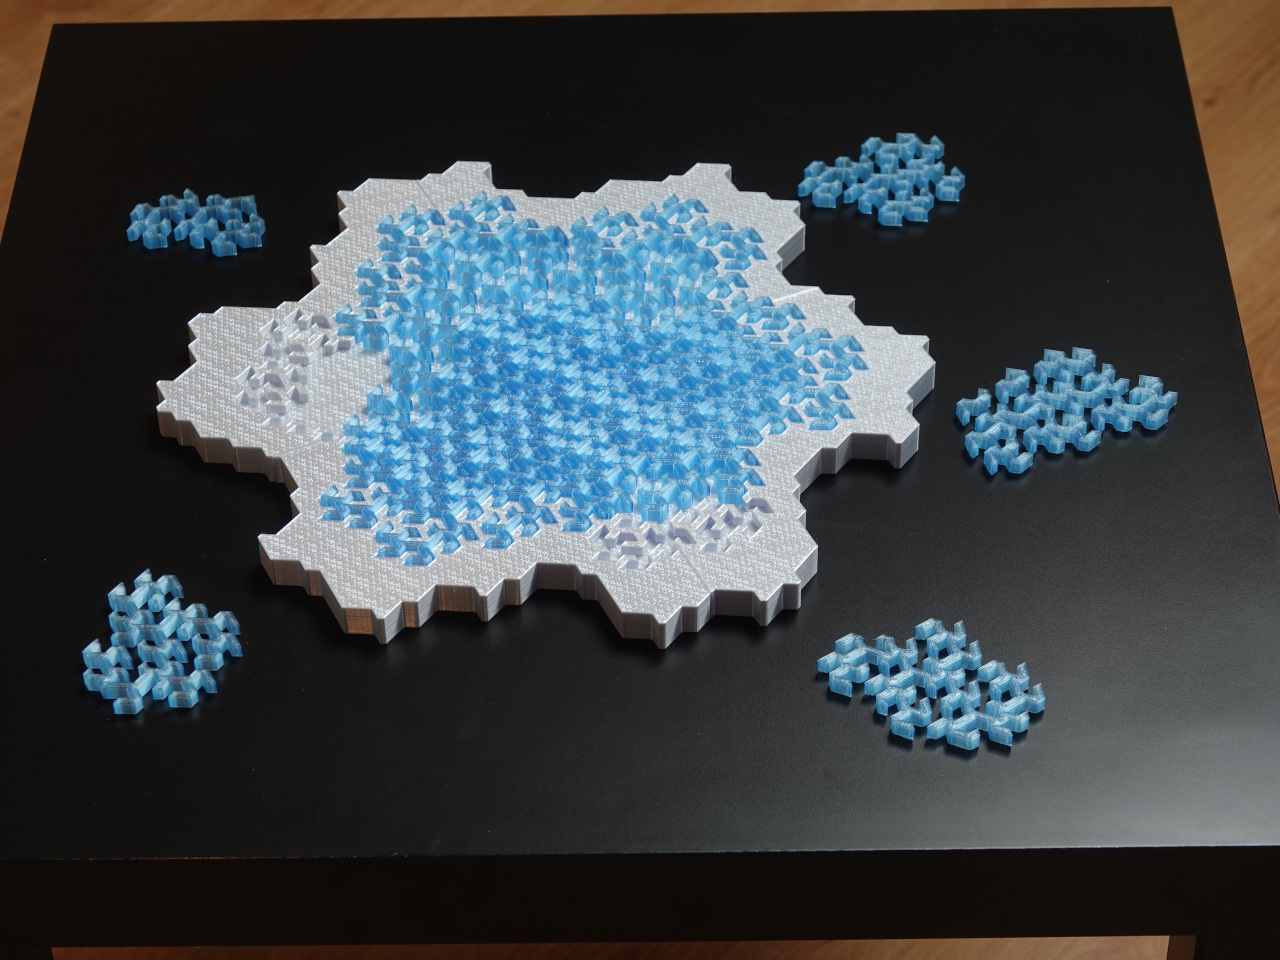
<p>This is a 12 piece jigsaw puzzle based on the <a href="https://en.wikipedia.org/wiki/Gosper_curve">Peano-Gosper curve</a>, also known as the "Flowsnake". The Flowsnake fractal creates a snake-like path that never crosses. The path fills the complete space of a “Gosper island”, which resembles a snowflake. Hence the name.</p><figure class="media"><oembed url="https://youtu.be/M-tdgNl__kM"></oembed></figure><p>Because of the nature of the fractal, the pieces interlock each other much more than in a classic jigsaw puzzle. This, combined with the apparently regular pattern that is still always slightly different, makes it much harder to solve than a regular jigsaw puzzle. In the finished puzzle, it is difficult to distinguish the individual pieces.</p><p>A border has been added such that it can be used as an inlay puzzle (*). But if you are up to a real challenge, you can try to solve it without using the border ;-).</p><p>Refer to the last picture with the colored pieces to quickly check that everything fits nicely together. Every piece should slide in position nicely without using any force.</p><p>The puzzle pieces are printed in Filamentum Crystal Clear Iceland Blue PLA to give them that gorgeous icy look. A “Flowsnake” fill pattern was used for the top and bottom layers of the white border to obtain a snowy texture that fits the theme very well. I achieved this by adding a new Flowsnake fill pattern to the PrusaSlicer software. A clear benefit of open source software!</p><p>The first version of the Snowflake border was printed in Filamentum Extrafill PLA “Traffic White”. It has a matte look. For the second version, I used Extrudr BioFusion "Arctic White", which results in a silvery white shiny look.</p><p>I added an optional black cover, allowing to store the puzzle in its unsolved state. It also gives you the option to build the puzzle in the black cover, instead of in the white snowflake border. The cover gives the puzzle a very luxurious finishing touch. Originally I intended to add white letters to the cover, but as I prefer the holographic look of the letters without the white inserts, I decided to leave them out in my version. I added both versions in the pictures above, so you can decide for yourself.</p><p>All parts are printed on my Prusa MINI.</p><p>To get a better feeling how this puzzle works, you can watch (part of) the video above.</p><p><i>(*) I asked my daughter to solve the puzzle and measure the time it took her. She almost solved it in 15 minutes (only two pieces needed to be swapped to make it fit, which I showed to her, but she would have found it quickly herself). So, I thought the puzzle was much easier to solve than expected. Later I asked somebody else to solve it and he had a much harder experience. It turns out that my daughter remembered the position of two key pieces when I disassembled the puzzle in front of her. Therefore I added three QR codes that can be printed and used as hints by scanning them with a smartphone. I also included a QR code that can be scanned to obtain the solution.</i></p><h5>Change Log</h5><ul><li>2021.09.15: Added MK3S print files with custom FlowSnake fill pattern.</li><li>2021.09.04: Updated the QR codes to obtain the hints and puzzle solution.</li><li>2021.08.31: Added puzzel pieces with flat bottom (.3mf & .stl), in case the originals don't stick to the print bed.</li><li>2021.08.18: Added (optional) black cover.</li></ul><p> </p><h3>Print instructions</h3><p>Everything is printed in PLA with 0.2mm QUALITY layer height settings and without supports. </p><h4>Puzzle Pieces</h4><p>I printed the puzzle pieces in Filamentum Crystal Clear Iceland Blue PLA. I had read on the forum that several people have had problems printing with this filament (clicking extruder), but that these problems could be avoided by <a href="https://forum.prusaprinters.org/forum/how-do-i-print-this-printing-help/beginner-consistent-problems-with-filamentum-crystal-clear-pla-on-prusa-mini/paged/2/#post-395863">printing at 230C and 69% of the speed</a>. So I printed all puzzle pieces with these settings (I manually tuned the speed down for every print). Nevertheless, after a few minutes in my first test print, I noticed the clicking extruder noise and ended up with a clogged nozzle. After cleaning the nozzle, I successfully printed every piece without any problems at all. So, I think it is important that you start with a clean nozzle to print this filament. I did not check whether the reduced speed is actually needed or not.</p><p>Note that my first test prints were done with white filament, and that looked very nice too! So, don't worry if you can't use this translucent filament.</p><p>To get the best look: </p><ul><li>Print at 0.2mm layer height. Thick layers actually enhance the snowflake look!</li><li>Horizontal shell:<ul><li>Solid layers: 1 (for Top and Bottom)</li><li>Minimum shell thickness: 0.1 mm (for Top and Bottom)</li></ul></li><li>Without infill (Infill density 0%)</li><li>Infill > Advanced > Fill angle: 60 degrees</li><li>Print the pieces upside down (hooks pointing counter clockwise)</li></ul><p><i>Note: If you have trouble keeping the puzzle pieces stuck to the printbed, you can use the alternative set of pieces in the Pieces_with_Flat_Bottom folder. They have a wider surface at the bottom, so they should stick better. I added a slight chamfer at the bottom to avoid “elephant foot” problems on the first few layers.</i></p><h4>Snowflake border</h4><p>The snowflake border consists out of four parts that can be connected via pins. I sliced it using a custom compiled PrusaSlicer version in which I added a Flowsnake fill pattern for the top and bottom layers. </p><p>I added two height range modifiers to have only 1 perimeter on the layers that have the Flowsnake fill pattern: </p><ul><li>between 9.80 mm and 10.00 mm, and</li><li>between 14.40 mm and 14.60 mm</li></ul><p>The other layers use the default 2 perimeters.</p><p>Infill > Advanced > Fill angle: 150 degrees.</p><p>You can use the provided .gcode files for the Prusa MINI or MK3S to get the FlowSnake fill patterns without having to download the source code, patch it, and compile the customized PrusaSlicer yourself. Of course, you can also choose a different fill pattern, if you want. I can imagine that flat ironed top will have a very nice look also. </p><p>Note that both .stl files and .3mf files are provided for the snowflake border files, as the .3mf files give some warnings due to unrecognized configuration values when using the regular PrusaSlicer. </p><h4>Snowflake Border Pins</h4><p>The four parts of the snowflake border are connected together using 8 pins. They are printed with 6 perimeters and 5 bottom layers to avoid any infill. No clearance has been added to the pins. Sand them down to the perfect fit, if necessary.</p><h4>Black Cover (optional)</h4><p>The black cover consists also of four parts that are connected via pins. But the four parts are intended to be glued together to get a firm lid. This is also sliced with the custom compiled PrusaSlicer to get the Flowsnake fill pattern.</p><p>All parts are printed upside down (top layer on the print bed).</p><p>I added three height range modifiers:</p><ul><li>between 0.00 mm and 0.20 mm: 8 perimeters completely fill the fractal pattern on the top,</li><li>between 4.80 mm and 5.00 mm: 1 perimeter around Flowsnake fill pattern, and</li><li>between 9.40 mm and 9.60 mm: 1 perimeter aound Flowsnake fill pattern</li></ul><p>The other layers use the default 2 perimeters.</p><p>Horizontal shells: Solid layers: Top: 7</p><p>Quality: Thick bridges: On</p><p>Infill >Top fill pattern: Flowsnake, Bottom fill pattern: Monotonic</p><p>Infill > Advanced > Fill angle: 60 degrees.</p><p>Infill > Advanced > Bridging angle: 180 degrees</p><p>Check that the bridging layer over the letters goes horizontally over the letters. This gives the nicest look if you don't insert the white “FlowSnake Puzzle” letters. You definitely want these bridging to go in the same direction for all 4 parts of the cover!</p><p>Note that both .stl files and .3mf files are provided for the black cover files, as the .3mf files give some warnings due to unrecognized configuration values when using the regular PrusaSlicer.</p><h4>Black cover pins</h4><p>The pins for the black cover are printed with 8 perimeters to avoid any infill. Note that some of the pins have to be inserted at an angle of 60 degrees. First connect the parts that have pins at 60 degrees. Then connect both halves of the cover with pins at 90 degrees.</p><h4>White letters (optional)</h4><p>The white letters are optional. I think the cover looks very cool without them! Depending on the viewing angle the letters can be darker or lighter then the main part of the cover.</p><p>The letters are printed upside down. </p><p>I inserted a color change at 2.20mm to switch to a black background.</p><p>If you decide to include the letters, they should be glued in the extruded parts.</p><h4>QR code hints (optional)</h4><p>I added four QR codes that can be scanned to obtain 3 hints and the solution of puzzle. There are two ways to print them:</p><ol><li><strong>QR_Hints_1_color_change.3mf</strong><br>Print the QR_…_background objects with the QR code facing up. <strong>Start the print with white color filament</strong> for the background and insert a color change to black at 0.60 mm. Only one color change is needed: White → Black.</li><li><strong>QR_Hints_in-layer_color_changes.3mf</strong><br>This uses the <a href="https://schlosshan.eu/blog/2019/03/02/prusa-i3-mk3-real-multicolour-prints-without-mmu/">Real multicolour prints without MMU</a> technique of <a href="https://forum.prusaprinters.org/forum/profile/55937">Rainer</a> to do a multi-color print with in-layer color changes without an MMU. It uses two virtual extruders with a manual color change when switching between the two tools. See settings in the .3mf file (e.g., Printer Settings > Custom G-code > Tool change G-code). <strong>Start the print with white color filament.</strong> Only 3 color changes are needed for the whole print: White → Black → White → Black. The QR_Hint1_background.stl and QR_Hint1_white_part.stl must be loaded together and kept as a multiple parts of the same object. Same for the other QR codes. Each part should be assigned to the right (virtual) extruder. The QR codes are printed facing down to obtain the smoothest possible surface.<br><br>I followed the advice of JoanTabb in this <a href="https://forum.prusaprinters.org/forum/original-prusa-i3-mk3s-mk3-user-mods-octoprint-enclosures-nozzles/simple-way-to-print-in-real-multi-color-without-mmu-or-layer-height-based-changes/paged/8/">forum thread</a> to leave the purged filament hanging at the nozzle after each color change. Hold it with tweezers before pushing “Yes” on whether the color is correct. Before the print head moves back to print, it extrudes some extra filament. This will stick to the purged filament if you leave it, and stick to the nozzle if you removed it. When the nozzle moves back to the print, it disconnects from the purged/extruded filament.<br><br>The result is spectacular for someone that is not used to multi-color prints! You have to look very carefully at the top side to see that it is 3D printed. That said, I think I prefer the look of the first version. It is more special with the black part laying on top of the white background.</li></ol><p>Note that the .stl files contain errors when loaded into PrusaSlicer. These can easily be fixed by clicking on the warning triangle in front of the object names.</p><p>The light bulb icons are derived from a design by <a href="https://thenounproject.com/coquet_adrien/">Adrien Coquet</a> and the arrival flag icon is from <a href="http://www.onlinewebfonts.com">oNline Web Fonts</a>.</p><h3>Building a custom PrusaSlicer with FlowSnake fill pattern support</h3><p>This section is only meant for people familiar with compiling source code and (git) version management.</p><p><i>Disclaimer: The provided patch is sufficient to produce the FlowSnake fill pattern for this project. It is not ready for merging in the regular PrusaSlicer code base. For instance, it will break the HillbertCurve fill pattern by messing around with the (vertical) scaling factors. </i></p><ol><li>Follow the <a href="https://github.com/prusa3d/PrusaSlicer/blob/master/doc/How%20to%20build%20-%20Windows.md">Step by step guide to compile PrusaSlicer from source code on Windows</a>.</li><li>Copy the latest patch from the Other Files section to the PrusaSlicer folder and apply it to the source code on a separate branch (e.g. my_add_flowsnake_branch):<br><br>cd PrusaSlicer<br>git checkout -b my_add_flowsnake_branch<br>git am Add-flowsnake-fill-pattern-for-custom-project-patch-v1.txt<br> </li><li>Compile the modified code again.</li><li>Start the customized PrusaSlicer by clicking on the Local Windows Debugger button in the Visual Studio menu. You should now be able to select the FlowSnake fill pattern from the drop down menus and load the provided .3mf files for the FlowSnake border parts without getting warnings about unrecognized configuration values.</li></ol><p>Notice the spacing_factor variable in the code. I set it to 1.5 to make the FlowSnake pattern more visible, but then it doesn't fill the complete plane leaving considerable space between the lines. If you set it to 1.0, you can still recognize the fractal pattern and it fills the space better. Values below 1.0, make it harder or impossible to recognize the pattern but still produce a satisfying texture.</p>
With this file you will be able to print Flowsnake Fractal Puzzle with your 3D printer. Click on the button and save the file on your computer to work, edit or customize your design. You can also find more 3D designs for printers on Flowsnake Fractal Puzzle.