Flsun linear rail X-Y gantry
thingiverse
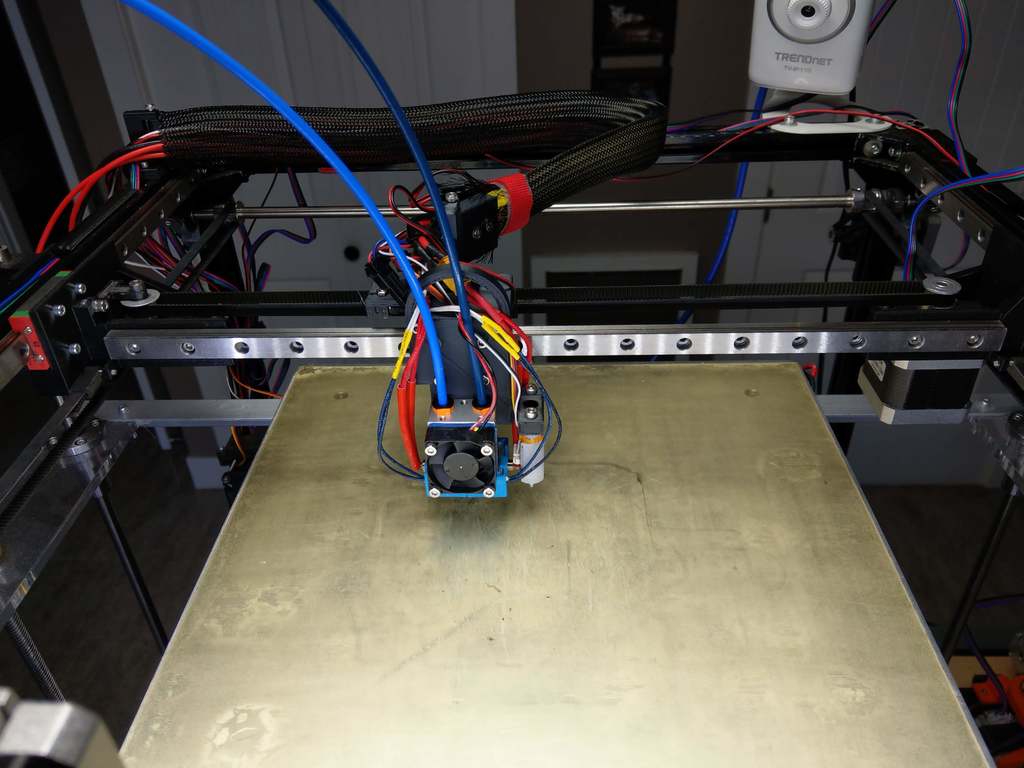
I wanted to try linear rails on my Flsun cube, but I wanted to do it in a way that kept things largely as they were originally, and not require a bunch of extra parts, other than the rails themselves. This is the result. The front and rear Y rods are still used, but the carriage travels on 3 MGN12H linear rails. The main advantage the rails provide is a massive reduction in the middle-of-bed sag caused by the deflection of the original smooth rods due to the weight of the carriage. The sag makes it seem like the bed has a bump in the middle. The linear rails allow this effect to be all but eliminated. Some other features: * The carriage is made more compact, resulting in an expanded build volume, which is 300mm by 295mm. * Adjustable X limit. * Adjustable Y limit. Since it's mounted on a top extrusion, it can can be moved easily. * Mount points for a tape chain. See https://hackaday.com/2017/12/17/diy-cable-chain-looks-great-stays-cheap/ * Hotend clamps are provided for the original E3Dv5 with a fan mount, the E3Dv6 with it's own cooling shroud, and the dual extrusion E3D Chimera * The E3D Chimera mount allows access to the heatbreak grub screws without having to remove the heatsink * All hotend bases are provided for both the original SN04 sensor, the LJ12A3 barrel mount sensor, and the BLTouch * Optional mount for a dial indicator for the E3Dv5 and E3Dv6 bases Here is the BOM. Most of the fasteners are already provided with the cube, but you will need the linear rail and the hammer nuts: * 400mm MGN12H linear rail (3) * M2 12mm (4) * M2 hex nut (4) * M3 6mm (2) * M3 8mm (28) * M3 12mm (1) * M3 16mm (1) * M3 25mm (4) * M3 30mm (4) * M3 35mm (2) * M3 40mm (2) * M3 hex nut (13) * M3 hammer nut (8) * M4 10mm (4) * M4 20mm (1) * M4 square nut (5) * X Idler (Use the one from the original kit) *Update 2019-02-03:* Made a v3. Changes from v2: * Added Chimera dual extrusion mounts * Added a second screw hole for the tape chain to avoid sagging * Made the LJ12A3 mount thinner Also, I was little underwhelmed at the quality when I first did this, but that appears to have been a material problem. I switched materials and I am now convinced that the print quality is actually quite a bit better over the original gantry. *Update 2020-04-04:* Made a v4. Changes from v3: * Added cable management rings to all the mounts * Added BLTouch versions of all the mounts * Redesigned the tape chain mounts. The motion is a lot smoother and the ends of the tape are protected from the repetitive motion * Tightened up most of the M3 holes to ensure less play in the mounting, which particularly helps with the alignment of the Chimera hotend * Added an example Klipper config
With this file you will be able to print Flsun linear rail X-Y gantry with your 3D printer. Click on the button and save the file on your computer to work, edit or customize your design. You can also find more 3D designs for printers on Flsun linear rail X-Y gantry.