FLSUN QQ-S Delta Arm Fixture
thingiverse
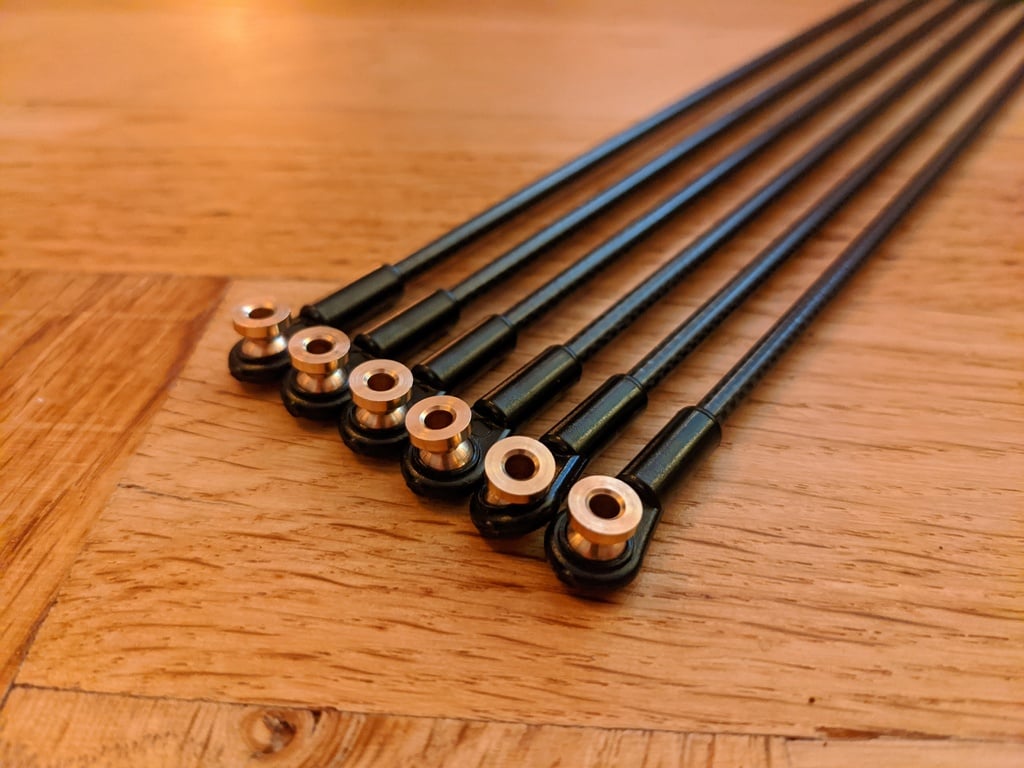
I bought my FLSUN QQ-S months ago and the original arms were of really bad quality. They were all different lengths which lead to a bad effector tilt. Therefore, with advice from friends, I started to build new arms for the printer. To help other users, I'm publishing the fixture that I built to fixate the rods while gluing them. The original arms are roughly **280mm** but the new ones I designed are **285mm** to make sure that they can reach every area. The arms were built using 4mm OD (3mm ID) woven carbon fiber rods, high quality push-rods, 3mm threaded rod and epoxy glue to keep everything steady. You should **only print one fixture** and make one arm at a time to be sure they're all the same length. **Preparations:** 1. Screw down fixture to wooden plate 2. Tap all of the push-rod ends with M3 tap 3. Cut M3 threaded rod into **25mm pieces** 4. Screw pieces of threaded rod into push-rods 5. Cut the carbon fiber rods into pieces of **exactly 240mm** 6. Put masking tape on the ends of each carbon fiber rod and push-rod. **Instructions:** 1. Mix a small amount of epoxy glue 2. Apply a small amount of glue all around to the exposed threaded rod on the push-rod 3. Stick the exposed threaded rod into one end of the carbon fiber rod. Make sure the glue doesn't go anywhere you don't want it. If so, clean it up. It's OK if it's only on the masking tape. 4. Repeat steps 2-3 for the second push-rod. 5. Once the arm is complete, bolt it down into the fixture with the screws you get with the push-rods. 6. Let each arm dry for approximately 24h before removing them from the fixture. 7. Once all the arms are done, remove the masking tape and install them on your machine. 8. Update the printer firmware with the new rod length **(285mm)** and calibrate your machine accordingly. **See all parts you need to buy below:** * Push rods - amazing quality, no slop at all: https://mpjet.com/shop/gb/ball-7-mm-dia/1287-377-ball-link-v1-type-7-mm-dia-m33-short.html#/11-colour-b_black * 4/3mm carbon fiber rods - 2x 850mm https://www.carbix.se/product.html/kolfiberror-4 * Loctite Power Exoxy https://www.clasohlson.com/se/Power-Epoxy-Loctite/p/34-8917 * M3 threaded rod Cut into 25mm pieces and used to keep everything together. * Wood/MDF plate Used to bolt down the fixture to that there is no warping. These arms have made my effector very stable and completely removed my effector tilt and the print quality _(see attached photos)_. I would also recommend that you combine the new arms with my rod braces for maximum stability. You can find them here: https://www.thingiverse.com/thing:4444440 **Have fun with your machine!**
With this file you will be able to print FLSUN QQ-S Delta Arm Fixture with your 3D printer. Click on the button and save the file on your computer to work, edit or customize your design. You can also find more 3D designs for printers on FLSUN QQ-S Delta Arm Fixture.