Flush Valve
prusaprinters
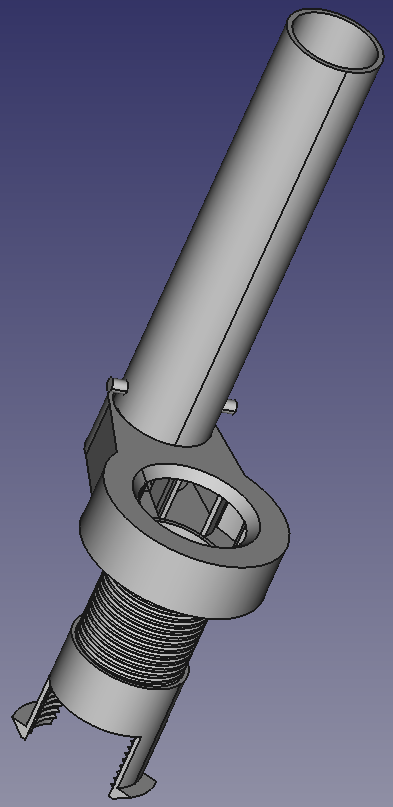
<p>This was created to replace a broken flush valve. This does not require disassembly of the tank, unlike most kits you can buy. You will still need some sealing putty, glue or epoxy, and a 2 inch flapper. I used a Fluidmaster universal 2in flapper.</p> <h3>Print instructions</h3><h3>Category: Bathroom Post-Printing</h3> <p><strong>Valve Assembly</strong></p> <p>First you need to attach the overflow tube to the small hole on the holder with the cut out going into the holder facing towards the other hole. The end of the tube should rest on the bottom of the opening in the holder.</p> <p>It is vital that two knobs on the tube are symmetrical to the hole as this is where the flapper will attach. I recommend doing a test fit with the flapper to ensure everything is lined up.</p> <p>Then glue, epoxy, or otherwise affix the tube in place. Make sure the joint is watertight.</p> <p>Next place some sealing putty on the screw side of the holder. It should be in a ring around the screw about the size of the hole in the tank the valve will sit in. Attach the barb to the screw with the barbed ends facing away. Only turn it one or two turns so the barbed ends are able to bend inwards.</p> <p>When done, the valve should look like the thumbnail.</p> <p><strong>Valve Insertion</strong></p> <p>Push the barbed ends into the drain hole of the tank until they catch on the underside of the bowl. Screw the holder into the barb until it makes a tight seal with the tank. Reaching through the opening in the holder and rotating the barb worked best for me. When done, the end of the screw should prevent the barbs from bending inwards.</p> <p>Finally attach the flapper to the overflow tube.</p>
With this file you will be able to print Flush Valve with your 3D printer. Click on the button and save the file on your computer to work, edit or customize your design. You can also find more 3D designs for printers on Flush Valve.