Flying Pest Trap
thingiverse
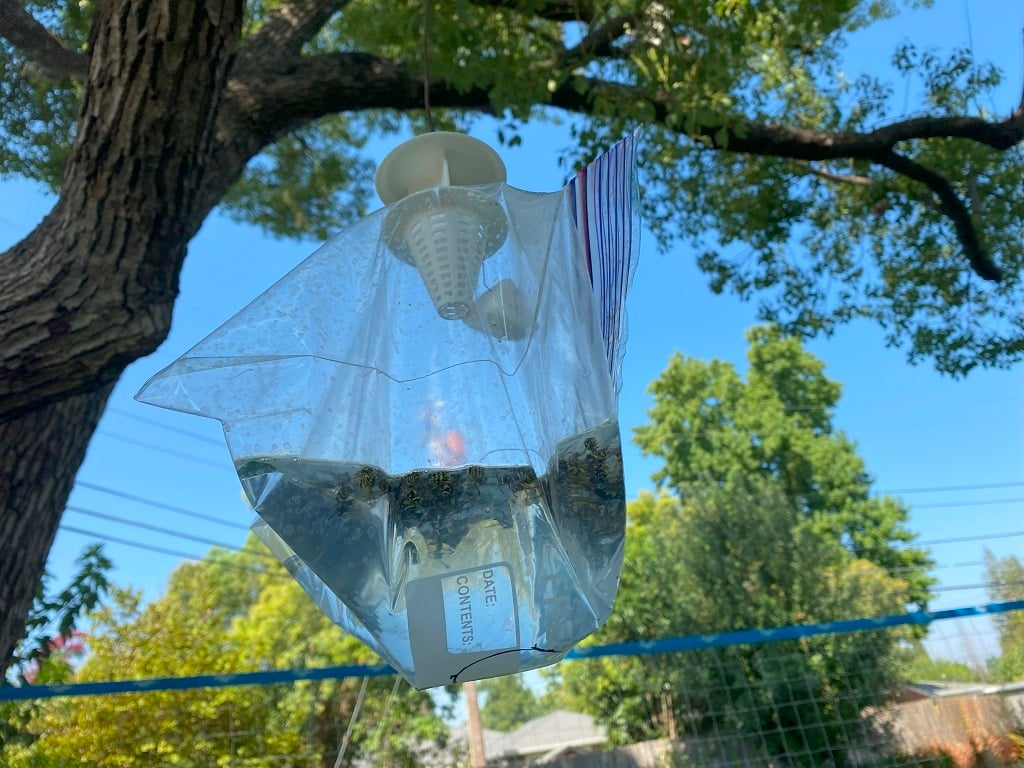
I tried several printed and commercially available yellowjacket traps to control the pests in my backyard. One of the commercial designs was clearly more effective than the rest; I designed this thing with a similar shape and size (see photo for comparison). I also noted that traps for other flying insects use the same trap with different baits. So this trap can be used for many different flying insects besides yellowjackets, provided the correct baits are used. To build this thing you will need: 1x printed top 1x printed bottom 1x gallon sized ziploc style plastic bag ~2" of thin wire (like a paper clip) ~12" thicker wire (needs to be strong enough to hang the trap with water) 1x M3 bolt ~2" double sided tape (3m VHT is best) ~1tsp dish soap ~1qt water Bait of choice To build this thing you will need to print one top and one bottom part. No rotation or supports are needed. I used PLA and it's holding up fine in 106F ambient exposed to direct sunlight. The effective traps I am trying to copy were a bright yellowish green color (chartreuse, see photo). So preferably print with chartreuse PLA to maximize effectiveness. Alternatively you can apply a coat of chartreuse latex or other plastic safe paint. Regardless, I found white PLA to be quite effective (it's what I had on hand). To assemble, start by cutting a round hole near the top of a ziplock type plastic bag that fits the large opening on top of the bottom part. Apply 1/4" square pieces of double sided tape in at least 4 locations evenly spread out on top of the bag holding flange. Push the bottom part from the inside of the bag so it is lined up with the hole, and stick it to the tape. Slide the top into the notches in the bottom, and rotate about 1/4 turn clockwise to lock in place. At this stage, give the bag a test by holding the top of the trap in one hand and pulling the bag down from the bottom, to put tension between the bag and flange (this simulates being filled with water). As you do this, look for any large gaps that may form around the top, between the bag and flange. If there are large holes here a bug might escape the trap. Do what you have to with tape, or recutting a new bag with a smaller hole etc... once you can pull the bag and keep a decent seal on top, move on with the rest of the assembly. Next make a bait hook by bending a ~2" piece of wire into a modified question mark like shape (see photo). With some manipulation the bent wire should fit through a hole in the bottom printed part and lock into a hole above, as shown in the photo. You may need to play with the shape size of the top bend a bit to get a good fit. I did play with adding a hook, but that required supports and also meat baits can get stuck after drying out; then you break off the hook trying to remove the bait. Next make a wire hook or loop to hang the trap. There is a hole on top that can fit an M3 bolt, which you can tie your hanging wire to. Alternatively, what I did was take some steel bailing wire, cut the end with wire cutters, and bent the very tip at a slight angle such that the sharp edge of the cut can catch on the side of the hole. Then I inserted the bent end all the way into the hole. This takes a decent amount of force and twisting a bit as it goes in. I used this method on several traps which have lasted months in 100F+ weather, direct sun, with just PLA. For additional security (if it ever falls), you can scoring the wire, and heating the end to soften the plastic after inserting it, then hold it still until it cools. Now load the trap... open the bag zipper, add about 1tsp of dish soap. Holding the trap upward, fill the bag with water to about 3" depth. Place your bait on the hook, and close the bag zipper taking care not to get your bait wet in the process. Now hang the bag wherever you like, and before long you may enjoy a more pleasant environment (less infested with pests anyways)! After either the bait is no longer working, or the bag is starting to smell too much like rotting corpse, it is time to maintain the trap. Simply open the zipper, dump the soap water and insects (this makes great fertilizer BTW), rinse and repeat. How often you need to maintain will depend on the bait used and how successful the trap is. Usually I maintain them after the bait becomes ineffective. The soap water bath will still be effective even with a considerable amount of bugs floating on the surface. Tips on bait: For some traps, I placed cotton balls inside that were soaked with commercially available yellowjacket attractant. This is very effective for about 1week, before the attractant needs to be replaced. On others I used white chicken meat. This attracts yellowjackets as well as house flies. For yellowjackets, I found using meats requires rebaiting every day or 2 (they become less interested after the meat gets rancid). I also noticed house flies are far less picky... I left a stale meat trap out for weeks, and the flies kept entering long after the bath started to stink.
With this file you will be able to print Flying Pest Trap with your 3D printer. Click on the button and save the file on your computer to work, edit or customize your design. You can also find more 3D designs for printers on Flying Pest Trap.