Flying Scooters Working Model
thingiverse
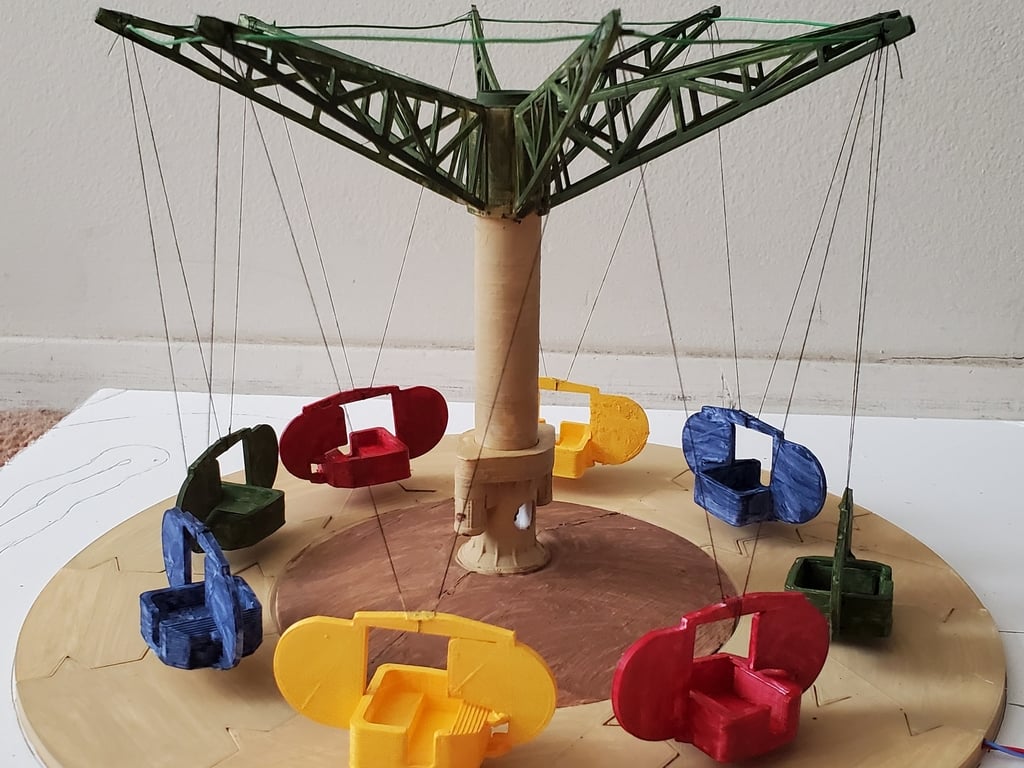
This is a model of the Larson Flying Scooters you might see at some parks around the world. Based on publicly available information, this functional model uses a motor that can be found here: https://www.amazon.com/NW-Planetary-Reducer-Torque-Gearbox/dp/B07DCLL82G Although it's a slightly different motor, just cut off the tabs. If you want a static model that still turns, follow the instructions in the title section. Below are the pieces and quantities needed to print: FS ground tile.stl - 10 of these flat pieces surround the ride and act as the ride platform. These puzzle-like pieces need to be printed. FS channel R ground tile.stl - This specialized tile allows two wires to travel under the platform into the center to power the motor. Print one of these flat pieces, which goes to the right of the wire. FS channel L ground tile.stl - This is the other end of the specialized tiles with a cutout to allow the wire to pass through but still close properly. Print one of these flat pieces, which goes to the left of the wire. FS tower foundation.stl - This is the largest piece of the model and for those with smaller printers, using MechMixer to split it up into pieces that can be printed is suggested. The large piece goes in the center and has a channel for the motor wires to go. You'll still need to print this even if you're not making a motorized model. FS tower base.stl - This is the base of the tower where your motor can go, but you'll still need it without one as well. Print one of these pieces. FS tower.stl - This is the main tower of the ride. Nothing much to explain here. If you're using a motor, press-fit the bottom onto the motor so it's standing on top of the base. Do not glue. Print this piece vertically. FS tower cap.stl - This will keep the tower in place. Slide this over the tower and glue at the corners making sure it doesn't touch the tower where it will rotate. Print one of these pieces. FS arm hub.stl - This is the piece that will slide onto the top of the tower. Slide it on and glue it in, but not in the 8 slots on the side. On top is best. Print one of these pieces. FS arm.stl - These are the arms of the ride. Print these as flat as you can and avoid warping. Slide these into the slots on the hub from earlier and glue. Sand if necessary. Print eight of these pieces. FS car.stl - These are the cars for the ride. Nothing complicated. Print eight of these flat pieces. FS wings.stl - These are the wings of the cars. Print these flat and glue them to the cars perpendicularly. They only go on one way. See the photo for help. At this point, you should get some sewing string, tie a knot behind the flat section on the wing piece (about center of the gap), and carefully string them up in a V-fashion to the arms. It's a bit tricky, but make sure they're centered from above and also have something under the cars meanwhile so that when they are in they're not touching the ground. Paint as your heart desires. Happy printing! If you have any questions, feel free to contact me on Instagram: @coaster.labs
With this file you will be able to print Flying Scooters Working Model with your 3D printer. Click on the button and save the file on your computer to work, edit or customize your design. You can also find more 3D designs for printers on Flying Scooters Working Model.