Flysky FS-I6 Mod - New Shell - Antenna Mod - 18650 Battery - Fusion File included
thingiverse
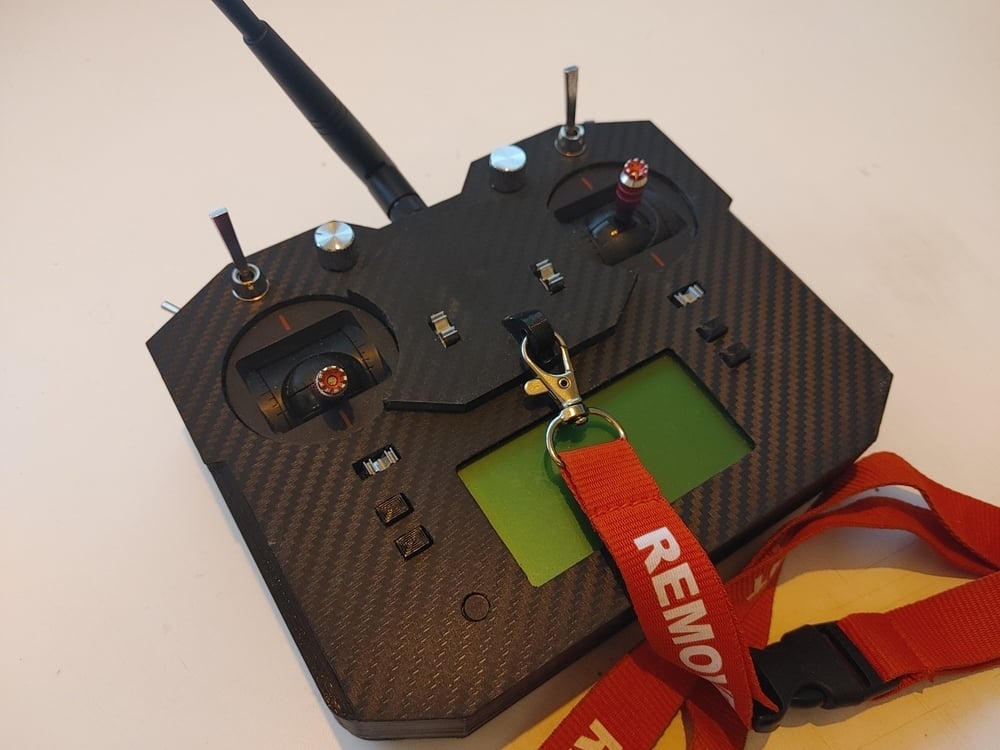
I didn't like the feel of the Fs-I6 and always wanted a cool frsky one. So I designed a new shell for my Flysky FS-I6. With my design you have the look and feel of the FrSky taranis x7 Radios, while being able to use cheap flysky receivers, on the cheap. + Antenna Modification replace one original antenna with an high gain SMA 2.4GHz Antenna. Don't turn you transmitter on without the antennca screwed on. It will damage your transceiver. Banggood Link: https://bit.ly/3aXV1Lt +18650 instead of AA-Batteries The FS-I6 runs on about 5V +-1. You can use any 18650 and charging circuit you want. I recommend using marketing gift power banks. Just disassamble and put it in the right grip. (Some plastic cutting on the gimbals may be required) +Switches and Potentiometers I intentionally didn't make holes for the switches and pots because I think it is highly personal where you want your switches to be. Just drill or use your soldering iron to make the holes where you want them. Items your need 6x - M3x6 inserts 4x - M3x10 bolts 3x - M3x6 buttonhead bolt 1x - 18650 battery with charging circuit (see above) 1x - Ipex to Sma connecter and antenna (see above) glue - Epoxy or hot glue (hot glue is strong enough even in the sun) Order of Installation (kinda important) 0 . Preparations - If you want to wrap your front. Do it now. I used cheap carbon fiber vinyl. It already lasted one season and shows no signs of failing. - press M3x6mm inserts in the holes in the top shell where the bottoms shell will screw in. The holes are noticeably larger. - make the holes for your buttons, potentiometers and !!power button!! - disassemble your transmitter (obviously) - cut your battery leads and solder them into your 1850 charging board 1. Top Plate - screw in your strap hook if you want it - glue the top plate to the top shell - install buttons and pots - install the sma-connector in the recessed hole in the top - screw the center trimming buttons in the lower mounting holes - glue the Gimbals in (be careful that you don't switch them up) - glue in the internal, original Antenna on the recess(pictures) - lay the buttons-pressers in the holes in the top shell - screw the mainboard (slow and steady you screw into plastic here. Be careful that you don't short out anything with the screws.) - plug the buttons, pots, antennas, gimbals, trim-pcb 2. Bottom Shell - glue the grips on - mount your 18650 battery in the grip of your non-throttle gimbal ( you may need to cut some unnecessary material.(test fit against the top shell to see if it really fits. It's a tight fit.) - glue this trainer port pcb in - glue your accessory plate in (you can also it with some double-sided tape or velcro if you want to access this in the future.) - close it up and screw in the 4 m3x10mm bolts. - screw in the lower charging plate - good job you now got an awesome radio with premium features on the cheap. If you want to improve your radio even more you have to check out Firmware upgrades for your FS-I6. Have Fun! If you have any questions or comments feel free to post them. I'll try to respond to them as quickly as I can.
With this file you will be able to print Flysky FS-I6 Mod - New Shell - Antenna Mod - 18650 Battery - Fusion File included with your 3D printer. Click on the button and save the file on your computer to work, edit or customize your design. You can also find more 3D designs for printers on Flysky FS-I6 Mod - New Shell - Antenna Mod - 18650 Battery - Fusion File included.