Folger Tech i3 2020 Nema 17 Extruder Mount (El Scorpion)
thingiverse
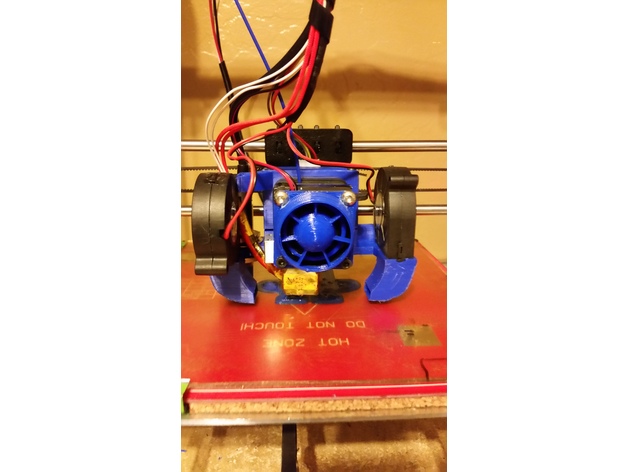
Version 1 in pictures is WHITE.Version 2 in pictures is BLUE. I haven't found the time to replace it in RL but you can be assured it works, I tested the fit on a Z-axis motor and it is oooooooooh-soooo-nice. All other important dimensions are coincident with the earlier version so I feel safe posting this now. EDIT: I finally stuck it on... went on the motor perfectly; though I had to file out the 18mm diameter probe hole a tiny, TINY bit. I had to move the heat-block and throat back up almost all the way to the extruder as the fan ducts no longer go sooo low. So you can disregard moving the hot end down. I keep the instructions here just so newbies like me have a reference in case they need to make an adjustment. Looks pretty good. I'm happy with it. If you are like me and so many others you (already did or are doing now) shopped around for upgrades to your printer BEFORE you bought one, had a list and made your decision on what to buy based on your upgrade options, bought the thing, put it together and started printing all your upgrades. I had a heck of a time finding my footing at first and the cooling/proximity probe mount points are pretty major aspects I simply could not fix without spending a bunch of cash and just replacing the extruder with a higher quality one... on a printer I just freaking bought. And even if I bought a better extruder I still needed to print new parts for it... so I made dun dun DUN!!!!! El Scorpion.... This part will help you if you are getting ready to print Toranado parts OR just want something that works. This is an extruder mount for the Folger Tech i3 2020 direct drive extruder. I remixed this from 2 other "things", the Dual Blower/Radial Fan Duct Mount (Tevo Tarantula) bysupasorn and a proximity probe mount for the nema 17 direct drive extruder that I can't, for the life of me, find anymore to give credit to (SORRY YO). Either way, I had to almost completely remake the whole thing because the dimensions were all wrong or the walls were too thin or this, that; the idea was spawned from these two things and the fact that the Folger Tech i3 2020 direct drive extruder is difficult to find "accessories" for because of the limited mount options... that I found, anyway. I had a cooling fan hitting below the nozzle from the front but found that my printed walls were not very smooth as cooling from one direction was not even as the y-axis moved the bed back and forth; the layer being laid down in the +y direction would not get any cooling but the layer laid down in the -y direction would get a bunch. After I made the first prototype (WHITE ABOVE) my prints looked uniform and good at 0.1 layer height with .4mm nozzle. Even if you don't use this puppy I highly recommend using a 360 fan duct or some other multi-angle blower. The original dual blower duct fan thingy was awesome because both fans were bringing in air from the outside as they faced away from each other. The El Scorpion is made for the following accessories: 2 50mm BLOWER fans 1 18mm proximity probe Requires no hard-points as it mounts directly on the nema 17 motor. I guess you can use this on any direct drive extruder where the nema 17 faces forward. The El Scorpion uses this hardware to fully construct: 4 50mm 3m socket cap screws 4 3m nylock nuts 2 small screws to mount each of the blowers (1 each) even though it is a snug fit into each duct The fans plug into the ducts pretty snug but will line up with the anchor points differently so you will have to drill a pilot hole for each screw (I left plenty of room for error on each anchor point) but this is really a 30 second job and 2 screws in your junk drawer or misc screw bucket. Whatever works just don't crack the PLA. Yeah, I used PLA for its stiffness because of the proximity probe. This puppy will keep it stable and unmoving. ***The X-axis end-stop (which I keep on the right-hand side) will need to be moved to the upper 8mm smooth rod and then bent down at an angle to allow the carriage to hit it. Also, remove the two screws holding the end-stop to the 8mm rod clip, move the pcb up one hole and screw it on tight; 1 screw is all you need anyway 8) Yeah, that's about it. In the original design I had to "bend" the nema 17 bracket apart to slide it on and then it would break. So now we have this puppy. Print Settings Printer: Folger Tech i3 2020 Rafts: No Supports: Yes Resolution: .1mm Infill: 60-100 up to you Notes: PLA for stiffness. Triangle supports at 4 or 5mm. Print the LOWER part up-side up. Print the UPPER part up-side down. Make sure the support Z-distance is at least 0.2mm as any less and you will have a heck of a time removing the very little support INSIDE the fan duct. The print at 0.1mm layer height takes a while, but it looks soooooooo good. Take your time removing the supports. I used an exacto knife and needle-nosed pliers.... gently now. YOU DON'T EVEN HAVE TO REMOVE OR UNBOLT THE EXTRUDER TO MOUNT THIS!!! BLAHAHAHAHAHAHAHA!!!! Take a breath, yeah I know it's pretty awesome. HOWEVER, the ducts go pretty low from where the original nozzle lays on the vanilla setup.... sooooo upon mounting El Scorpion you will need to remove the fan and heat-sink in order to get to the block to loosen the set screw that is holding the heat-break (throat) in place in order to lower it to its LOWEST POSITION POSSIBLE. So here's what you do: ***These instructions are for novice makers like myself that are new to the 3D printing game and have a Folger Tech i3 2020. Please don't be offended at how simplistic, basic, or even childish the instructions are.... I wouldn't care anyway 8) *We are starting off with a COLD hot-end here, people, we aren't barbarians*** Pull the 2 screws at the bottom of the fan, the block is only being held up by the filament inside the heat-break at this point, don't worry it's not witchcraft. Cut the filament above the extruder, squeeze the extruder button thingy to release the filament and pull the block away from the extruder. Heat the hot-end to PLA-melting-temp and pull the filament from the throat (USE ALL PRECAUTIONS TO KEEP YOURSELF FROM GETTING BURNED AND YOUR BED DAMAGED OR ANYTHING ELSE GOING UP IN FLAMES!!). Cool the hot-end... use the fan 'er sumtin. 5.Loosen the set screw holding the throat to the block (AND BY BLOCK I MEAN THE BIG PIECE OF METAL THAT WAS SCREWED TO THE MOTOR, NOT THE PIECE THE NOZZLE IS CONNECTED TO). Looking through the top of the block, lower the throat to its lowest point where the set screw still hits the throat and then screw the set screw in tight with an eye on the orientation of the heat-block (nozzle piece). If you leave the heat cartridge wires on the left they will come up and behind the left-side blower anchor. You'll see. Without attaching the heat-sink and extruder-fan, put the screws back in the block and put a few turns on them to lock the block into a height. Now look at where the bottom of your nozzle lays in comparison with the fan ducts. You want the bottom of the fan ducts to be slightly ABOVE the bottom of the nozzle.... or your ducts will crash into the bed and into all of your prints and bla bla bla. If you need to adjust the throat position then do yo thang. DON'T FRET ABOUT THE BLOWERS HITTING THE NOZZLE AT THIS POINT. DADDY HAS YOU COVERED. JUST KEEP GOOOOING, JUST KEEP GOOOOING. Pull the screws and use the Kapton tape that came with your printer to wrap the block attached directly to the nozzle. You want to wrap the block and just below it without getting too low. Put the screws back into the block and a couple turns into the motor, no heat-sink or fan, feed some filament through and get it into the throat and down to the nozzle. Pull the screws and put it all back together.... tight. Now your nozzle is at the correct height in relation to the fan ducts. All you got to worry about now is the proximity probe. Here's a couple suggestions, yo. When I upgraded to 24V the proximity probe had a much greater range than when it was running off 12V. That's a fact, jack. Make your adjustments with the probe and spec out your shizzle. Now El Scorpion is your ally. I really hope this "thing" makes being a maker for someone else a little easier, like all the "things" I've printed that have aided me. Have fun, guys.
With this file you will be able to print Folger Tech i3 2020 Nema 17 Extruder Mount (El Scorpion) with your 3D printer. Click on the button and save the file on your computer to work, edit or customize your design. You can also find more 3D designs for printers on Folger Tech i3 2020 Nema 17 Extruder Mount (El Scorpion).