Folger Tech Sliders and Carriage Remix for Limit Switch Micro Adjustment
thingiverse
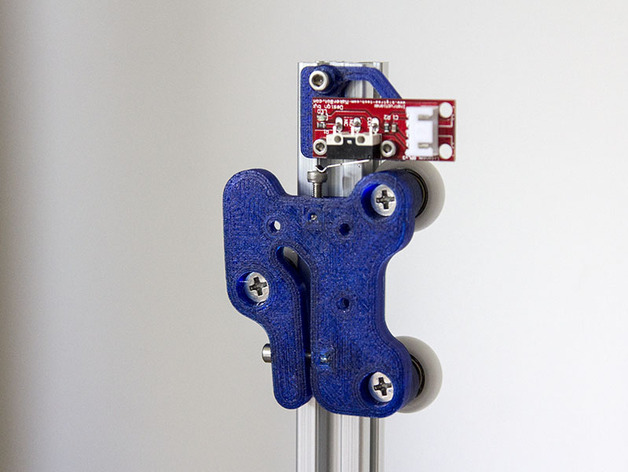
The main reasons I modified this design were to add a micro-adjust screw to the top of the slider and be able to adjust the diameter of the holes slightly. This is my first Delta build, but having a micro-adjust screw on my Prusa printer seems to be quite handy, and this looked like an easy change. I dipped down the top middle of the slider to add the M3 adjustment screw without losing any or very little height. If you have the screw even with the top of the slider, you lose no height. I added an optional slider with one side flush that is mirrored so the side with the wheel is opposite the limit switch circuit board. This should allow that side of the carriage to ride over the limit switch circuit board and give you a little extra height. It's there if you want to try it out. You might have to add 1-2mm in height to the base of the slider for a comfortable miss of the limit switch board. After about 50 hours of printing, I had a problem with the belt causing a motion issue with one of the carriages as it moved up and down. It may have been that it picked up some plastic debris over time that caught there, but I don't like the right side of the belt touching the right clamped side as it moves. I'm redoing the carriage design to give 2mm more clearance for the belt to pass through, which should miss rubbing against the wire-tied bottom belt. For the top-right belt connection, I'm using a self-locking belt clamp in the carriage. I might try the flush-top slider since I have to take this apart anyway. Looks like that should work after looking at it assembled. The 3xsliderv2_Mod_Rev10.stl file shouldn't change any of your Delta geometry from the original, and you should be able to use any carriage with the same hole patterns as the original. I traced the original STL files from Folger Tech using a workflow of converting STL files to DWG using TurboCad Deluxe and working with the DWG files in DraftSight Pro. Then I used OpenSCAD to create the final 3D model from dimensions and polylines I derived from DraftSight. This part could probably be used for other Kossel 2020 Deltas, but it was created to be used with the Folger Tech Kossel 2020. There's a test print I would recommend printing first to test whether your printer prints the holes and nut traps the correct size. If it doesn't, you can change the associated variables in the OpenSCAD files to the numbers that work for you. To create a new test part, change the variable TestCutON = 1 in the 3xsliders2_Mod_Rev10.scad file. For the slider, I changed the top spherical connection at the wheels to a conical cylinder as that seemed like a better connection at the wheel bearing than the less surface of the sphere. In the wheel holes, I tapered the hole at the correct height for a better print and better length fit of the M3x20 flat-head screws. I modified the inner cut at the top to allow for a longer limit switch adjust screw if needed. I started the rounding higher on the single-wheel side above the wheel adjustment screw so the screw head would be on a flat surface. For the Jamb Nut slot, I added a little hole on the bottom so I could retrieve the nut by pushing a small Allen wrench through to push the Jamb Nut out. I got tired of trying to get that nut out, so I'm glad I made this change. The hardware I used was: Original 3x M5x25mm Countersunk screws for the Wheels, M3x22mm cap screw for Wheel Tensioner instead of the original M3x20mm screws, M3x12mm cap screw for the Micro adjust screw, M3 Jamb Nut for Micro adjust and Wheel Tension screw. Original 2x M3x20mm screws to mount top of carriage, and M3x12mm cap screw to mount bottom one side of carriage. Here's a link to the limit switch holder I'm using with this design: http://www.thingiverse.com/thing:1673347 Let me know if you have any problems with this design. I'm new to Delta-style printers and haven't finished putting this Delta together yet, so something may change with this as I get further into my build. To get a little more height, I might be able to angle the limit switch out using this idea: http://www.thingiverse.com/thing:1161094 if I can miss the belts. I won't know that until I put the belts on.
With this file you will be able to print Folger Tech Sliders and Carriage Remix for Limit Switch Micro Adjustment with your 3D printer. Click on the button and save the file on your computer to work, edit or customize your design. You can also find more 3D designs for printers on Folger Tech Sliders and Carriage Remix for Limit Switch Micro Adjustment.