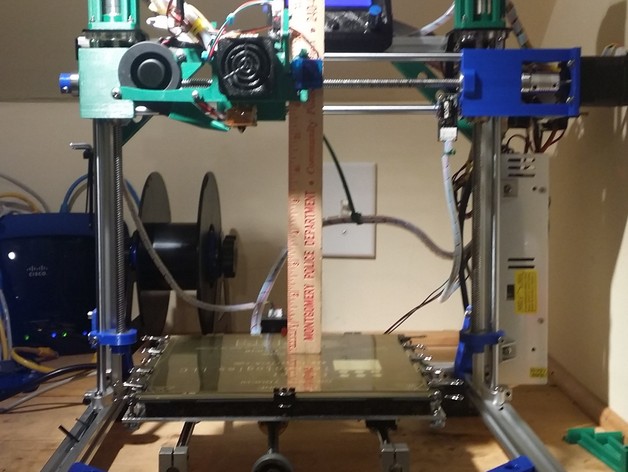
Folger Technologies i3 2020 Full Lead Screw Upgrade on all axis

Folger Technologies i3 2020 Full Lead Screw Upgrade on all axis

thingiverse

Folger Technologies i3 2020 Full Lead Screw Upgrade on all axis. 1st Thanks to GarRemMash (http://www.thingiverse.com/GarRemMash/about) for the original Z & X kit. This kit got me thinking of that all that was needed was to add the Y Axis to make full lead screw machine. The result is a full 190 x 190 x 180 mm print area. This upgrade is not for the novice. The upgrade just about takes the whole kit apart, re-squares and re-assembles; please plan ahead accordingly. Check your parts, parts lists, and be sure you have everything (else you'll be borrowing a friends printer for parts) ** Do this upgrade at your own risk, for additional support join the Folger Technologies Facebook page: https://www.facebook.com/groups/Folgertech3dPrinters/ Videos in action:https://www.facebook.com/James.M.Beam/videos/10207023617811768/https://www.facebook.com/James.M.Beam/videos/10207034929934564/ Important note: The lead screw drive limits build speed to a nominal 50 mm/s travels / on some parts you can go to 60 mm/s. I have tried going above with very mixed results. For example, I have had some parts do great at 75 mm/s where others will skip and fail. If you have ANY reservations about this upgrade I definitely do not recommend it. Print Settings Printer: Folger Tech i3 2020 Alum Rafts: No Supports: No Resolution: 0.2 mm Infill: 100% for rigidity Notes: I used ABS for most parts; however, PLA will work just fine. Post-Printing General Notes Be sure to trim & edge parts, as well as test fit before major disassembly. I found keeping the steppers at the top, with the extensions, with the 608ZZ bearings, then on the lower plate side adding a thrust bearing, then a collar to clamp the screw the best way to stop the flex coupling from stretching (in fact with this setup, it cannot). It's more expensive (and time consuming to setup); but, I get great 0.2 mm layers every time. This also solves a lot of the bed leveling issues too as Z is locked (does not change with up / down movements). Assembly for the Z-Axis setup needs thrust bearings installed in this order:: Stepper motor Extension mount Flex coupling 608ZZ bearing mount plate thrust bearing collar to clamp When installed correctly, the flex coupling will not expand or contract with Z axis movements adding more accuracy to your prints. Here are few photos of prints made with this setup: https://www.instagram.com/p/BMPxU5_hMjh/https://www.instagram.com/p/BMHpq-6hyvj/https://www.instagram.com/p/BLziwdxhaWt/https://www.instagram.com/p/BLpxrsVhaCo/https://www.instagram.com/p/BM33Nh_BFI1/https://www.instagram.com/p/BLXHkCdBe9f/https://www.instagram.com/p/BJVjv2-BPqR/https://www.instagram.com/p/BJUYjxiBbJb/https://www.instagram.com/p/BIxpfAuBc5m/ How I Designed This Benefits I see are: 1) increased accuracy & precision the lead screws have no play & move more with each rotation than a GT2 belt Igus bearings add to the above able to get +/- 0.05 (or less) dimensions on a 20 mm test cube 2) less ringing in the layers, lead screws are quieter/less vibration than a GT2 belt 3) allows for heavier "ends" so one of my plans was to add a laser cutter option or even a mini-mill via a Dremel with a flex shaft to the cutting tool 4) bonus feature is increase build Z height (can get this with a belted upgrade as well) - mine happens to maximize this to 180 mm (technically, I can go 184 mm, but that is really close to crash at the top) 5) not fully tested, but speeds are as fast as a belt; maybe faster. This requires more tweaking of firmware settings and stepper motor voltages - could spend weeks driving to ultimate levels. Not my intent as #1 was the prime objective, accurate parts. 6) Well someone had to do it . . . Parts! 1st you'll need the parts in this post Additionally you'll need: Lead Screws 2x 300 mmhttps://folgertech.com/products/300mm-lead-screw-3d-printer-z-axis-lead-screw-300mm-lead-screw-8mm-screw-pitch 2x 400 mmhttps://folgertech.com/products/400mm-lead-screw-3d-printer-z-axis-lead-screw-acme-lead-screw-8mm-screw-pitch 1X 8mm Brass Lead Scew Nut 1x (needed for anit-back lash Y axishttps://folgertech.com/collections/lead-screws/products/8mm-brass-lead-screw-nut Bearings for Y Axishttps://folgertech.com/products/2pcs-self-align-8mm-bore-inner-ball-mounted-pillow-block-insert-bearing-kp08 4x Stepper Motor Couplingshttps://folgertech.com/products/5mm-to-8mm-flexible-coupling-od-19mm-x-25mm-for-cnc-and-prusa-3d-printers Z Axis Motor Risers:http://www.thingiverse.com/thing:1288802 Corner braces:http://www.thingiverse.com/thing:1387216 My Fan bracket & Servo Arm for Z probehttp://www.thingiverse.com/thing:1481551 Blower Duct fromhttp://www.thingiverse.com/thing:976189 Dual Bearing mount for Y table:http://www.thingiverse.com/thing:1120328 All stepper motors replaced with this one:https://smile.amazon.com/gp/product/B0196FH94E Thrust washers and collars 4x of these: https://smile.amazon.com/gp/product/B00DN5KYT6 1x (set of 4) of these: https://smile.amazon.com/gp/product/B0063KWIYC/ref=oh_aui_detailpage_o00_s00?ie=UTF8&psc=1 12 Igus Bearingshttps://folgertech.com/collections/bearings/products/igus-rj4jp-01-08-8mm-linear-bearing-to-replace-lm8uu 6x 8MM ID Skate Bearings:https://smile.amazon.com/gp/product/B002BBGTK6 Optional: (anti-backlash nut & spring) will need 3xhttp://www.ebay.com/itm/322089168774 If used, the part "Z_leadscrew_antibacklash_rev2" will need to be mirrored for 1x One being left side, the other being right side. Also, the Z nuts will require to be trimmed with a cut off wheel to fit. I've not listed every 3mm / 4mm screw and T-nut. But plan for several. ** You'll need to review the assembly and make a check list for this. Here are a few to review:https://folgertech.com/products/12-x-lm8uu-4-x-608zz-2-x-623zz-bearing-kit-prusa-i3-rework-reprap-3d-printerhttps://www.amazon.com/gp/product/B014ONCP88/ref=oh_aui_search_detailpage?ie=UTF8&psc=1https://www.amazon.com/gp/product/B010CRN2SC/ref=oh_aui_search_detailpage?ie=UTF8&psc=1https://www.amazon.com/gp/product/B003KWER3Q/ref=oh_aui_search_detailpage?ie=UTF8&psc=1https://folgertech.com/products/four-4-internal-cast-2020-corner-bracket-fittings-industrial-aluminumhttps://folgertech.com/products/four-4-2020-corner-bracket-fittings-industrial-aluminum Photos should should show the remaining notes. Note the Power supply and ramps are moved to the outside 2020 frame so the lower brace arm can install. Note: I remixed the Y-Axis thread holder from here:http://www.thingiverse.com/thing:718386 2017-01-01 UPDATE FARGKENOB created a great Y Axis Stepper Motor mount here:http://www.thingiverse.com/thing:2007186 I have updated to this part & suggest any builders do the same. Simply cut the extra spool holder 2020 pc in half (~70.6 mm) and mount per the pictures shown shown here: http://www.thingiverse.com/make:283086 TNSI created a better Z-Axis Leadscrew Guide also here:http://www.thingiverse.com/thing:1937927 I have also updated to this part and recommend this part be used instead of the "z_axis_guide_bearing_leadscrew" as it can be installed/removed/replaced without removing the guide rod. Some more details on how the bearings go together: Z axis (top to bottom) is stepper motor->shaft couple->skate bearing (shaft couple rests on the skate bearing), bracket, thrust bearing, collar. X Axis (right to left) is stepper motor->shaft couple->thrust bearing (shaft couple rests on the thrust bearing)->skate bearing->right mount->skate bearing->collar ->carriage

Download Model from thingiverse

With this file you will be able to print Folger Technologies i3 2020 Full Lead Screw Upgrade on all axis with your 3D printer. Click on the button and save the file on your computer to work, edit or customize your design. You can also find more 3D designs for printers on Folger Technologies i3 2020 Full Lead Screw Upgrade on all axis.