Force Plate Attachment for Vernier Dual Range Force Sensor
thingiverse
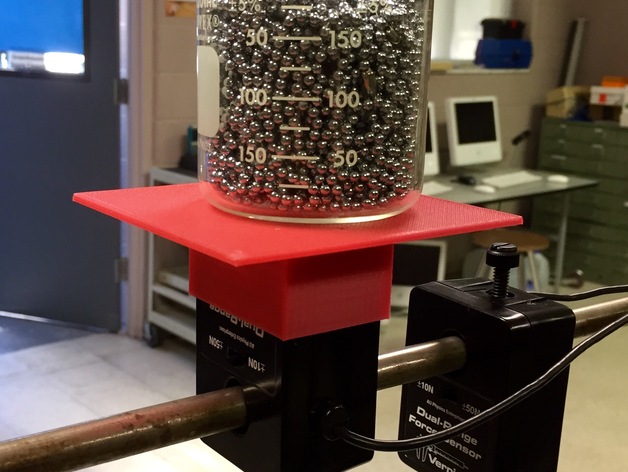
This lets you turn your Vernier Force sensor into a mini-force plate. It's suitable for experiments that measure tiny forces or changes in force, which might not show up well on Vernier's standard Force Plate. I made this so my students and I could learn how a chain fountain works. Below is a video showing the force plate in action. You can see me using an early prototype to test with beads on the top sensor, while holding it steady and attaching a catch tray on the bottom sensor for the final design. Although we didn't get any answer as to why it happens that way, we could use our class' modeling skills to create a simple model explaining what was happening. How I Created This I made this in Tinkercad. You can edit the project yourself if you're interested: https://www.tinkercad.com/things/ep8RjD4KXz1-vernier-force-plate-addon It's really basic. My hardest part was measuring accurately enough, and that's what led to my first attempt putting the screw hole directly in the center - where would you expect me to guess rather than take precise measurements? Instructions When printing with ABS, set the scale to 100.7% so you can account for any shrinkage happening later. You don't need supports since this won't cause print problems at all and won't be a bother either when it's done in just one print run. However I had put minimal support around the screw hole because after using your own tool set there are some small bits left that would usually be really problematic during disassembling, thus having the removal before any usage is mandatory otherwise these may stay stuck with this component permanently due to static electricity as we know that static can be strong. For a standard setup, you will use an unfastened hex machine head. Just don't mess things up since screws get bent if handled improperly after unscrewing from where previously attached at all.
With this file you will be able to print Force Plate Attachment for Vernier Dual Range Force Sensor with your 3D printer. Click on the button and save the file on your computer to work, edit or customize your design. You can also find more 3D designs for printers on Force Plate Attachment for Vernier Dual Range Force Sensor.