FPV drone - featured on GreatScott!
prusaprinters
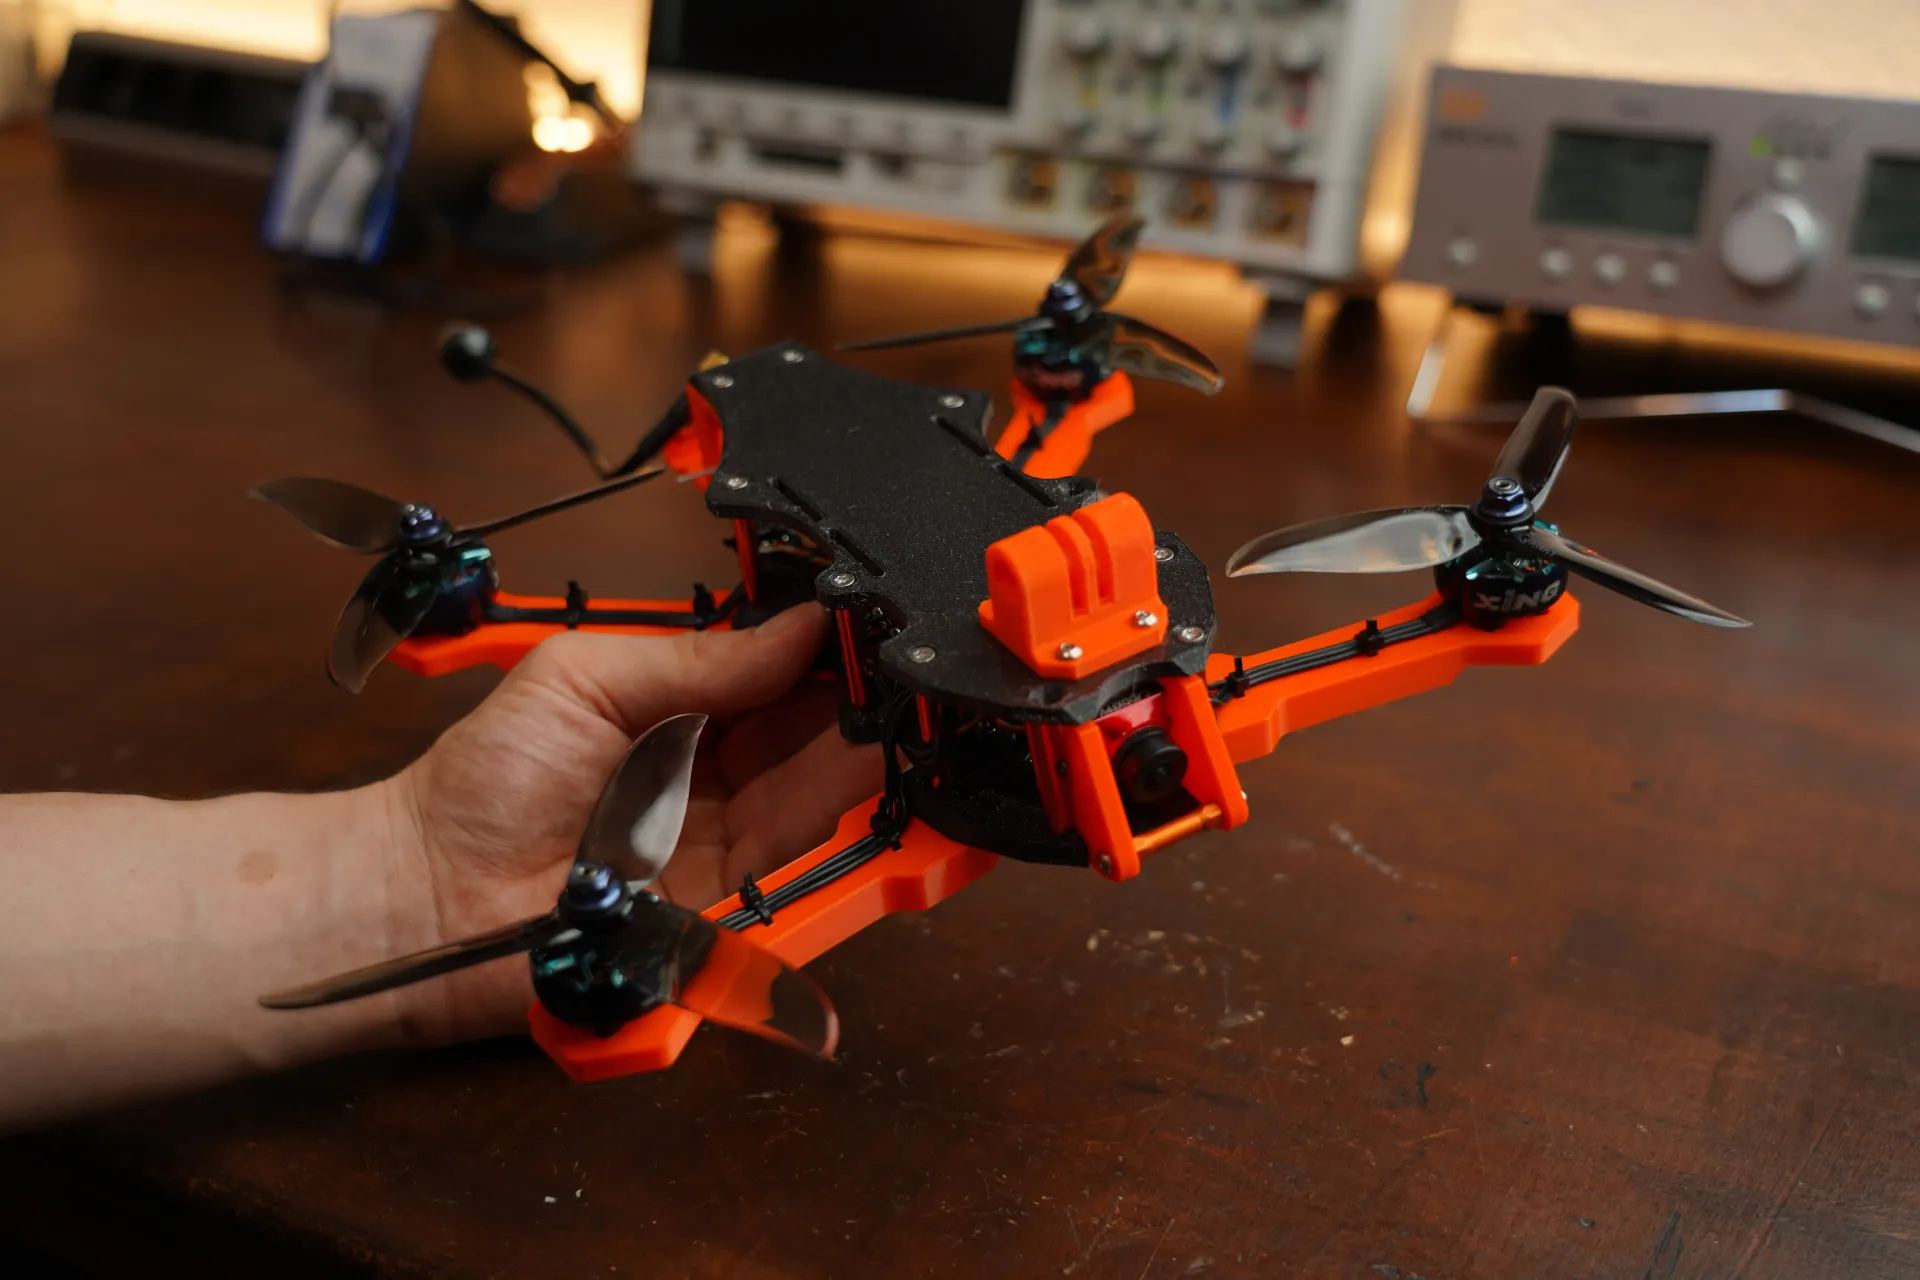
<p>UPDATE: GreatScott!, a large electronics YT channel, has made an FPV build guide using this frame! <br>Check it out here: </p><figure class="media"><oembed url="https://www.youtube.com/watch?v=DeSDjjicGWY"></oembed></figure><p>UPDATE: I have added STEP files and a new back mount (V2) which has 2 extra holes on opposite sides on the main one, for flange-mounted vTX pigtails. The holes are set 12mm apart, which should be pretty standard.</p><p>Welcome to this FPV drone project! I am excited to present you my first FPV drone design and build, with complete part and print information, recommended parts and more!</p><p>First of all, look at all the parts there are to print and what they mean/do. If this is your first quad, be prepared for a lot of work. If it is not, things will be a little more self-explanatory.</p><p>Second, buy all the required parts if you don't have them yet and print the frame parts.</p><p>Third, assemble everything together and test if it all works as expected. You are ready to fly!</p><h3>Overview</h3><p>The final drone is a pretty large 6" cruiser-type quad, made to fly smoother long-range mission as opposed to freestyle or racing. The frame is entirely 3D-printed, but some components need to be purchased separately (more details below).</p><h3>Recommended components</h3><ul><li>Motors<ul><li>2306 minimum for this build, I would recommend even something larger like 2508</li><li>My build had 2206 motors, which felt underpowered </li><li>XING2 2306 are a very good choice</li></ul></li><li>FC stack<ul><li>Use whatever you want here, that is compatible with the motors and your setup</li></ul></li><li>vTX<ul><li>This build is intended for an analog build, although you could probably fit a Vista or Air Unit in there (experimentation required)</li></ul></li><li>Camera<ul><li>Whatever suits your needs; I used a Caddx Ratel mini, which is a larger 22x22mm camera with 1200TVL, which gave good image quality</li></ul></li><li>Battery<ul><li>I would recommend a large-r battery, with more than 30Wh (4s 2200+ or 6s 1500+)</li></ul></li><li>Standoffs <strong>!</strong><ul><li>The build is intended for 29mm standoffs (what I could find on Hobbyking at the time of purchase)</li><li>For smaller standoffs, the <i>Camera Mount</i> and the <i>Back Mount </i>have to be modified with the new standoff height</li><li>In total I have fitted 10 standoffs</li></ul></li></ul><p> </p><h3>Parts description</h3><p>Below is a description for all the print files and how they fit together.</p><h4>Required</h4><ul><li><i>Lower Chassis </i><ul><li>Fits all the electronics and arms of the quad.</li><li>Has cutouts for zipties and cable routes</li><li>Offers 30.5x30.5mm FC stack mounting holes</li><li>Has holes for a XL4015 buck converter (I used it to power the vTX), but you may or may not need that depending on your configuration)</li></ul></li><li><i>Upper Chassis</i><ul><li>Holds the other end of the standoffs, the battery and the top of the camera mount</li><li>Has slits integrated in it for neat battery strap holding</li></ul></li><li><i>Camera Mounts(1 & 2)</i><ul><li>They fit in the front of the frame in the provided holes and hold a 22mm camera by default</li></ul></li><li><i>Back Mount </i><ul><li>Holds a BN-220 GPS module and the vTX antenna </li><li>Some hot glue may be required for the vTX antenna to be held properly</li></ul></li><li><i>Motor Arm (V2 or normal) </i><ul><li>4 of them fit into the bottom of the chassis and hold the arms. They have cutouts for zip ties.</li><li>The V2 is lighter but weaker; I wanted to put some carbon strips on it additionally for strangth; normally just print the regular version</li></ul></li></ul><h4>Optional</h4><ul><li><i>FC Cover</i> <ul><li>Covers the FC stack for added protection</li></ul></li><li>ESC Cover<ul><li>Covers the bottom of the frame to protect from debris</li></ul></li><li><i>Action Camera Mount</i><ul><li>Fits on top in front of the frame and can accomodate a GoPro or any other kind of action camera you might have</li><li>NOTE: the current top plate only has 2 slits for mounting an action camera with a battery strap, I whave to modify it to accept the Action Camera Mount</li></ul></li></ul><h3>Materials</h3><ul><li>Frame<ul><li>PETG, don't use PLA because it is too brittle</li><li>PC or Nylon would be stronger, but they have more difficult print constraints, but you have the possibility to use them, they would be better</li></ul></li><li>Screws & Nuts<ul><li>All screws are M3, the ones on the top and bottom are flathead, while the rest can be either a button head or socket head (preffered)</li><li>The <i>Bottom Chassis </i>has socket capture pockets to fit standard M3 nuts. They are used to mount the arms</li><li>SolidWorks BOM (approximate, since you will not use everything in the model)<ul><li>M3x10 flathead: 22 (for top and bottom)</li><li>M3x10 socket head: 16 (for motors)</li><li>M3x13 flat head: 8 (for arms)</li><li>M3x12 or longer socket head: 4 (for arms)</li></ul></li></ul></li><li>Zipties<ul><li>2.5x200mm or longer/shorter: as many as you can get (usually 20+ per build)</li></ul></li></ul><p> </p><h3>Assembly</h3><ol><li>Print <i>Bottom Chassis </i>and mount the FC stack on it</li><li>Print 4 Arms and attach them with 2 M3x13 flat head screws each (and leave one hole empty for one M3x12 or longer socket head, you will screw it in the standoff later).</li><li>Print the top chassis and the camera mounts and in the meantime install all electronics (including motors) on the Bottom Chassis, connect all your wires up and test everything</li><li>Attach the camera to the camera mount, which then slides in the front holes provided for it.</li><li>Print the Back Mount and install your GPS (if needed) and vTX antenna</li><li>Install the standoffs on the bottom side with M3x10 flathead screws</li><li>Install the Top Chassis piece with M3x10 flathead screws </li><li>All done!</li></ol><p> </p><p>Please post comments if something is unclear or more information is required. I am excited to see your makes! Cheers!</p>
With this file you will be able to print FPV drone - featured on GreatScott! with your 3D printer. Click on the button and save the file on your computer to work, edit or customize your design. You can also find more 3D designs for printers on FPV drone - featured on GreatScott!.