FPV Mount for FPVRaptor
thingiverse
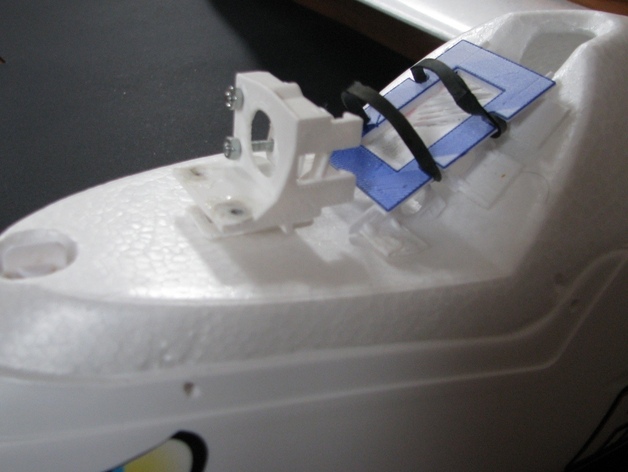
This project is an FPV mount system to fit a Fat Shark camera and transmitter into the cockpit space of an FPVRaptor from HobbyKing. Before we go too far I will say that this is NOT a tracking mount. It has a pivot in it so that the vertical alignment can be set up by the pilot to suit their desired view. The camera mount is designed to slot into the hole where a servo would go for a tracking camera mount. The transmitter holder is designed to be glued and taped down to the deck behind the camera. Instructions The camera holder is designed to glue onto the camera mount base, and two screw used to hold the back plate in behind the camera when it is in place. The camera holder has also got some recesses for a couple of nuts. Don't worry about these, they are just a legacy from a previous edition of this project. The prints are generally quite small so you will not need much material to produce these. I have designed it with a print layer thickness of 0.3mm in mind and wall thickness of 0.6mm. The top and bottom layers in the prints shown were single layers, and a 5% fill was used. My main considerations were to try to keep the weight down. These settings worked well on our Ultimaker, and I hope that whatever system you are using will manage OK too. The Blender (Blender 2.57 or later will be needed) files are included here if you need to adjust it at all. There is a recess in the Back plate of the transmitter holder, I would suggest you cut out a couple of rectangular card with dimensions of about 20x30mm to insert into the space as you print the bottom couple of layers. This will support the extruded filaments that span the region later in the print. You will be able to remove the card once the print is done. In addition to a printer you will need a screw driver, and two M3 screws + nuts, some glue, and probably a knife or file to clear the holes. Ordinarily the transmitter would probably be mounted within the plane body or on a small “platform†located behind the prop. I was quite keen to install the transmitter close to the camera and in a place where air would be passing in order to keep it cool. The canopy has openings in it to allow air to pass through the space cockpit without compromising the aerodynamics too much. The transmitter used here is only a 100mW one and I am hoping that the more powerful transmitters will fit the same footprint. There are slots in the transmitter holder for securing the transmitter into place using rubber bands or bits of cycle inner tube rubber. If you are curious about it, the canopy is in development at the moment. It was created using the DIY vacuum former described in MAKE magazine issue 11. I used a plaster mould taken from the inside of the original FPVRaptor canopy, and used a sheet of waste polyethylene packaging to make the form. The precess was a stunning success Except that the detail reproduced on the plastic form was a lot finer than I expected and so it captured the tiny ripples in the mould as well leading to a less than clear canopy. I will need to do some more development on this. Now I just need the weather to clear up enough to give it a try.
With this file you will be able to print FPV Mount for FPVRaptor with your 3D printer. Click on the button and save the file on your computer to work, edit or customize your design. You can also find more 3D designs for printers on FPV Mount for FPVRaptor.