Frame brace Anet A6 for y-axis. Clip on. For maximum y-belt tensioning without risk of frame fracture
thingiverse
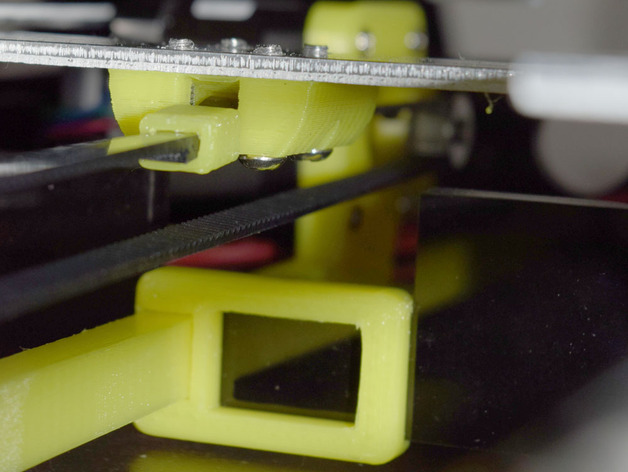
The sturdy acrylic frame of the Anet A6 bends, but tightens the y-belt as desired. I was planning to stabilize the frame with a frame-brace when I stumbled upon Jhedstrom's clever solution: http://www.thingiverse.com/thing:1517525. This simple yet effective design keeps the printer mobile and utilizes the force-counter-force relationship between the rod and belt perfectly. The only drawback was that I would have to drill holes in my nice printer, but if that's what it takes, so be it – I thought. I was about to head to a hardware store to buy threaded rod and nuts when my wife asked, "You're going out to buy parts? Can't your nerdy printer build those things?" And that's when it hit me: I can design something that will fit and support without altering the material of the printer if it clips on itself. The outcome is visible in the photos above. Another problem I addressed was the y-belt being far off from the heated bed, likely due to Anet's cost-cutting measures. To bring the belt closer, I took three steps: 1. I aligned the "y-belt-mount-bed" on the bottom of the bed with the center of the lead-rods (about 6mm down), opting for a non-screw attachment method. 2. I altered the "y-motor-mount" and "y-motor-L-support" to bring motor and belt up at one end, integrating the frame-brace in the back. 3. I modified the "z-belt-bearing" at the front to gain 5mm of height. To avoid buying a longer belt for my quick bed-mount-solution, I added about 10 mm of horizontal depth by making 2) and 3) slightly longer than their original dimensions. This space is not needed as the nozzle leaves the heated bed surface before moving and doesn't obstruct the hot-bed's movement. My special improvement to the y-motor mount: the hole guiding cables through is now open, allowing for easy addition of new lines without unplugging existing ones. The opening is small enough for 12v cables to pass through but prevents them from falling off again. Print Settings: Printer: Anet A6 Rafts: No Supports: Yes Resolution: 2.5 - 3 Infill: 10-25% Notes: Simple supports only for the front and center mounts of the brace rod. Post-Printing Instructions: To mount this thing, loosen the y-belt and four big outer nuts before re-tightening them with the printed "brace-rod" in place. Important hint: If you haven't already, alter the order of the aluminum plates supporting the hot-bed to minimize risk of damaging the PCB-hotbed with long screws from below and bring the belt 2 mm away from the bed. Anet's videos incorrectly describe the mounting process for the H-shaped part, so look at my picture below for the simple difference.
With this file you will be able to print Frame brace Anet A6 for y-axis. Clip on. For maximum y-belt tensioning without risk of frame fracture with your 3D printer. Click on the button and save the file on your computer to work, edit or customize your design. You can also find more 3D designs for printers on Frame brace Anet A6 for y-axis. Clip on. For maximum y-belt tensioning without risk of frame fracture.