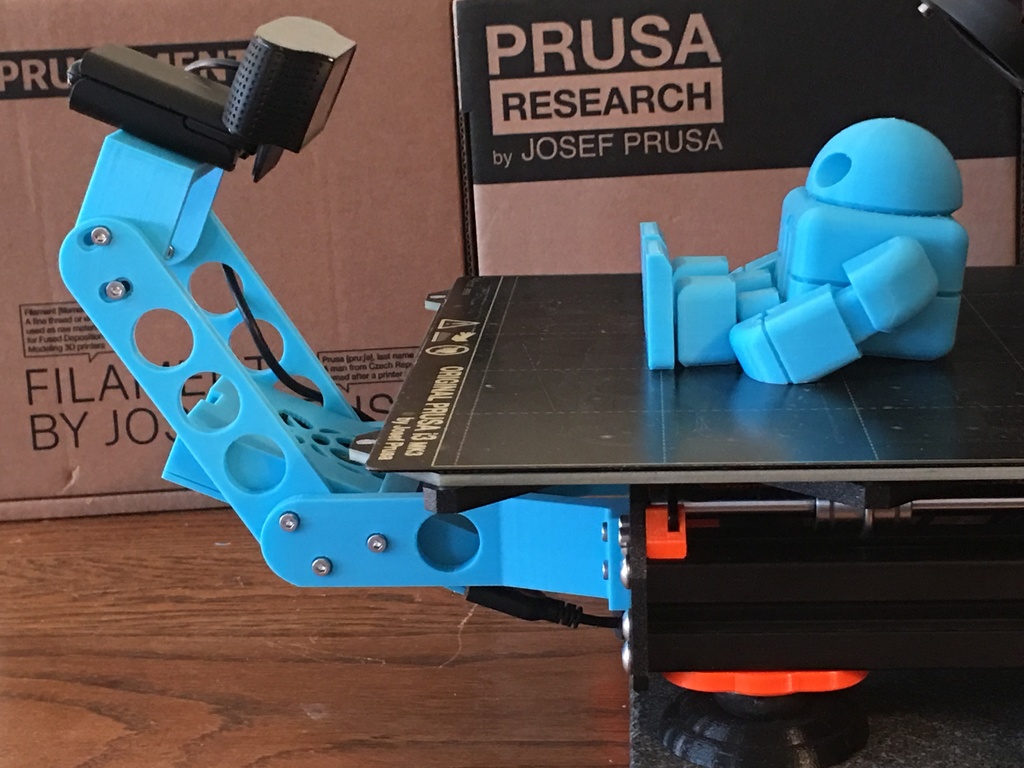
Frame Mounted Camera and Pi Case for Prusa MK3s
prusaprinters
<p>This is a frame mounted camera bracket for Prusa MK3s that also integrates a Raspberry Pi 3 B+ Case. It screws into the holes where the LCD is normally placed, which provides the strongest direct frame connection, and also the best front facing position for timelapse capture using Octolapse.</p> <p>Here is a timelapse example made with this and Octolapse: <a href="https://imgur.com/gallery/lwVJYah">https://imgur.com/gallery/lwVJYah</a></p> <p>Move the LCD to the side with this <a href="https://www.thingiverse.com/thing:3483560">https://www.thingiverse.com/thing:3483560</a></p> <p>Which cameras does it work with?<br/> It supports any camera that can be attached via a standard tripod 1/4 screw or can be attached to 1/4 hole. It works out of the box with Logitech c920 and does not require you to take apart the camera. It works with a Pi camera as well witht the the right attachment method. If you want to use a rasperry pi camera, print out the picasetop_V3_picameraslit.stl for the camera ribbon slit and a pi case like this that accepts a screw - <a href="https://www.thingiverse.com/thing:299529">https://www.thingiverse.com/thing:299529</a></p> <p>Can the camera position be adjusted for different size models?<br/> The camera height position can be adjusted 50mm higher by swapping in the tall camera holder part vs the normal one. Print both and see which one works best. This camera holder part also tilts forward up to 30 as well and is adjustable. You can also adjust your Logitech camera angle too or extend its base.</p> <p>How else can it be customized?<br/> The Pi case has a Raspberry 'Pineapple' logo on one side and a Logitech "G' logo on the other. You can choose which side you want to be face up. You also can use your existing Pi case instead. You can print the parts and arms in different colors which would look neat. The Pi case has two styles, one with a Pi camera ribbon slit and one without. Pick which one you want.</p> <p>What are all the issues I had getting this to work and how did I get it to work?<br/> See the txt file of notes that I just added (5/9/2020) from a year ago that documented all the fine tuning and installation steps of getting octoprint to work, as well as fine tuning a logitech camera.</p> <p>Parts needed:</p> <ul> <li>Raspberry Pi 3B+</li> <li>Logitech c920 or any webcam or large USB web camera with that type of standard screw hole mount, or Raspberry Pi</li> <li>One of these camera mount screws - https://www.amazon.com/gp/product/B00R7AWP04</li> <li>6 M3 10mm screws (used at the elbow between the lower and upper arms) - MUST HAVE THIS EXACT LENGTH IF USING THE CASE. If no Pi case is used then 12mm works and also longer screws, but they will be more visible</li> <li>4 M3 14mm screws (used to attach to the frame)- can be longer too</li> <li>4 M3 12mm screws optimal (used to attach the upper arms to the top bracket) - 10mm will also work, but 12mm allows for easier adjustment/tilt, can be longer too but will be more visible</li> <li>14 M3 hex nuts<h3>Print Settings</h3> </li> </ul> <p><strong>Printer Brand:</strong></p> <p>Prusa</p> <p><p class="detail-setting printer"><strong>Printer: </strong> <div><p>I3 MK3S</p></div><strong>Resolution:</strong></p> <p>.2</p> <p><p class="detail-setting infill"><strong>Infill: </strong> <div><p>10%</p></div><br/> <strong>Filament:</strong><br/> Inland PLA+ Turqouise <br/> <p class="detail-setting notes"><strong>Notes: </strong> </p><div><p>Prefer PETG but PLA fine. Since the parts all print on the bed flat they are inherently strong. </p></div></p> </p></p> Category: 3D Printer Accessories
With this file you will be able to print Frame Mounted Camera and Pi Case for Prusa MK3s with your 3D printer. Click on the button and save the file on your computer to work, edit or customize your design. You can also find more 3D designs for printers on Frame Mounted Camera and Pi Case for Prusa MK3s.
