Franken Cetus
thingiverse
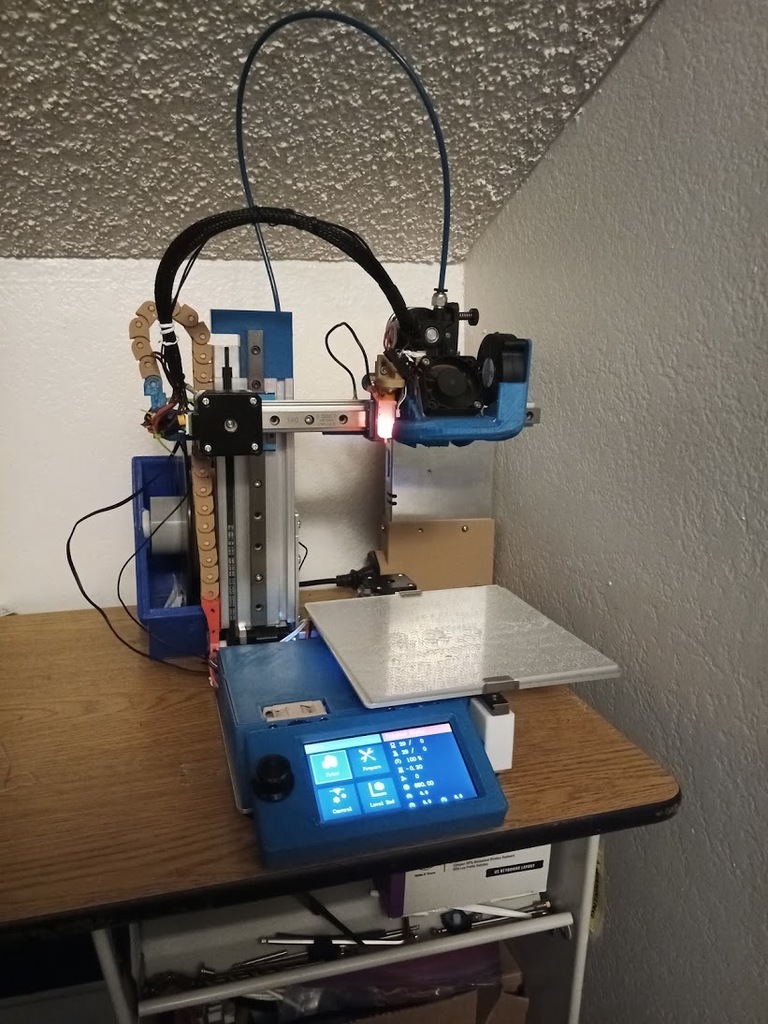
This is a bit of a hot mess of parts and various remixes here an there to get my dead Cetus MK2 up an running again. Motherboard : Creality 4.2.7 board running Otioss's fork of Marlin 2.x for a landscape mode on the creality v2 screen (came in a bundle on sale with the 427 board) Extruder: official orbiter 1.5 Hotend: complete E3D v6 24v setup (1st party thermistor and heater cartridge, tried 3rd party stuff and had mad temp swings even after auto tuning) Heated bed: Tinyfab heated bed (my cetus heated bed died on me after 3 years of service) Power supply: Meanwell LRS-350 MB cooling fans: Twin 40mm noctua 5v fans (left over from the original cetus prior to its board dieing) Hotend cooling: creality replacement ender 3 hotend fan (24v) Part cooling fan: SoundOriginal 24V DC Brushless Blower Cooling Fan 50x50x15mm Bltouch: creality 3.1 bltouch upgrade kit (double check your wiring I've had 1 of these ship with the wiring flips on 2 pins) Using a the Hero me Gen 5 e3d clone mount and setup with a modified part duct to allow the bltouch to mount in closer and not collide with the X stepper and have the oribter mounting in as close an low as possible The base enclosure was a quick look at tinyfabs enclosure to make sure I got the hole spacing to the baseplate right on the cetus mk2 (might be different on other variants don't know) Then cause where my printer is it can get very warm so I thought why not but a buck converter in and run twin 40mm fans to cool the setup and also put the lcd at landscape and at a tilt so it all is pretty flat as possible Printer is also setup to be using 2 creality ender 3 endstop switches (since the mk2 didn't have them built in. (If you make one with factory endstops just need to make sure you have the right connectors cause I have no idea what they put on the ends!) Z cap might not fit your printer depending on whatever batch yours came from as mine came with a IKO rails an bearings. Z chain is 21 links Printing: For not weight bearing parts that don't get near the tip of the hot end feel free to print them in pla at a light infill Parts that support weight or tension please print in abs especially things near the nozzle The adapter plate to let the hero me system mount to the cetus make sure to print it dense and with 5 perimeters (this part really should be cnc'd for maximum rigidity) use best judgement on supports as some parts don't need them but others may I don't remember all of it exactly due to minor bouts of heat exhaustion @-@ Other notes: There isn't a set enclosure yet for my Meanwell LRS-350 as I'm at the moment content with my hodgepodge of a ender 3 replacement bottom and a random louver cover Printer configuration (MARLIN) X,Y,Z E steps = 80 Extruder E steps (orbiter) = 690 NOZZLE_TO_PROBE_OFFSET { -36.5, -9.12, 0 } I'm not actively gonna be updating this as I've been getting very consistent prints with this frankenstien Using these profiles for prusa slicer on my printer at the moment https://www.thingiverse.com/thing:3045287 I wish I could tell you what all sized screws I was using but its... a frankenstien of various lengths but 3mmm is used where it normally be but the orbiter mount you want longer m3 screws to keep it locked down into place
With this file you will be able to print Franken Cetus with your 3D printer. Click on the button and save the file on your computer to work, edit or customize your design. You can also find more 3D designs for printers on Franken Cetus.