FrankenSnappy
thingiverse
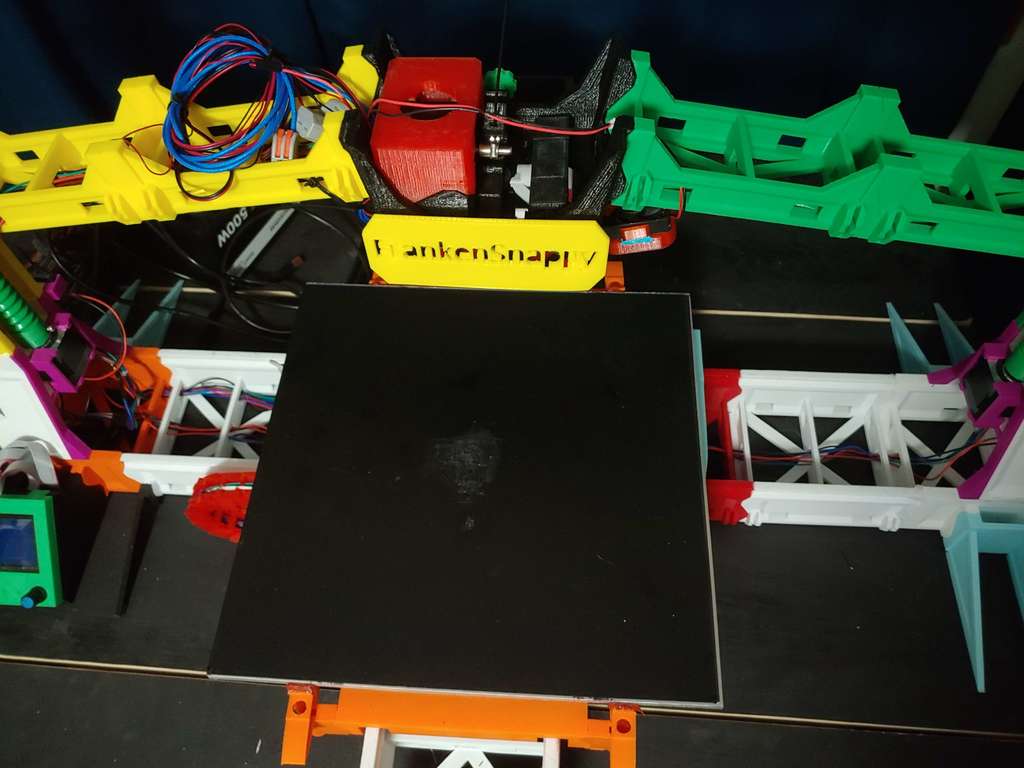
My first thought when I saw the Snappy RepRap was how I could increase the bed volume. It is all snap together parts so there really isn't anything preventing making it larger. To support this I custom designed a few supplemental parts. Could use a little tweaking still but it does seem to work. It roughly increases the build volume to 12x12x12 inches. Part changes (Number to print - Filename - Usage): 1 - frankensnappy_logo.stl - replaces the original logo 1 - heightened_3d_print_extrusion_platform.stl or heightened_3d_print_extrusion_platform_e3d.stl - replaces the original extrusion platform for the jhead or the e3d hot ends 1 - ArduinoHolder.stl - Replaces the original arduino holder with more space for wiring 3 - supportlegs.stl - replaces the original feet on the snappy 6 - supportleg.stl - for additional support along the x axis. You should be able to fit quite a few of them (although I didn't install them in all the open snap on slots), just make sure you don't install them under the wire chain or you may break some parts 2 - wheel_stand.stl - replaces the end caps on the y axis (be careful with these as they will currently hold the axis weight, but not much more) 4 - y-xbrace.stl - holds the y axis in place on top of the x axis carriage. This is simply an extender to allow it top snap in with the existing x axis carriage mechanism. 2 - ShortenedGear.stl - replaces the gear on the x and y axes since the motor is higher than normal. 1 - LcdHolder.stl - replaces the lcd holder base on the original. 2 - MotorHolder.stl - replaces the xy motor holders on the original. Fits the larger motors. 1 - PartFanHolder.stl - replaces the fan shroud and fan clip if using an e3d hot end. 2 (optional) - ExtendedScrew.stl - replaces the screws used for bed leveling in case you use a longer hotend, e.g. an e3d volcano hotend. I've also tweaked the firmware for this. It may still need some changes (the bed size might be slightly off), but seems to be functioning correctly. It also needs tweaked according to your heated bed type (or set to 0 for TEMP_SENSOR_BED if you aren't using any). You'll also need some additional parts from the original design. You'll need to print out: 40 of the chain link pieces (not sure how many were originally printer) 2 more of the spiral z axis poles 2 more z axis struts 2 more x axis struts 2 more y axis struts 2 more bridge braces 2 more bridge segments 2 more xy sled parts (1 for x axis and 1 for y axis) I also purchased a few different parts as well: I started with a JHead hotend, but had a large number of issues with it. I ended up just picking up an E3D hotend instead: https://www.amazon.com/gp/product/B07TXH3B5G/ref=ppx_yo_dt_b_asin_title_o03_s02?ie=UTF8&psc=1 I replaced the x and y axis motors with the STEPPERONLINE 1x Nema 17 Stepper Motor 59Ncm(84oz.in) 2A 48mm Body: https://www.ebay.com/itm/STEPPERONLINE-1x-Nema-17-Stepper-Motor-59Ncm-84oz-in-2A-48mm-Body-17HS19-2004S1/333628582297?ssPageName=STRK%3AMEBIDX%3AIT&_trksid=p2057872.m2749.l2649 You'll note that in order to fit the increased size of this motor you will have to remove the bottom of the x axis motor holder piece (either by altering the print or by dremeling out the space). This is also why the feet are lofted in this design. You'll need more wire to get everything hooked up since this is quite a bit larger. 22 Gauge Silicone wire spool red and black each 25ft Flexible 22 AWG Stranded Copper Wire: https://www.amazon.com/gp/product/B01K4RPE0Y/ref=ppx_yo_dt_b_search_asin_title?ie=UTF8&psc=1 Replaced the glass built plate with an aluminum sheet and the reprap heater with an adhesive silicone heater: 6061-T651 Aluminum Sheet, 12 Inch x 12 Inch x 1/4 Inch Thickness: https://www.amazon.com/gp/product/B0127OJK7U/ref=ppx_yo_dt_b_search_asin_title?ie=UTF8&psc=1 120x120mm 12V 120W Silicone Heater Pad: https://www.amazon.com/gp/product/B079QZ7FV1/ref=ppx_yo_dt_b_search_asin_title?ie=UTF8&psc=1 I installed a magnetic sheet on top for the bed. 11.8 x 11.8 in New Flex Magnetic Heat Bed Build Surface Platform 2 in 1 with 3M Adhesive Backing: https://www.amazon.com/gp/product/B07GGL5M4X/ref=ppx_yo_dt_b_search_asin_title?ie=UTF8&psc=1 Lastly, I installed a sheet of insulation foam under the heater to prevent the print bed supports from getting heat from the aluminum sheet. 300x300mm with 3M Adhesive Tape: https://www.amazon.com/gp/product/B07M778FRC/ref=ppx_yo_dt_b_search_asin_title?ie=UTF8&psc=1 Assembly on all of this is fairly straight forward. Construct it as per the original instructions for the snappy including the axis extensions and purchased parts outlined here. Once you are done with that, include the 3d printed parts included in this project (skipping or replacing the parts from the original design that have been redesigned here). Huge thank you to Revar for the original models!
With this file you will be able to print FrankenSnappy with your 3D printer. Click on the button and save the file on your computer to work, edit or customize your design. You can also find more 3D designs for printers on FrankenSnappy.