Frankenstein Light Switch Plate
prusaprinters
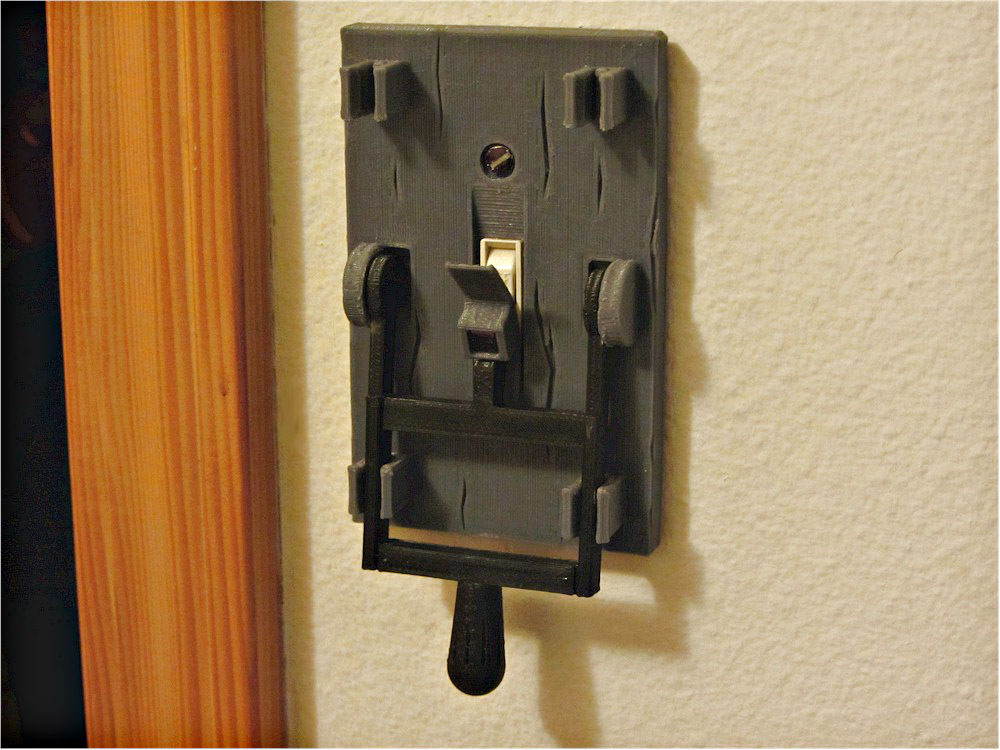
<p>"Igor, throw the switch!"</p><p>"Yes, master."</p><h3>Instructions</h3><p>Check out the 2022 updated version posted here:</p><p><a href="https://www.printables.com/model/161850-frankenstein-lightswitch-plate-2022-version">https://www.printables.com/model/161850-frankenstein-lightswitch-plate-2022-version</a></p><p> </p><p>Update:</p><p>It's coming up on Halloween so I figured it's high time I add versions<i>without</i> the built-in supports that have been giving some printers fits. Use the switchplate files: "xxx_nosupport.stl" and turn on the supports option in your slicer.</p><p>Update:</p><p>Just added: a 3 switch version for "Decora" paddle-type switches. It uses the same paddlenubbin used for the 1 switch version, and the same "Nx" blade used for the multi-switch (standard-type) switch plate. (If I get too many more versions, I'll need to add switchplate configurator utility.)</p><p>Update:</p><p>Just added: a single switch version for "Decora" paddle-type switches (<a href="http://store.leviton.com/1-Gang-Single-Various-Available-WSS0S-D0/dp/B00700SHBW#.VO4DJ_nF-ws">http://store.leviton.com/1-Gang-Single-Various-Available-WSS0S-D0/dp/B00700SHBW#.VO4DJ_nF-ws</a>). You'll need the paddle_switchplate, paddlenubbin, and the madsci_blade. This version is a little different: because the modern looking paddle would look out of place, I hid it entirely underneath the switchplate and it uses a nubbin piece that fits through the plate.</p><p>Update:</p><p>I've added 2 switch and 3 switch versions! The same nubbin part (1 per switch) is used for all versions. The standard blade part is used for the standard 1 switch plate, but the Nx blade (1 per switch) is used for the 2x and 3x plates.</p><p>Update:</p><p>I've also added an alternate version of the nubbin that prints on its side (and without support ribs). Use this version if your printer handles bridges fairly well.</p><p>Printed in PLA with 0.2mm layers, 3 perimeter shells, and 20% infill. (You might want to print the plate part a little hotter than normal to insure good layer adhesion.)</p><p>Rotating the plate + or - 45 degrees before slicing (or alternately, setting the infill angle to 0 or 90 degrees) will make the top infill lines run with the grain of the "wood", for a more refined look, or else across the grain, for a rough-sawn look. You'll have to preview the slicer output to see which orientation of the top layer lines you end up with.</p><p>All parts print without support, but the switch plate and nubbin have ribs that break away before assembly. If you have adhesion trouble with the built-in support ribs, try printing with a 1 layer thick raft.</p><p>Category: Decor</p>
With this file you will be able to print Frankenstein Light Switch Plate with your 3D printer. Click on the button and save the file on your computer to work, edit or customize your design. You can also find more 3D designs for printers on Frankenstein Light Switch Plate.