Frankenstein Light Switch - Revisited
thingiverse
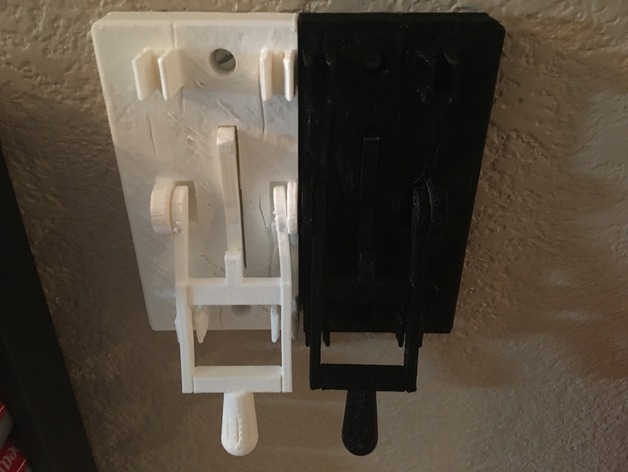
LoboCNC, your design for the Frankenstein Light Switch really shines. The only catch was that the two up modern configuration took up too much space in my Printrbot Simple's Y 100m limit. I'm sure many users are stuck with this same limitation. One solution is to install an extended X axis, which can be a straightforward fix. However, you should be able to print easily within the Y 100mm restriction. To get it right, I just needed to cut Lobo's Modern 2 Up design in half. Since I thought it would only work as a symmetrical piece, this actually helped it turn out well. You're really on top of things, Lobo, and I'm impressed by your switch design. The thing that was bugging me about my computer room is that one light switch turns on all the lights while the other controls specific sockets. What's more, sometimes I would flip the wrong one and accidentally shut down half my lab. By cutting this print into two pieces, I was able to make things easier for myself. Now it's simply White Lights or Black Power. To help people duplicate this effort with minimal hassle, I'll be copying over the Nub and Blade files so we can avoid making any modifications to these parts. Everything remains the same with these components. **Print Settings:** Printer Brand: Printrbot Printer: Simple Black Rafts: No Supports: Yes Resolution: 0.2mm Infill: 20% Notes: Due to a need for quite a bit of Dremel work, I ended up having to thoroughly clean out the interior of this switch. In keeping with other modern versions of this design, it's supposed to come out as one solid piece from the inside. **Designing This Thing Wasn't Rocket Science** All it really took was making some adjustments: I fired up NetFab (free) and went through the process of halving that two up modern switch. With those pieces printed out, a bit of Dremel cleanup made them usable as the basis for our very own full switch!
With this file you will be able to print Frankenstein Light Switch - Revisited with your 3D printer. Click on the button and save the file on your computer to work, edit or customize your design. You can also find more 3D designs for printers on Frankenstein Light Switch - Revisited.