Fred Flintstone
prusaprinters
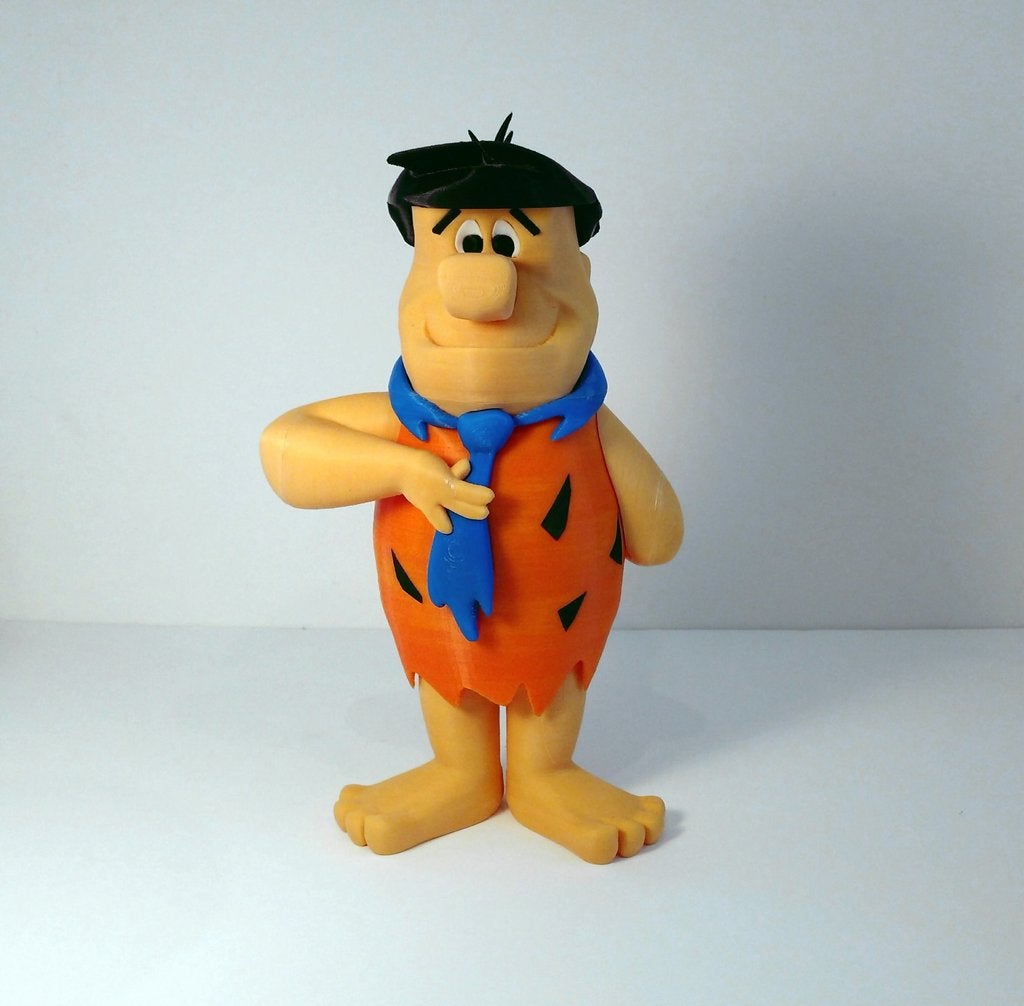
<p>Fred Flintstone is one of my favorite childhood cartoon characters.</p> <p>Fred was modeled in Blender, sliced using Simplify3D and printed in ABS on a FlashForge Creator X. I also used a GeckoTek plate to ensure perfect adhesion of the parts to the bed.</p> <p>Fred is in proportion to my other Flintsone models.</p> <p>If you have the proper filament colors, no painting is required.</p> <p>The model is 29cm tall.</p> <p>Enjoy, and I hope you have a "Yaba Daba Do" time printing this!</p> <h3>Print instructions</h3><h3><strong>Print Settings</strong></h3> <p>Printer: FlashForge Creator X<br/> Rafts: No<br/> Supports: Yes for one part<br/> Resolution: .2mm<br/> Infill: 2 shells, 10% infill</p> <p><strong>Notes:</strong></p> <p>Only the top part of the hair (hair_a.stl) and a small piece of the tie (tie_front.stl) require supports, all other pieces should be printed without supports.</p> <h3><strong>Building the model</strong></h3> <p><strong>Colors</strong></p> <p>Black:<br/> eyebrowl<br/> eyebrowr<br/> eyel<br/> eyer<br/> hair_a<br/> hair_b<br/> spot1<br/> spot2<br/> spot3<br/> spot4</p> <p>Skin or peach:<br/> head_a<br/> head_b<br/> arml_a<br/> arml_b<br/> armr_a<br/> armr_b<br/> nose<br/> feet</p> <p>Blue:<br/> tie_front<br/> tie_loop_a<br/> tie_loop_b</p> <p>White:<br/> eyer_white<br/> eyel_white</p> <p>Orange:<br/> body</p> <p>Any color:<br/> pin (twelve)<br/> pin_small (three)</p> <p><strong>Extra notes for printing</strong></p> <p>Hair_a needs to be printed with supports. I used Simplify3D and set the supports to 2mm. 3 dense top layers and a horizontal gap of .2mm. Removal was clean and the resulting part was perfect. I also manually removed the supports in S3D that were generated for the pin hole on the bottom, as these supports were not needed.</p> <p>Tie_front also required some very minor supports. I used the same parameters as for the hair.</p> <p><strong>Assembly</strong></p> <p>Assembly is fairly straight forward, refer to the following picture. I've listed a detailed step by step process below if guidance is needed.</p> <p>The model can be assembled with the pins to help align and hold some of the parts together for gluing. Depending on the quality of the printer used, you may need to scale the pins down a bit (.98%) to make the fit a bit easier. Personally I like a tight fit, even if a little sanding is required.</p> <p>-Use two pins to attach/glue hair_a to hair_b<br/> -Use two pins to attach/glue head_a to head_b<br/> -Use three pins to attach/glue arml_a to arml_b<br/> -Use three pins to attach/glue armr_a to armr_b<br/> -Use three small pins to attach/glue tie_loop_a to tie_loop_b<br/> -Insert the left and right eyebrows into the head<br/> -Insert the left and right eye whites into the head (see below for a note on this)<br/> -Insert the left and right eyes into the eye whites<br/> -Insert and glue the nose into the head<br/> -Use one pin to attach/glue the hair to the head<br/> -Insert and glue the four different spots to the body.<br/> -Insert and glue the feet to the body<br/> -Insert the front of the tie into the body<br/> -Insert and glue the tie loop to the body. Be sure to fit the ends of the tie loop fit into the top of the tie front<br/> -Insert and glue the right arm into the body as well as into the tie front<br/> -Insert and glue the left arm into the body<br/> -Use one pin to connect and glue the head to the body. The head should fit nicely within the tie loop.</p> <p>Note:<br/> The white parts for the eyes do fit perfectly, however they need to be positioned just right in order to slide them in. There is no need to force the pieces, just take the time to position them correctly and they will fit flush with the head.</p>
With this file you will be able to print Fred Flintstone with your 3D printer. Click on the button and save the file on your computer to work, edit or customize your design. You can also find more 3D designs for printers on Fred Flintstone.