Fretsaw / Hacksaw / Coping saw
thingiverse
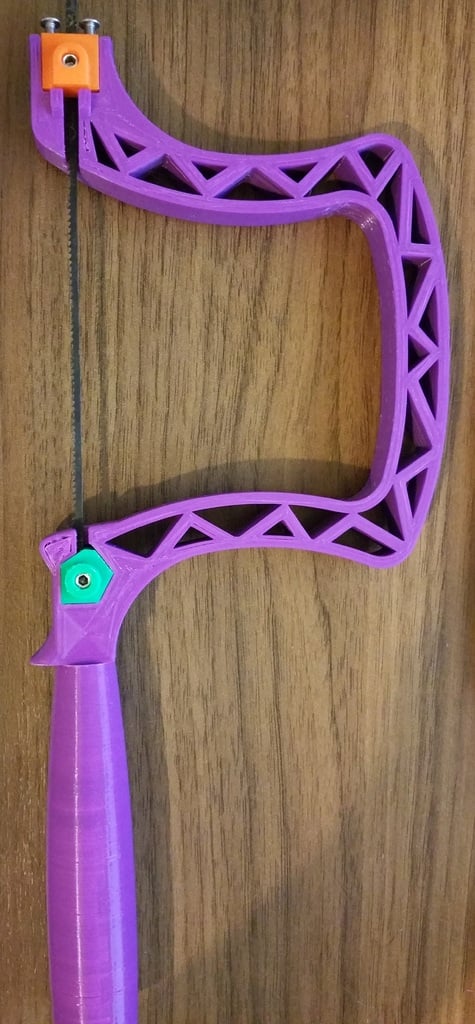
Hi all, If you can look past the terrible print (extrusion issues) I have designed a 3d printable saw capable of taking coping and fretsaw blades, there are better designs available but I didn't want to just copy paste existing hardware and hopefully mitigates some of the limitations in using plastic. Its fairly simple to use but will require some hardware in the form of grub and machine screws which I will list below. I have split it into 4 main parts: - The body is self explanatory and should be printed with at least with 3 top/bottom/perimeter & 50% infill for rigidity, you want it sturdy, I cannot break one by hand with those settings (PLA is fine but will not last forever, PETG would be better for the main body) - The handle is threaded 10mm and I use a piece of 40mm threaded steel rod, this makes it very strong, I have included a printable threaded piece as well. this also means you can design your own handles and just screw them on. I am working on other designs, but other projects are currently hogging printer time. - The clamping blocks are printed separately for 2 reasons, the first is that they will wear out with use, the clamping blocks take an hour to print a handful, the body takes 9 hours to print one. Also you can print a load and have blades ready to go making change over much quicker, they will only fit in the body one way so you don't have worry about orientation. The tension block (orange) has a couple of M3x20mm machine screws running through it, these are used to post tension the blade and push against two M3x3mm grub screws set into the saw body. Each block has an M5x8mm grub screw on each side to grip the blades. There is also a set of inserts with a smaller opening to make loading and using the fine fretsaw / jewellers saw blades easier, <b>I only have the cone bottomed type grub screw and discovered the hard way that you must grind the bottom of these flat to use the finer fretsaw/jewellers saw blades or they will just snap when you tighten them.</b> To load a blade for the 1st time: - Adjust the grub screws in the blocks until they are approx centred in the slots - Back one of the grub screws off a bit in each block (try to remember which one) - Insert and tighten a blade into the smaller (green) block making sure the blade does not stick out the other side. - Then feed the blade into the larger (orange) block but do not tighten yet - Place the green block into the saw and slide the orange into its slot - Then squeeze the body of the saw, this will push the blade further out the back of the orange block and, once tightened in place, put tension on the blade - With your 3rd hand, tighten the grub screw you backed off earlier and your done, additional tension can be added afterwards by tightening the machine screws in the orange block. You can now with equal difficulty remove the tensioned blade, easiest way i have found is to release the tension, again by squeezing, then just pop the green block out by pushing it from behind, the orange block can then just be pulled out, I have several blades ready to go with blocks already on (the tiny blades break a lot) Try not to leave the body under tension as PLA will take a set quite quickly making the tensioning harder over time. I promise blade replacement gets easier with practice and please, mind your fingers :)
With this file you will be able to print Fretsaw / Hacksaw / Coping saw with your 3D printer. Click on the button and save the file on your computer to work, edit or customize your design. You can also find more 3D designs for printers on Fretsaw / Hacksaw / Coping saw .