Friendly Articulated Slug
thingiverse
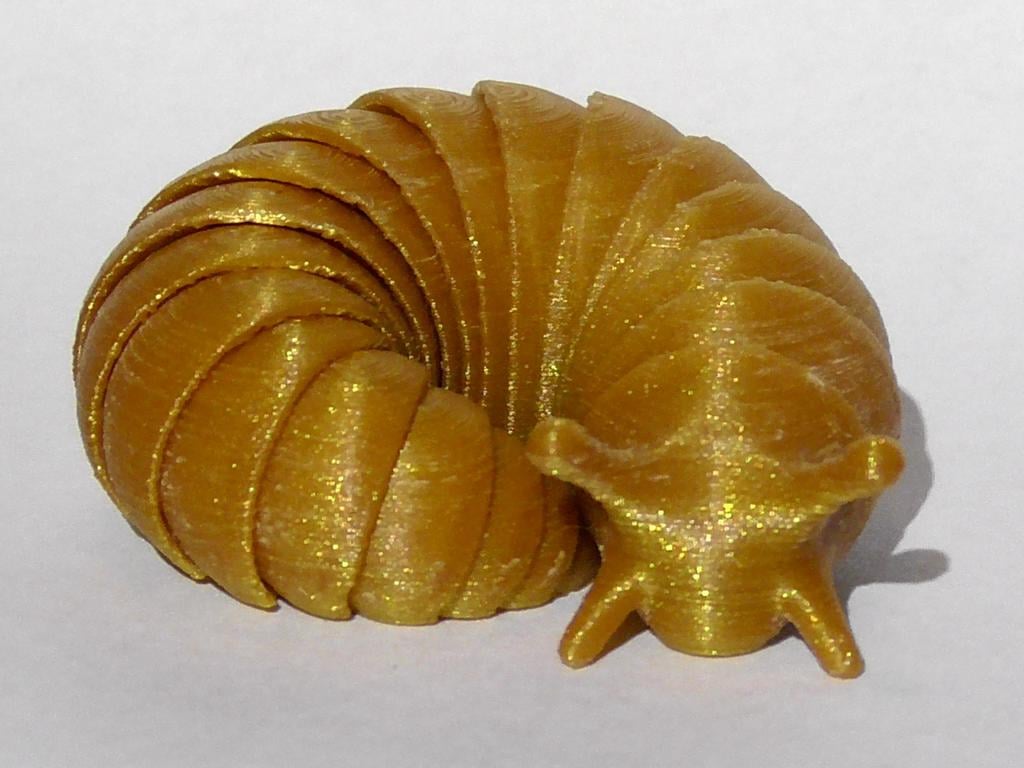
Due to a ridiculously convoluted inside joke involving racing lawn mowers, songs by Rush, and home-grown potatoes, I decided to make some articulated slugs for my family for Christmas. My main interest in this project lay in the joint design. I wanted to design a joint that would print in place, fully assembled, with no support, no visible internal workings, and with as much freedom of movement as possible. After a lot of work, I finally designed a joint, and a slug, that I'm happy with. Now I am entrusting the model to you, so that you too can begin the day with a friendly slug. I've provided two STL files, one with built-in brims on the slug's feelers and one without. I wanted to have a built-in brim on the feelers so that I wouldn't have to enable brims in my slicing software. Use whichever you like. Print Settings: This is a complex model that contains lots of thin walls and steep overhangs, so it needs to be printed slowly and carefully. I use a layer height of 0.1mm, and a top print speed of 30mm/sec. With these settings, the print takes just under eight hours. The thin walls in this model are 0.025 inches thick (0.635mm). In my experience, this is the thinnest wall that can be printed accurately with two perimeters (with a 0.4mm nozzle). I don't recommend using single extrusion walls for this print, as they usually end up weaker and sloppier than dual perimeter walls. Have your part cooling fan on full blast to keep blobs and warping to a minimum. The tolerance between the segments is 0.01 inches (0.254mm), which should not be a problem for a well-tuned printer. Support material should be OFF. Post Printing: One likes to believe in the freedom of slugs. However, when you first take the slug off of the printer, most of the segments will be stuck together (unless you have a really awesome printer). Starting with the tip of the tail and working forward, give each segment a firm twist to pop it loose. If the segment doesn't pop loose immediately (most of them won't) take a knife or similar object and work it into the crack between the segments to separate them and try again. A pair of pliers are helpful for gripping the smallest segments. If you want your slug to be able to move very smoothly, take a minute to work each segment around after popping it loose. Press it against the segment in front of it and "scrub" them together to smooth off any internal defects. If you take your time and do it right, the slug will end up moving very freely and fully. The joints should not easily fall apart. If the joints are falling apart easily, then the slug hasn't been printed correctly. Most of them should not be able to come apart at all, although a few of them close to the slug's head will come apart if you pull on them and wiggle them enough. If a joint comes apart, don't panic. Just press the segments back together and the joint should snap back into place without damage. Print slugs for all your friends and family, and soon the world will echo with the sound of slugs!
With this file you will be able to print Friendly Articulated Slug with your 3D printer. Click on the button and save the file on your computer to work, edit or customize your design. You can also find more 3D designs for printers on Friendly Articulated Slug.