FT MiG 3 replaceable articulated skis
thingiverse
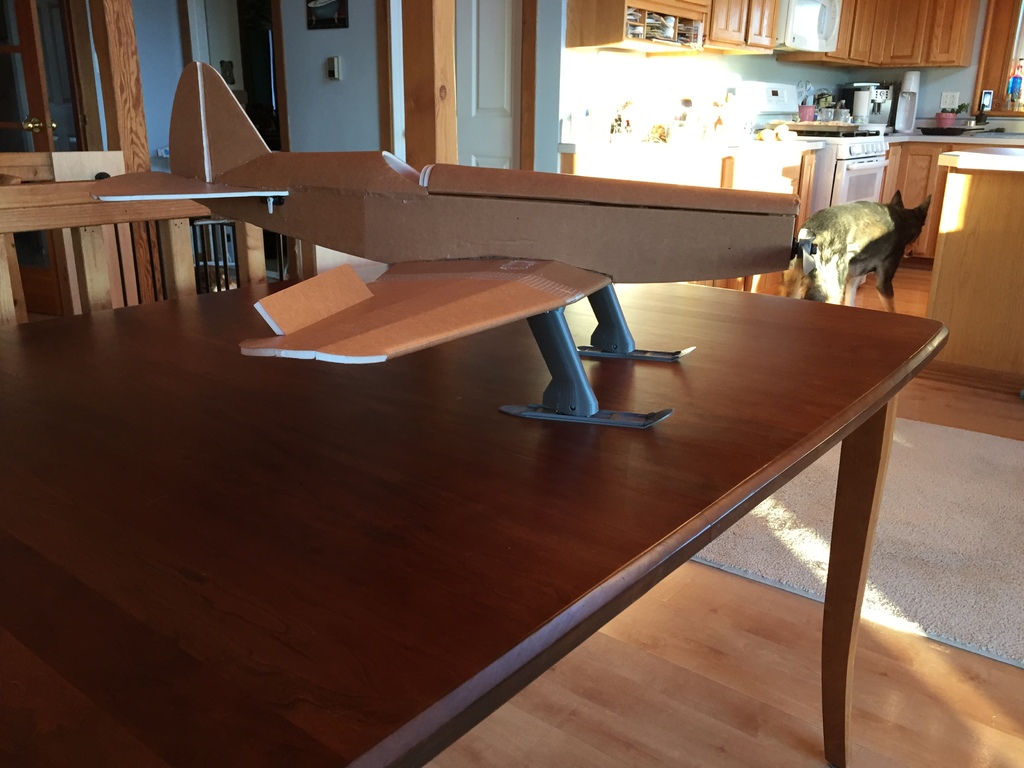
Want to convert your warbirds for all season action? Winterize your next FT MiG build with these spring-loaded skis, and you can take off, land, and taxi on snow. Skis and struts are both replaceable in case of breakage, or if you just want to take them off for summer operation. Be on the lookout for wheel pants for these mounts to easily convert back to summertime. In addition to the printed parts, you will need: 10 M3*12 pan head machine screws and hex nuts. Longer screws are okay. Everbilt 84-piece spring assortment kit, available from the door hardware aisle at Home Depot. Superglue and kicker. INSTRUCTIONS Step 1: Build your MiG until you are ready to close the wing. But don't close it yet. You really want inside there still. Step 2: Prepare the hardpoints You will notice that the nut recesses on the hardpoint have a single layer of filament blocking the screw holes. This is so that the area prints out correctly without having to use infill. Clear the holes before proceeding. Insert a hex nut into each of the recesses, and glue in the X-shaped retainer over top. The nut should be completely ensconced and held securely so that they can be screwed into without rotating. Step 3: Measure for the hardpoints The hardpoints have an arrow that points towards the front of the plane and a notch on the front and back sides. Line the notches up with the landing gear slot, as far forwards as the hardpoint will go without interfering with the fold of the wing. Make sure they are even. Press them onto the inner surface of the foamboard, just enough to mark where the posts go. Cut these holes out. The hardpoint should sit flush with the outer paper, or nearly so. Step 4 (Optional, but highly recommended): Reinforce the wing The stock landing gear wire has the advantage of being able to bend to handle hard landings. Plastic gear legs do not, so we want to spread impacts out over as much foam as possible. Also, if you are using a speed build kit, the landing gear slot will be already cut out, which makes it weak. The best course of action is to cut a spanwise slot in the wing in the middle of the hardpoint, avoiding cutting through the bottom paper as though one was making a fold, and lay in one or two barbecue skewers, or perhaps a larger piece of balsa or basswood. Glue the landing gear slot shut. Step 5: Finish the wing Glue the hardpoint in and finish building your plane. Step 6: Install the skis With your chosen skis printed out, you will need to turn up the edges by (optionally) using a heat gun or hair dryer to bend them at the crease lines, and then (not optionally) gluing them in place. Select two springs for each ski from the box. By default, both of the 3/8” diameter springs, the 51/64” in front and the 1-3/16” in back, will put the ski in a nose-up attitude. This is recommended for deep snow, but if you are using the skids on hard ground, you may want to pick two other springs that point the skis further down, to avoid prop strikes. With your springs selected, insert a nut into the recess on the leg, and screw the ski into it, then screw the leg into the plane, and go fly.
With this file you will be able to print FT MiG 3 replaceable articulated skis with your 3D printer. Click on the button and save the file on your computer to work, edit or customize your design. You can also find more 3D designs for printers on FT MiG 3 replaceable articulated skis.