Full Colour Lithophane
thingiverse
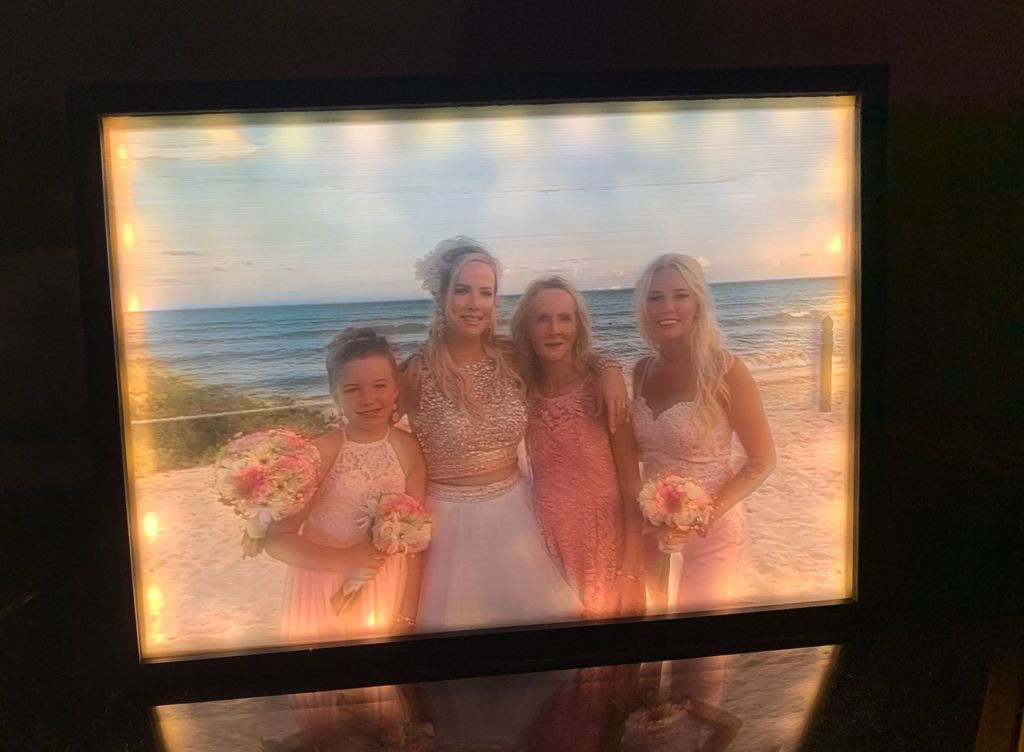
Firstly, this is not a tutorial for how to make a lithophane. If you want that, there are plenty on youtube. I recommend going to www.lithophanemaker.com. He has put a lot of time and effort into making lithophanes and I use his website to prep all my STL's. As far as print settings, I just make sure i print along the Y axis and set walls to 9999 to ensure there is no infill. Also, 30mm/s print speed. If you would like to use my frames, you can do so. I have a 5x7 done in portrait and landscape. Print with tree supports in Cura or it will be very hard to remove. For print sizing to fit my frames use Landscape: 178mmx128mm portrait: 129mmx182mm There is obviously a cost to make these but I tried to keep it as cheap as possible. This meant having to wait for my stuff to come from china via aliexpress and ebay. If you want a quick solution, a local hobby shop should have everything you need or if you want to just do lithophanes using natural lighting like a window then scroll to the bottom for the colouring process. Parts list: I know links can be frustrating from different country so I will just supply you with the parts and description and you can source them yourselves. *Lights: 12V LED strip lights from Ebay. SMD 2835 I bought a 20m roll that can be cut down every few inches. You need approx 24 inches for one frame. *Power supply: AC 100-240V To DC 12V 2A Adapter Plug Power Supply for light strips *Optional switch: LED Strip Touch Dimmer Brightness Control LED Dimmer Switch 1keys Dimmer 12V-24V *Tin Foil for reflective backing. *Optional hotglue to help keep light strips in place if you bought light with no adhesive backing or it's just not sticking well to your frame. *Depending on if you get a switch or not, you may need/want to lengthen your cable to the wall. in this case, I used some sensor wire I had laying around at work but 20-22 gauge speaker wire will work too. *Heatshrink tubing. I just have a kit of misc sizes. It's always recommended to use it if you are soldering wires together. alternatively, electrical tape would work. Clear Vinyl printer sheets. I got a 30 pack of A4 off amazon for 20 bucks. Assembling: This is fairly self explanatory if you look at the pictures I have posted. I did use a soldering iron to solder the wires onto the led strip and to extend the length of my power cable. Colouring: This process is pretty easy as well. you will need access to a colour printer and depending on your image, you may want to use an editing program like GIMP or Inkscape. I used a combination of both. If you have a fairly dark image, i would bring it into gimp and set the transparency to between 50-75% to allow more light through the lithophane. Make sure to mirror your image also because you need to print and stick to the back of the lithophane. Make sure to scale your image to the same dimensions as the lithophane. Aside from that, all you do is print out your image on the clear sticker paper, cut it to size and stick it on the back of the lithophane.
With this file you will be able to print Full Colour Lithophane with your 3D printer. Click on the button and save the file on your computer to work, edit or customize your design. You can also find more 3D designs for printers on Full Colour Lithophane.