Fully 3D printable flashlight! Made from Proto-pasta Conductive PLA
thingiverse
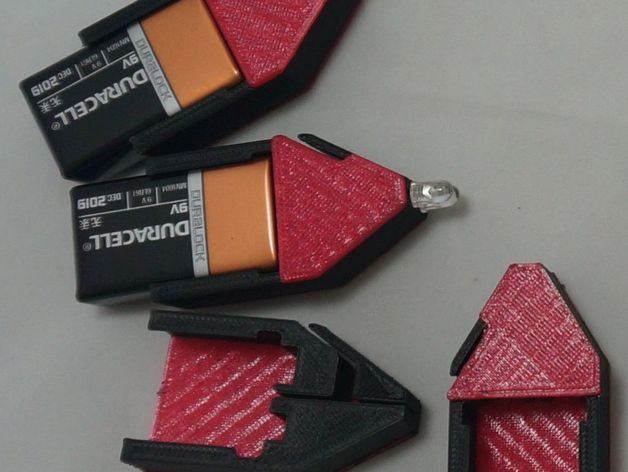
Fully 3D printable flashlight! Made from Proto-pasta Conductive PLA. Can be printed on a dual head or single head machine if filament is exchanged. Instructions This flashlight is made from Proto-pasta conductive PLA and standard PLA. The base is standard PLA, the conductive part is conductive, and the top is standard. A small amount of support is modeled into the base so supports do not need to be turned on. The 9V battery clips into the flashlight after printing, and the LED's are inserted into small holes that can be melted or drilled into the conductive part after printing. The polarity if the LED's needs to be correct for this to work, and remember not to hook the LED directly to the 9V battery, this will fry it!! Use a few cm of your conductive filament or a 1-10K resistor. When done, the flexible section on the side is the switch, squeeze this down and the conductive parts make connection, turning on the flashlight. The Conductive PLA is a bit fragile, so the flashlight needs to be handled relatively carefully, but works great! Update 3/22/15 So we have had a few questions on this. First, this is intended to printed all at once, we had some folks wondering how to attach the 3 pieces. We printed it on a dual head printer with PLA in one head and Conductive in the other. The PLA fuses to the Conductive during printing, holding the assembly together. If you have a single head printer this is still possible to make, but you will need to switch out filament twice during the print. How exactly to do this depends on your slicer, but basically it pauses at a specified layer letting you change out filament. Second was a question on how to attache the LED. We have uploaded the LED datasheet (Cree C503B-WAN-CBADA152) which shows the lead size, we recommend about a 1/2mm hole and cutting the LED leads to about 8mm in length. The datasheet also shows the polarity, the shorter lead is (-) or the Cathode (also the flat spot on the epoxy package denotes the Cathode if you've already cut the leads). Third, how to use the filament for a resistor. This is pretty simple, the filament has a built in resistance. About 10cm of this (1.75mm diameter) filament has about 1.5Kohm of resistance which is enough to protect the LED from damage with a 9V battery. So just use about a 10cm piece of filament to hook the LED to the battery (only needed on one side) and you can figure out the polarity and experiment. It will not hurt the LED any to hook it up backwards, it just will not make light. Here is a quick introduction to LED's. -An LED is a diode in a clear package, optimized to produce light. -A diode is a semiconductor device that allows electricity to flow in one direction only, which is incredibly useful in electronics but not really the point of LED's. -The amount of light produced is dependent on the amount of current flowing through the LED. If too much current flows, the LED will overheat and be destroyed, so a way of limiting that current is required and a resistor does the trick. The value of this resistor is picked so that about 20ma flows through the LED (the one sent with our product anyway) for full brightness, but quite a bit less than that will give nice bright light. You can use the equation V=IR where I is current and R is the resistance to calculate R. But there is a trick!!! There is a thing called forward voltage drop, or forward breakdown voltage Vf. For white LED's this tends to be around 3V, and it is the voltage that must be across the leads of the LED before any current flows. For these LED's, it is 3.2V. So, unless you have 3.2V or more you cannot light these LED's at all because no current will flow no matter how you hook them up. To calculate the resistance needed using V=IR, use the voltage across the RESISTOR. For example, if we use the 9V battery supplied, we know the total circuit voltage is 9V, and the drop across the LED is 3.2V, so the drop across the resistor is 5.8. So if you put in 5.8V=.020A*R, you get 5.8V/.020A=290ohm. Hope this helps!
With this file you will be able to print Fully 3D printable flashlight! Made from Proto-pasta Conductive PLA with your 3D printer. Click on the button and save the file on your computer to work, edit or customize your design. You can also find more 3D designs for printers on Fully 3D printable flashlight! Made from Proto-pasta Conductive PLA.