Fully 3D Printed Snapback Hat
prusaprinters
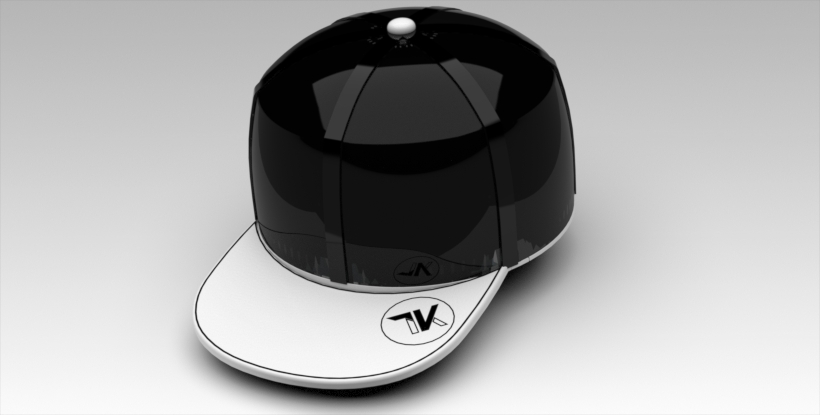
<p>As the name suggests, this is a fully 3D printed snapback hat made out of PLA and TPU FLEX filaments. Standard snapback hat dimensions were used in the design and with a stretchable tensioner at the back, it should fit on every maker's hat :).</p> <p>The hat also features a COMPLETELY FLAT visor, so adding your favorite textures, stripes, emblems or even logos should not be a problem.</p> <p>The design requires some superglue but is otherwise fully 3D printed. For a detailed assembly read the print instructions below.</p> <h3>Print instructions</h3><p>If possible, please use .3mf files to print the snapback hat components, as the print settings were tweaked multiple times to ensure reliable print. Each file includes the name of the filament which should be used for printing.</p> <p>"pla_visor_multicolor.3mf" is the only file that requires multicolor print (if you want to add a logo for an example). .3mf file is configured to work with a single extruder printer without any MMU upgrades via the M600 command. In case you are adding your own .stl to the visor file, you should know that the visor is 4.8 mm thick (Z = 4.8 mm is the height for your .stl file :) ). If you do not wish to add any of your own designs, then just use "pla_visor_singlecolor.3mf".</p> <h3> Assembly Instructions </h3><p>Firstly, print files "pla_visor_multicolor.3mf" (or "pla_visor_singlecolor.3mf"), "pla_joint_and_knob.3mf", "pla_main_frames.3mf" and "pla_support_frame.3mf". Assemble them using superglue as seen in picture below.</p> <p><a href="https://ibb.co/09B7YfR"><img alt="Picture1" border="0" src="https://i.ibb.co/gWv2tDL/Picture1.png"/></a></p> <p>Next print file "tpu_back_tensioner.3mf" and attach the stretchable tensioner at the back of the hat.</p> <p>In the next step print "tpu_cover.3mf" TWICE (2x) and "tpu_cover_back.3mf" ONCE (1x). Attach the covers to the main frame as suggested in the picture below:</p> <p><a href="https://ibb.co/YN1h4Dw"><img alt="Picture2" border="0" src="https://i.ibb.co/0n6rpBv/Picture2.png"/></a></p> <p>Firstly place the TPU cover's pin (upper part of the over) into the hole of the joint part. Next, superglue should be applied to ONLY the bottom of the TPU cover. Press the bottom of the cover on the appropriate space on the hat's frame. TPU covers should partially overlap with vertical PLA support frames. Optionally, some superglue can be added on the sides of the TPU cover, to fix it on the vertical support frame, although in my case it was not necessary. Use the same procedure for all six TPU covers.</p> <p>As the last step "pla_cover_frames.3mf" should be printed. Each cover should be pressed and glued on the hat assembly as the picture below suggests:</p> <p><a href="https://ibb.co/ysJtrfR"><img alt="Picture3" border="0" src="https://i.ibb.co/dKyFRWc/Picture3.png"/></a></p> <p>After that glue the button on the top of the hat's frame and you are done!</p>
With this file you will be able to print Fully 3D Printed Snapback Hat with your 3D printer. Click on the button and save the file on your computer to work, edit or customize your design. You can also find more 3D designs for printers on Fully 3D Printed Snapback Hat.