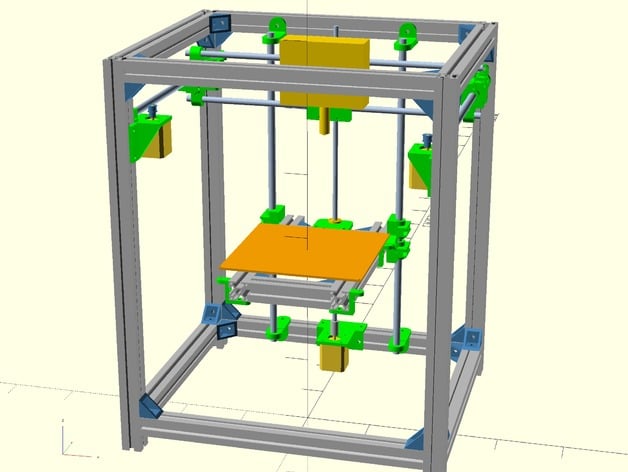
Fully Parametric 3D Printer CoreXY "HyperQbert"

Fully Parametric 3D Printer CoreXY "HyperQbert"

thingiverse

Fully Parametric 3D Printer CoreXY "HyperQbert". BACKGROUND: The idea of designing an own printer comes from the Hypercube project by tech2c.http://www.thingiverse.com/thing:1752766 Many idea's from that printer have been incorporated into this fully parametric design. OPENSCAD: The printer has been fully designed in OpenSCAD. This has the great advantage that parts of the objects can be changed and the complete printer can be recalculated to determinate the new dimensions of all the related parts. The OpenSCAD console log summarizes the dimensions of the required extrusions, rods and lead screw. The printer can also be fully visualized by compiling: drawTotalAssembly() or drawTotalAssembly(true) to visualize the printer including the enclosure. MODIFYING THE PRINTER: The most interesting parameters to change are the following: 1) The buildsize: maxBuildHeight = 300.0; (maximum height of printed object) wHeatedBedX = 213; (width of heated bed) wHeatedBedY = 213; (depth of heated bed) 2) The extrusion profile type: //include "ALU_PROFILE_15x15.inc" //include "ALU_PROFILE_20x20.inc" include "ALU_PROFILE_30x30.inc" //include "ALU_PROFILE_40x40.inc" (remove the comment sign of the profile to be used) 3) The bearing sizes per axis (so enforcing the rod diameters) BearingX = LM10UU; BearingY = LM12UU; BearingZ = LM12UU; 4) The motor types motorXY = NEMA17; //NEMA23; motorZ = NEMA17; //NEMA14; 5) The screw size used for connecting the parts: //include "M3.inc" include "M4.inc" (remove the comment sign of the screw size to be used) PRINTED PART LIST: ZCarriage (2x) ZCarriageClamp (4x) ZMotorMount (1x) ZRodMount (4x) LeadScrewNutMount (1x) BedClamp (4x) YCarriage (2x) YCarriageClamp (4x) YRodMount (4x) XYMotorMountLeft (1x) XYMotorMountRight (2x) XYIdler (2x) XCarriage (1x) XCarriageClamp (3x) XCarriageBeltClamp (2x) OPTIONAL PART LIST: Optional parts (only needed when second ZMotor is used): LeadScrewNutMount2 (or LeadScrewNutMountBigCoupler2) (1x) ZMotorMount (1x) Optional Parts (needed only for enclosing the printer): HingeFixed (number dependent on height of printer; dimensions are dependent on thickness of front enclosing panel "tFrontEnclosingPanel", so rerendering required if different front panel thickness is being used!) HingeMoving (same number as HingeFixed ) DoorKnop (1x) DoorMagnetClamp (1x) Optional Parts (needed for microswitch endstops X and Y): XEndstopMount (1x) XCarriageClampWithEndStopMount (1x), replaces one the 3 XCarriageClamps YEndstopMount (1x) Optional Parts (needed for organizing the electrical wires): "WireHolderClip" (as many as required) "WireHolderClipTieRap" (as many as required) REMARKS: All parts can be printed without use of support structures. The attached STL's belong to the printer with all dimensions, extrusions, bearings, etc, set to the default values. If you decide to change those defaults, the STL's of course need to be re-rendered using OpenSCAD. I would recommend to choose extrusionLengthBedY longer than the the calculated value. A larger length will give the option to move the heated bed more forward/backward to compensate for alternative extruder dimensions. (40 mm extra should be enough) I recommend to use ABS as material for the printed parts, especially if one plans to build the enclosure around the printer. I printed most of the parts with 95% infill to avoid cracking of the plastic parts when strongly tightening the screws. For the dampening parts I used Ninja flex with 50% infill. THE PRINTER IN ACTION: https://youtu.be/3svdtzb3dgAhttps://youtu.be/MBuSbpBIuI8https://youtu.be/WVZtLoglih4 RELEASE NOTES: Changes 17 December 2016 All bearing holders can now self align to ensure smooth traveling along the rods. To disable this feature one can set the variable useBearingSelfAlignment = false;. Y Rod Mounts have now slot holes instead of the original round holes, to allow alignment of the Y-rods. X-Carriage has now an integrated profile to fit the GT2 belt. Changes 22 December 2016 XCarriage and XCarriageBeltClamp now contain an exact imprint of the GT2 belt. Changes 23 December 2016 increased thickness of XCarriageBeltClamp Changes 26 December 2016 alternative Lead Screw Nut Mount called "LeadScrewNutMountBigCoupler" when the very big Z Coupler is to be used (the flexible coupler type with the plastic inserts) mount for X Endstop microswitch : "XCarriageClampWithEndStopMount" + "XEndstopMount" mount for Y Endstop microswitch: "YEndstopMount" fix for XYIdler to avoid collision with the YRodMount in case the Aluminum profile 2020 is used Changes 28 December 2016 support for NEMA14 and NEMA23 motors (not tested) clip for holding electrical wires inside the aluminum profile "WireHolderClip" clip for holding electrical wires with aid of a tie rap: "WireHolderClipTieRap" Changes 29 December 2016 support for aluminum profiles 1515 and 4040 (not tested) Changes 11 January 2017 fixes to ZBearingMount and YEndStopMount added Spoolholder to mount on top of printer (SpoolholderLeft, SpoolholderRight) added ShockAbsorber (printed in Ninja flex) to put underneath the legs of the printer added option to create an extra strong version of the ZCarriage samples: drawZCarriage(true); drawZCarriage(true,45); // will create one arm extra long (can be used if a longer version of the extrusionLengthBedY is used). 45 mm is the extra length of the arm. fixed ZRodMount and ZBearingMount in case aluminum 1515 profiles are used. Changes 12 January 2017 added screw slot holes to ZMotorMount to allow for alignment in y-direction. Changes 16 January 2017 added motor slot hole to ZMotorMount to allow for alignment in y-direction. added camera mount for Logitech C270 webcam (CameraMount). Changes 3 February 2017 added door magnet clamp holder DoorMagnetClamp increased length of spool holder arms closed hammer nut holes for XYMotorMountRight and XYMotorMountLeft added shockabsorbers for XY steppers XYMotorMountShockAbsorber (ninja flex) changed shape of hole in top enclosing panel TopPanel Changes 17 February 2017 support for aluminum profile 2525 (not tested) Changes 8 April 2017 (added optional X carriage extruder parts) CoolingSystem_Probe_8mm_Offset10.stl Gasket.stl (Ninja Flex) FanDuct2.stl BigGear_Nut.stl SmallGear.stl idler.stl extruder.stl FanSeal.stl (Ninja Flex) Changes 11 September 2017 fixed water-tightness of the XYMotorMounts (both left and right). This issue caused the slicer to create a weaker part then expected. Changes 24 September 2017 made XYMotorMounts (both left and right) much stronger (partially). Changes 26 September 2017 made XYMotorMounts (both left and right) much stronger (the whole part). Changes 11 November 2017 support for second Z-Motor. To enable this feature set variable useSecondZMotor=true. this option has not been tested yet in a real printer. It is on my to-do list to build a printer with a 300x300 build area and use the second Z-Motor for this printer. markings have been put on Carriage clamps (X/Y/Z) the bearing alignment feature can now be enabled/disabled via variable useBearingSelfAlignment Changes 20 November 2017 bugfix undefined variable "correction_BearingRadius" Changes 26 February 2018 added optional holder for LJ12A3-4-Z Proximity sensor (GregMountWithProbe.stl) added support for bearing types: LM8LUU, LM10LUU,LM12LUU removed "useBearingSelfAlignment" variable. This variable has now been defined in the BEARINGS.inc file. For all long bearing types, the self alignment has been disabled. Changes 10 October 2018 added optional hinge where screw can be used as axle (HingeFixedWithScrewAsAxle.stl) added optional XCarriage with hole for cable management (XCarriageWithCableHole.stl) Changes 7 July 2019 updated the model to take into account length/width of hammernuts when calculating hole distance of XYIdler Changes 31 August 2019 updated the model to take allow for a bigger distance between the micro switch mount holes (this concerns part "XCarriageClampWithEndStopMount.stl"). Changes 8 September 2019 added bearings LM6UU and LM6LUU

Download Model from thingiverse

With this file you will be able to print Fully Parametric 3D Printer CoreXY "HyperQbert" with your 3D printer. Click on the button and save the file on your computer to work, edit or customize your design. You can also find more 3D designs for printers on Fully Parametric 3D Printer CoreXY "HyperQbert".