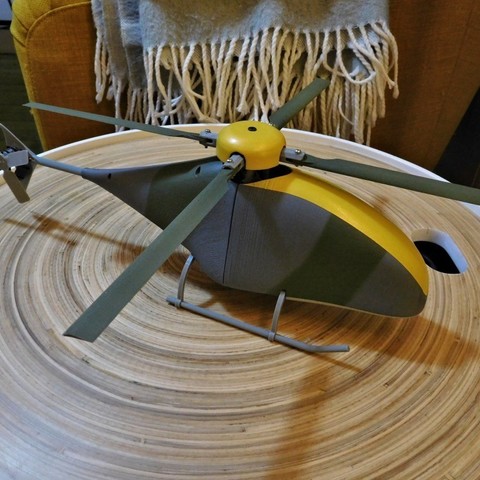
Fully Printable Collective Pitch RC helicopter.
cults3d
Disclaimer: Be careful with high speed rotating parts. Improper printing or assembly, or inferior materials, may cause problems. Centrifugal forces of the blades will be be under 40 N at 4000 rpm, but they are not harmless if something shatters. Avoid hovering with the blades at eye level without protective goggles. News: I'm pretty much finished with the design. It flies great and works reliably. News: Changed the nose a bit. Made it narrower, and it looks a little more balanced now. The camo one pictured has the new shape. All parts should print without additional supports now. Assembly notes: -I attached an exploded view of the head and swash plate. The arrows marked "CA" indicate where you should use a tiny amount of CA glue (superglue/crazy glue) to bond the swash plate and bearing together. -The main rotor head and swash plate need to be adjusted so that they operate at the same cyclic phase. This is done by turning the washout arm. If your flybarless gyro unit does not have software phase adjustment (for example KDS EBAR or Tarot ZYX S2), then your pitch links will have to run diagonally to achieve a synchronized swash plate. The prototype has a KDS EBAR V2 and flies fine with diagonal links. The Mikado mini V-Bar (and clones), BeastX and other more expensive units have swash plate phase adjustment in software, so you can do this adjustment via your computer and keep the pitch links vertical. This is preferable. I may change the design so that the servos , swashplate and head are synced mechanically, but decided against it now because it might be confusing to builders to set up. -Install servos with thick double sided tape or hot glue. I used double sided tape for the prototype. The tabs of the recommended servos fit in the slots in the main frame. If you are using different servos you probably have to cut off the bottom tab and can install it with just hot glue. -The clamping screws of the gear, head and shaft collar must be tightened carefully. It helps to print these parts with slightly higher temperature to ensure good layer adhesion. -The landing gear slots into the main frame and is designed to stay locked in place, and come off in case of a crash, but the tabs will wear with frequent disassembly. I use thick CA to keep it in place after this happens. -PLA pinions wear down relatively quickly, so it's useful if the landing gear is removeable. I might improve the solution later on. I tried Taulman 910 nylon for the pinion and it's lasting much longer now.Steel pinions are available. 13 teeth and 32p or 0.8 module will work. Axial AX30724 13T Steel Pinion Gear 32p 3mm is such a gear. -The gear set with the large pinion will need the pinion to be installed onto the motor shaft after the motor is installed. This is because the pinion is too large to fit between the motor attachment screw holes without compromising the security of the motor installation. -The tail rotor has to be twisted by hand after printing. You can adjust the pitch as necessary when you tune the tail. -The tail rotor has two small holes around the hub. Insert a screw in one or both of the holes to engage with the spokes of the outrunner tail motor. Otherwise it will slip on the shaft. If the second hole doesn't line up with a spoke you can insert the second screw from the other side to act as a counterbalance so the rotor spins without vibration. Videos:https://youtu.be/Us8hcsxFzpMhttps://youtu.be/8GmalS5hhr4https://youtu.be/94xkn27AZd0 Required hardware: 3x75mm main shaft. Make from carbon rod or steel. No drilling required. Two 3x6x2,5mm ball bearings for the main shaft: https://www.banggood.com/Orlandoo-F150-OH35P01-KIT-Parts-30625-Ball-Bearing-TA0009-p-985250.html?p=HD240528697332015103 Eight 2x5x2,5mm ball bearings for the blade grips. One 10x15x4mm ball bearing for the swash plate: https://www.banggood.com/FS-Racing-FS-53910-FS-53625-6PCS-582002-Roll-Bearing-10x15x4mm-110-RC-Car-Parts-p-1153527.html?p=HD240528697332015103 Assorted #0 screws or similar self tapping 1-1,5mm diameter screws and ~6mm (~1/4") length. Two M2x6mm screws for the main rotor blades and motor installation. Four M2x18mm screws for the blade grips. Four M2x10mm screws for installing the main rotor blades. Short lengths of M2 threaded rod to hold the pitch and roll control rods together. Servos:https://www.banggood.com/JX-Servo-DHV56MG-5_6g-Coreless-LV-Low-Voltage-DSMG-Metal-Gear-Servo-0_89kg-0_10sec-p-1034036.html?p=HD240528697332015103https://hobbyking.com/en_us/turnigytm-tgy-d56lv-coreless-low-voltage-ds-mg-servo-0-89kg-0-10sec-5-6g.html Tail motor:https://hobbyking.com/en_us/ntm-prop-drive-13-12-2400kv-40w.html Main motor:https://hobbyking.com/en_us/turnigy-2211-brushless-indoor-motor-2300kv.html (Needs longer shaft out the bottom end. Easy modification) 2100-3000kv motor should work fine.There are gears for two ratios in the files. The one with the small pinion fits higher kv motors. I attached photos showing how to change the shaft on typical quadcopter motors, which work great for micro helis of this size. Carbon fiber shafts are best when using PLA pinions because they don't transfer heat from the motor well, and CA sticks better to carbon fiber rods than steel shafts. ESC: Any small 3S capable ESC. I used 6A ESC for the tail and 10 A ESC for the main motor because that's what I had. 6A ESCs are probably enough for both motors. One ESC needs BEC, the other can be OPTO. Battery: 3S 450mAh or similar:https://www.banggood.com/Gaoneng-GNB-11_1V-450mAh-80160C-3S-Lipo-Battery-JSTXT30-Plug-p-1165484.html?p=HD240528697332015103https://hobbyking.com/en_us/turnigy-nano-tech-450mah-3s-65c-lipo-e-flite-compatible-blade-180cfx-eflb4503sj30.html The battery tray fits up to 30 mm wide batteries. I used a KDS EBAR V2. Works well. ZYX S2, V-Bar mini or similar works just as good: https://www.banggood.com/Tarot-ZYX-S2-3-Axis-Gyro-System-ZYX23-USB-Programmer-Link-p-91613.html?p=HD240528697332015103
With this file you will be able to print Fully Printable Collective Pitch RC helicopter. with your 3D printer. Click on the button and save the file on your computer to work, edit or customize your design. You can also find more 3D designs for printers on Fully Printable Collective Pitch RC helicopter..