Fully printable Dremel table saw
thingiverse
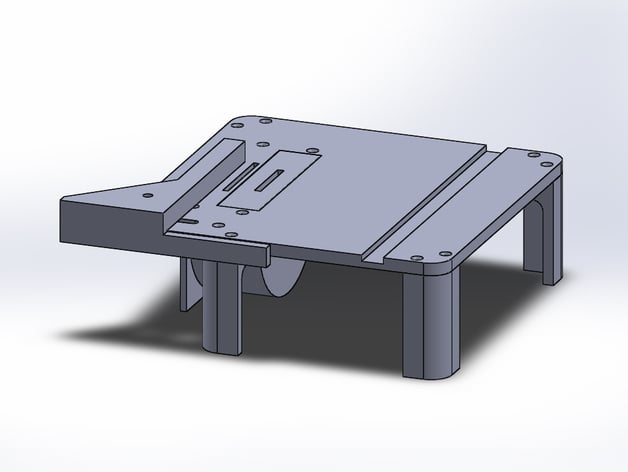
This is in progress. It is already online to improve mistakes and optimize. Some parts are missing, they are coming soon. This is a fully printable table saw, to saw pcb, small wooden, metal pieces or all kind of soft material. I have serached such a tool on Thingiverse and on the Internet, but I dind't have found any matchable tool which is so cheap and easy to make. So I decided to make one and this is the prototype. I also added the CAD-files, so you can customize, optimize and modify the part, but let me know your modifications. At the moment you don't can adjust the cutting depth. You could only adjust it with the diameter of the cuting blade, with a 40mm blade you have a depth of 2mm. I have buy these for prototying (http://www.banggood.com/10pcs-40mm-Diamond-Grinding-Wheel-Cutting-Disc-with-2-Mandrels-for-Dremel-Rotary-Tool-p-987968.html). It is not perfect, but with cost of 10 - 20$ without the dremel it does the job pretty well. Please leave comments to improve this thing. For the assembly instructions scroll down. Print Settings Printer Brand: RepRap Printer: Prusa i3 Hephestos Rafts: No Supports: Yes Resolution: Layerheight: 0.3mm Infill: 20% or 100% I made mine with 20% Notes: I printed of black PLA with a diameter of 1.75mm. Supports are recommanded, not at all parts but I used it on the baseplate and on the dust collector. With my settings the printing time was about 14h. Material (What is needed?) Printed Parts: 1x Baseplate 4x Legs 1x Dremel mount 1x Coverage of your choice (optionally) 1x Dust collector (optionally) 1x Stop angle (optionally) Other Parts: 1x Dremel (I used Dremel 4000) 1x Saw blade (min. Ø 40mm for a cutting depth 2mm) 16x Countersunk head screw Ø2,5 x 12mm (Woodscrew) 1x Screw M4 1x Washer M4 1x Nut M4 Assembly STEP 1: Take the baseplate, the four legs and eight screws and screw the legs to each corner. STEP 2: Take the dremel mount and four screws and screw it to the baseplate. STEP 3: Add the M4 screw, washer and nut to the stop angle, the screwhead is under the angle then cames the angle and on the top the washer and the nut. Now you can slide the screw with the angle in the long hole. STEP 4: Add the other parts and the dremel. Now you can add the saw blade and the saw blade holder. STEP 5: Take the dust collector and screw it to the four holes around the saw blade cut.
With this file you will be able to print Fully printable Dremel table saw with your 3D printer. Click on the button and save the file on your computer to work, edit or customize your design. You can also find more 3D designs for printers on Fully printable Dremel table saw.