Fully printable Prusa MMU2 Filament Retract Bank (Buffer)
prusaprinters
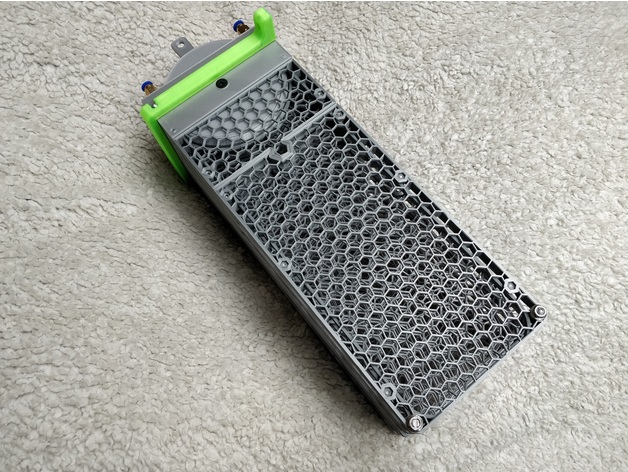
<p>Update 1: I've updated the base a little - made the filament channel wider and added a chamfer on the entrance</p> <hr/> <p><strong>TNDave</strong> was kind enough to let me modify his awesome design, so I've made a <strong>fully printable</strong> version (you don't need the acrylic panels).<br/> Original files here: <a href="https://www.thingiverse.com/thing:3373895">Thingiverse</a></p> <p>Plus, I've increased some of the tolerances, modified the base so it can take PC4-M6 fittings and introduced a few minor tweaks here and there.</p> <p><strong>You will need some hardware like nuts and screws. The assembly of the upper part of the buffer is clearly described in Dave's files (please visit his thing on the Thingiverse (link above) and download the PDF file with the instructions or click the <a href="https://cdn.thingiverse.com/assets/d3/b7/81/4d/34/MMU2_Retract_Bank.pdf">direct link</a> ).</strong></p> <hr/> <p><strong>Hardware needed for the base part of the buffer (1 piece):</strong></p> <ul> <li>4x M3x20 socket head bolt</li> <li>4x M3 hex nut</li> <li>1x M5x12 countersunk bolt</li> <li>2x Festo fitting (PC4-M6)</li> <li>1x 605 bearing</li> </ul> <hr/> <p><strong>You can use only the panels if you want to attach them to Dave's original models - they are fully compatible.</strong></p> <p>I've modified most of the parts and will try to describe the tweaks briefly:</p> <hr/> <p><strong>Tweaks</strong></p> <p>Base:</p> <ul> <li>threaded hole for the PC4-M6 coupling added </li> <li>diameter of filament channel increased </li> <li>tolerances between the base and the roller increased </li> </ul> <p>Filament guide:</p> <ul> <li>tolerances between filament guide and slide increased </li> <li>cutouts added so it does not collide with PC4-M6 coupling mounting points</li> <li>filament entry made smoother by filleting the two edges</li> </ul> <p>Roller:</p> <ul> <li>bearing hole diameter increased by 0.1 mm</li> <li>filament cutout cut slightly deeper and broader (higher tolerance between base and roller)</li> <li>overall diameter decreased by 0.3 mm</li> </ul> <p>Slide guide:</p> <ul> <li>screw holes changed to take M3 socket hex screws instead of countersunk</li> </ul> <p>Slide:</p> <ul> <li>no mods (included the original STL, just rotated)</li> </ul> <p>Bearing retainer:</p> <ul> <li>no mods (included the original STL, just rotated)</li> </ul> <hr/> <p><strong>Addons:</strong></p> <p>Fully printable panels (included in the .zip file):</p> <p>I've designed fully printable panels, so you don't have to buy or cut acrylic or any other materials. They consist of 6 parts:</p> <ul> <li>Bottom 1</li> <li>Bottom 2</li> <li>Top 1</li> <li>Top 2</li> <li>2x brace to hold them together with the base</li> </ul> <p><strong>Hardware needed to assemble the panels:</strong></p> <ul> <li>6x M3x16 socket head bolt</li> <li>4x M3x12 socket head bolt</li> <li>10x M3 hex nut</li> </ul> <p>Brace is mounted to the panels and the base with M3x16 screws, and panels themselves are fastened with M3x12.</p> <p>All of the parts fit on a Prusa bed (but not at once, obviously).</p> <hr/> <p><strong>My print settings for the panels (make them look cool and save filament):</strong></p> <ul> <li>0.2-0.3 mm layer height</li> <li>4-5 perimeters to make sure the screw hole perimeters are connected to the panel perimeters</li> <li><strong>no top and bottom layers</strong></li> <li><strong>8-10% honeycomb infill</strong></li> </ul> <p>One of the end gets fastened to the base with M3x16 screws. The other side has 5,5 mm through holes, so you can use a threaded M5 rod to stack them my way if you like to.<br/> <strong>In this case you need 2x 135 mm + 2x 120 mm M5 threaded rod (you can use 4x 135 mm) and 4x M5 nut</strong>.</p> <p>I've added 2 versions of spacers to place between the panels on the M5 rods in the lower part.</p> <p><strong>Bracket to fasten the stacked assembly to a wall</strong></p> <p>I have the whole assembly fastened with a M5 threaded rods and then with wood screws inside my enclosure with a bracket printed in PETG. Just stretch one side of the bracket <strong>carefully</strong> to put it over the rod with nuts and slide the other side on the other rod.</p> <p>As I don't particularly like screwing metal screws into plastic, I've made most <strong>screw holes through 3 mm in diameter with M3 nut pockets</strong> to fasten the parts together. I've printed them with supports (really little of them are needed and clean easily), but you should be able to do without them with just a little sagging.</p> <p><em>If you have a hard time pushing the M3 nuts in, use the screw pulling technique - align the nut with the pocket and screw a longer screw from the other side, to pull the nut in.</em></p> <h3>Print instructions</h3><p><strong>Printer Brand:</strong> Prusa<br/> <strong>Printer:</strong> I3 MK3S<br/> <strong>Rafts:</strong> No<br/> <strong>Supports:</strong> Yes, but not necessary (only for the M3 hex nut pockets)<br/> <strong>Resolution:</strong> 0,1-0,2<br/> <strong>Infill:</strong> 10-30<br/> <strong>Filament:</strong> Prusament PLA + PETG</p>
With this file you will be able to print Fully printable Prusa MMU2 Filament Retract Bank (Buffer) with your 3D printer. Click on the button and save the file on your computer to work, edit or customize your design. You can also find more 3D designs for printers on Fully printable Prusa MMU2 Filament Retract Bank (Buffer).